Context menu
On the Model tab and in the 3D view, you can perform a number of actions from the right-click menu. Some of the commands can be used on a single entity or multiple entities, while some are only available when a single entity is selected.
Note: All these actions require a licensed version of eBrowser.
View details
Displays object details in a separate window, using XML format that can be formatted and linked to external resources using an XSL style sheet. If you pick up several objects into this window, you can use the back and forward arrow buttons to switch between the objects. Moving back or forward also sets the camera location to the active object.
The list of object attributes that is displayed in this window depends on what data has been published to the 3D model. Typically, models imported from a third-party model file have different types of attributes than models published by CADMATIC tools.
The object attributes include the coordinate system, if the object attributes contain coordinate information.
When viewing a model published by Plant Modeller:
- Equipment nodes and their attributes are listed if Export nodes was selected when publishing the model.
- Cable-related information is shown if Export cables was selected when publishing the model.
- Details for group objects can be viewed, and the groups object belongs to are shown as links if Publish groups was selected when publishing the model.
Examine
Enables the object examination mode. See Examine mode.
Hide
Hides the selected objects.
To make hidden objects visible again, see Selecting objects and changing their visibility.
Show selected and hide unselected
Shows the selected objects and hides all unselected objects.
To make hidden objects visible again, see Selecting objects and changing their visibility.
Hide unselected
Hides all unselected objects.
To make hidden objects visible again, see Selecting objects and changing their visibility.
Transparency
Sets the selected objects to be transparent. You can also set this property via script interface by using the method for that purpose
The model viewer also supports transparent materials that are defined in the COS configuration object.
Make others transparent
Makes all other visible objects transparent except the selected objects.
Show through other objects
Shows the outlines of the selected objects through other objects such as walls. (Only available from the model tree.)
Goto near point
You can set the camera location near the selected object.
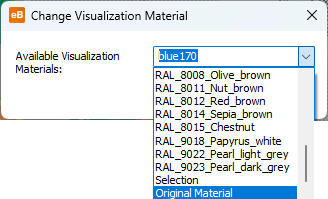
Change visualization material
Opens the Change Visualization Material dialog where you can change the color of the selected objects by choosing one of the following: a specific material, the color used to indicate selected objects ("Selection"), or the original color of the model objects ("Original Material"). If you save the model, the changed color settings are saved in the model.

Locate in tree
Finds the selected object from the currently active hierarchy and shows its location in the model tree.
Fit clip box
Fits the clip box to the selected objects. See also Clip box tab.
Show with surroundings
Crops the model so that it only shows the selected objects and objects that are close to the selected objects.
Check for collisions
Allows running a collision check for the selected objects. See Performing collision checks with default settings for details.
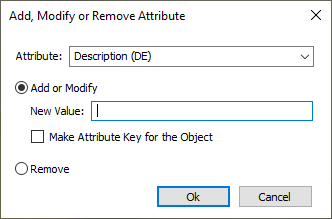
Modify attribute
Allows adding, modifying, or removing the selected object's attributes.
Note: Attributes defined as coordinates in EBM cannot be modified in the Modify Attribute dialog.
To add a new attribute, start typing the attribute name in the Attribute field. Give the attribute value in the New Value field. If you select the Make Attribute Key for the Object option, the attribute is displayed in the model tree.
To modify an attribute, select the attribute from the Attribute drop-down menu. Enter the attribute value in the New value field.
To remove an attribute from an object, select the attribute from the Attribute drop-down menu and select the option Remove.
