Object Types
In the CADMATIC desktop, select Object > Manage COS and browse to [server] > Common Configuration > Database Schema. Double-click Object Types to configure the object types used by CADMATIC applications.

The CADMATIC object types fall into three general categories:
- Reference data such as "Catalog Part" or "Sheet". These are usually stored in the library database, although they can also be created in projects. These objects can be managed via the CADMATIC desktop application, from Object > Library and Project Databases.
- Design data such as "Model Object" or "Drawing". Some of these objects are accessed via an Object Browser interface (documents, for example), while some have special user interfaces.
- Internal structures such as "Import History" that have little meaning to users because they are never accessed directly. These objects are hidden in the sense that they cannot be seen in any Object Browser interface. However, these types are displayed in the common configuration and sometimes it is necessary to change their permissions.
The set of available object types is fixed—you cannot create new types. The properties of each type include the attributes that it supports and user profile based access control.
Selecting an object type from the list and clicking Edit opens the object type configuration with the following tabs:
- General – You can see the name of the object type and its icon (if it has one).
- Attributes – You can manage the attributes of the object type, as described in Assigning attributes to object types.
- Security – You can define which user profiles are allowed to handle objects of this type, as described in Defining access control for object types.
Assigning attributes to object types
In the object type configuration you can define which attributes are assigned to the object type. Depending on the attribute definition, you can assign a given attribute to just one object type or to several object types.
Do the following:
-
In the CADMATIC desktop, select Object > Manage COS. The COS Networks dialog opens.
-
Browse to [server] > Common Configuration > Database Schema.
-
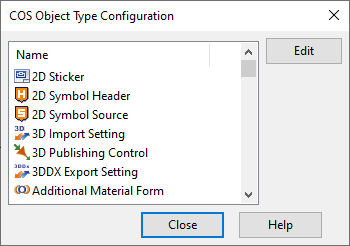
Double-click Object Types. The COS Object Type Configuration dialog opens.
-
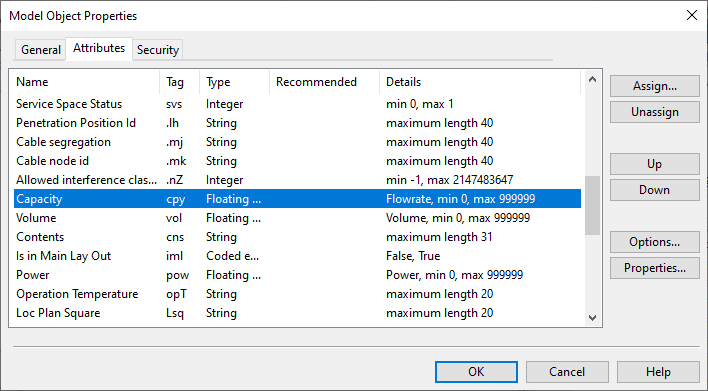
Select the required object type and click Edit. The Properties dialog of the object type opens.
-
Select the Attributes tab. The attributes are listed in the order in which they are shown in various user interfaces, and you cannot change the sorting order.
-
Select the desired attribute from the list.
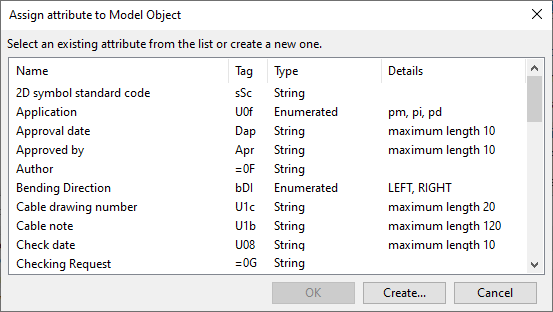
- To assign a user-defined attribute to the selected object type, click Assign. The Assign attribute to dialog of the object type opens.
- To use an existing attribute, select the attribute from the list and click OK.
- To create a new attribute, click Create and complete the process as described in User-defined attributes.
-
To remove an attribute from the object type, select the attribute and click Unassign.
-
To change the order of the attributes, select an attribute and use the Up and Down buttons to adjust its position.
Important: The order of the attributes in this list is the order in which the attributes are shown in various user interfaces such as the
-
If you want an assigned attribute to be automatically added to new objects of this type (user can still choose to remove it from the new object), select the attribute, click Options, and select Recommended attribute.
-
If you want to view the properties of an attribute, select the attribute and click Properties.
- If the attribute is system-defined, all values are read-only.
- If the attribute is user-defined, you can edit some of its properties, such as attribute name and min/max values.
-
Click OK.
Defining access control for object types
In the object type configuration you can specify access control for different user profiles.
Do the following:
-
In the CADMATIC desktop, select Object > Manage COS > [server] > Common Configuration > Database Schema.
- Double-click Object Types. The COS Object Type Configuration dialog opens.
-
Select the object type to edit and click Edit. The Properties dialog of the object type opens.
-
Open the Security tab. You can see the user profiles that have been created for this COS server as described in User Profiles.
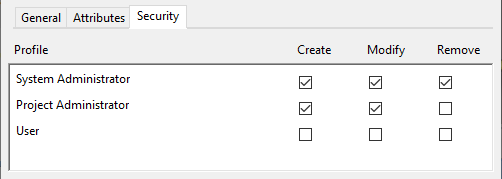
-
Select or clear checkboxes as required to define which user profiles are allowed to create, modify and remove objects of this type.
For library objects such as GDLs you can basically use any settings, but some basic application functions require users to have write access to certain project objects. There is no great risk in removing access rights, as you can easily restore the rights if a required functionality becomes unavailable.
Note: As this access control occurs at object type level, it cannot be used to restrict access to a subtype such as model objects that represent air ducts.
-
Click OK.