Installing replica servers
Perform the following at a satellite site to install a replica COS server using a .cri file. Depending on the .cri file, the installation might include a project database and/or library database.
Prerequisites
- Main site creates a .cri file as described in Creating replica server installation (.cri) files and sends it to this site.
Do the following:
-
Launch the CADMATIC Plant or the CADMATIC Marine installer.
- If you are using the CADMATIC Marine installer, select Outfitting installation. The list of applications opens.
-
Select Install/upgrade COS server, and click Next. The Installed COS Servers dialog opens.
-
Click New.
- On the COS server setup page, select New replica COS server installation. The Choose Replica Installation file dialog opens.
-
Browse to the .cri file, and click Open.
-
In the Select the Properties for the COS Server dialog, review and specify the following server properties.
-
Name for COS network – Shows the name defined in the installation file.
-
Name for the Server – Shows the name defined in the installation file.
-
Port – Specify the port to use.
Note: Make a note of the port number. You will need it later in order to connect to the replica server.
-
Server data files directory – Specify the path to the folder where the COS server is to be installed.
- Enable HCA – If you are using this server for a Hull project, select this.
- HCA Port – If you are using this server for a Hull project, select the port that the Hull COS Agent (HCA) uses.
- Service Account – Define the user name and password for the account. Another Account is selected by default and cannot be changed, as local systems do not have access to network drives.
In order for the HCA to start, the account needs to be able to log on as a service.
 Show/hide details
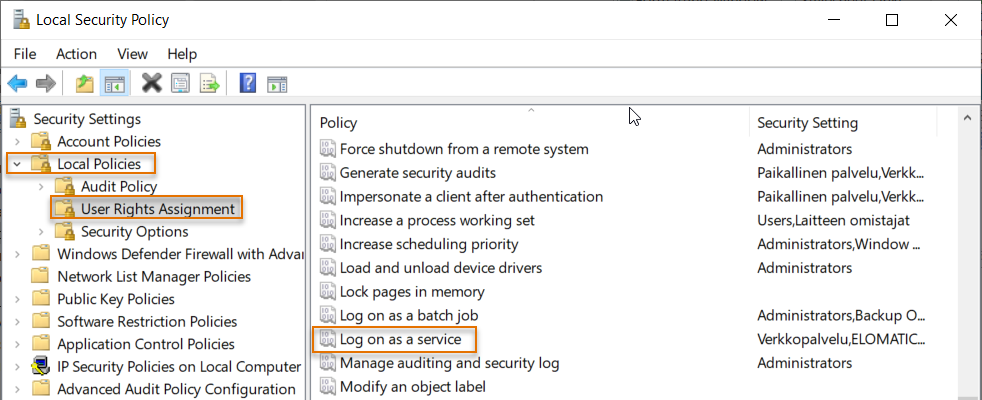
To grant the permission to log on as a service, do the following:
-
Open the Local Security Policy application.
-
Expand Local Policies, and select User Rights Assignment.
-
Double-click Log on as a service.
-
Click Add User or Group. The Select Users, Computers, Service Accounts, or Groups dialog opens.
-
Add the desired account, and click OK.
The Log on as a service Properties dialog opens.
Click Next.
-
-
In the Installation Summary dialog, review the installation settings, and then click Yes to install the server.
-
You are prompted that the server has been installed and it is offline by default. Click OK. The COS Server Administrators dialog opens.
-
In the COS Server Administrators dialog, click Create Administrator if there is a need to create additional administrator accounts for this COS server.
Click Next to continue.
-
Enable replication as follows:
- In the CADMATIC desktop, select Object > Manage COS Servers. The Manage COS Servers dialog opens.
- If the replica server is not visible, click Connect to connect to the replica server. You need the correct replica server port number for this.
- Select the replica server and then the Replication tab.
- In the Update Settings section, select the Server is online option. The replica server starts to replicate with its master.