Replication
On the Manage Project dialog's Replication tab, you can define which remote design offices (satellite sites) are allowed to replicate this project.
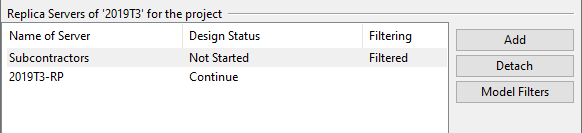
Add
At the main site of a project, you can add a new project site. See Creating project sites for details.
Detach
At the main site of a project, you can detach a remote project site to stop the replication between the replica and this server.
Do the following:
- In the Manage Project dialog, select the Replication tab.
- Select a the replica server, and click Detach.
- You are prompted to accept the project site to be removed and that all data at the site may be lost.
- If the replica server no longer has any projects using the library, you are prompted whether to continue the library replication.
- If the replica is no longer replicating any projects or libraries, you are prompted whether to remove the replica server.
Model Filters
At the project main site, you can control which parts of the project area are visible in each replica site. You define pass boxes to permit replication of the objects within, and deny boxes to prevent replication.
Important: Define model filters carefully when creating a project site, because later modifications are more restricted. Once the site begins replicating data, you can expand the pass area to show more objects in the replica, but you cannot expand the deny area to hide more objects from the replica.
Prerequisites
-
User is allowed to modify replication filtering rules security policy includes the user profile that defines access rights for your user account.
Do the following:
-
In the Manage Project dialog, select the Replication tab.
- Select the replica server, and click Model Filters.
-
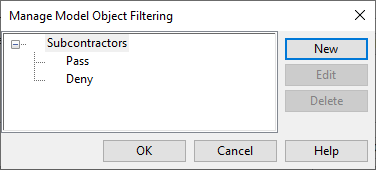
The Manage Model Object Filtering dialog opens, showing the name of the replica server and a list of pass and deny boxes currently defined for that server.
-
To create a new pass box or deny box, click New. The Filter Box Properties dialog opens.
-
Enter the following filter box properties.
-
Name – Enter a descriptive name for the filter.
-
Type – Select whether this is a pass or deny box.
-
Dimensions – Define the dimensions of the filter box.
You can, for example, first click Cover all to use the entire project area, and then adjust the X, Y or Z limits manually.
If the program indicates that the filter box is larger than the project area, click Trim to correct the dimensions.
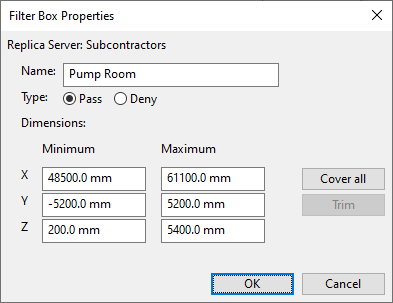
Then, click OK.
-
-
The new filter box is shown in the list. The example below shows one pass box and one deny box defined for the "Subcontractors" replica.
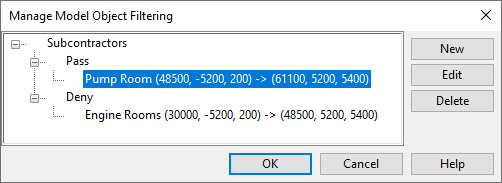
Note: Deny boxes will be replicated to replica's replicas. When a replica's replica has received a deny box from a master site, it is not possible to edit or remove the filters or define new ones at the lower-level replica site.
-
To edit a filter box, select the filter box and click Edit.
Note: You cannot increase the size of deny boxes or decrease the size of pass boxes, if the replica site has already begun to replicate project data.
- To delete a filter box, select the filter box and click Delete.
- Click OK to close the filter list.