Managing the P&ID database
The Manage Database Server dialog contains commands for managing the P&ID SQL database.
Important: All users must close their P&ID application before project administrator starts managing the database.
-
In the CADMATIC desktop, select Object > Manage Diagram Database. If the database settings have been defined but the database does not exist yet, you are first prompted to allow its creation, and then the Manage Database Server dialog opens.

Clean Binary Environment
With this command you can initialize the SQL database.
Note: Normally there is no need for cleaning the binary environment during the project. You should do it only if your diagrams and the database are not synchronized, and even then it might be a good idea to contact Cadmatic Customer Support first.
If you initialize the database during the project, all the existing binary diagrams are deleted from the project. ASCII diagrams are left intact.
Every user in the project should check in all the diagrams before initializing the database.
All the database tables are removed from the database and created again as defined in the cretbls script. When the database is created, the system checks the structure of the database, as described in Checking the database structure.
The content of the database tables is automatically restored the next time you check out the diagrams. The diagrams are automatically opened from ASCII format.
You can restore the database also from a backup.
To clean the binary environment during a project, do the following:
- Check in all the diagrams and exit the P&ID application.
- In the Manage Database Server dialog, click Clean binary environment.
- You are asked if you want to make a separate backup of Tags. Read more.
- If a backup of the TAGS table exists, you are asked if you want to load the data from the backup. Normally you should select Yes.
- When you start P&ID, the systems and pipelines have to be synchronized: the systems and pipelines with all the related data are read from COS and added to the SYSTEMS and PIPELINES tables in the database.
- Check out all the diagrams. The diagrams are checked out from ASCII format.
The content of the database can be reloaded also with the command Clear Database for Rebuild from Backup.
Clear Database for Rebuild from Backup
Before you clear the database, be sure that you have a suitable backup.
You might need this if you have restored the library and the project from COS backup and you have the corresponding backup of the diagram database.
To rebuild the database, do the following:
- Check in all the diagrams and exit the P&ID application.
- Make sure you that you have the backup available.
- In the Manage Database Server dialog, click Clear Database for Rebuild from Backup.
- Select the rebuild script rebuild.mac from the backup directory you want to use.
- Check out all the diagrams.
Backup Database Tables
In addition to normal COS backups, it is wise to make backups of the SQL database. You can restore the data also from ASCII diagrams, but if the amount of diagrams is very big, it does take some time.
The root directory for the database backups is Site/db/backup, which is created automatically when you make the first backup. Each backup is stored in a separate directory named by date (db.dd.mm.yy).
The backup directory stores several files; rebuild.mac is the most important one.
To make a backup, do the following:
- Check in all the diagrams and exit the P&ID application.
- On the Manage Database Server menu, click Backup Database Tables.
- Accept the directory. If you for some reason make more than one backup on the same day, you can, for example, add an order number to the suggested name (such as db.01.02.07.a). Otherwise, the previous backup will be overwritten.
Manage Database Tables
Database Table Manager is an interactive tool for editing the structure of the database. The current binary database structure is updated and the new structure is written to script cretbls. This cretbls script stores only the structure, not the current contents of the database.
You can have several projects using the same library. If there is a need for different database tables or fields for one project, you can save the changes of the database structure in the project. Thus all the other projects can have their common database structure.
When you clean the binary environment or rebuild the database from backup, the scripts are primarily run from the project, if available there.
To manage database tables, do the following:
-
All users should close the P&ID application.
-
In the Manage Database Server dialog, click Manage Database Tables.
-
If you are prompted that there are still users connected to the database, consider whether to proceed anyway (Yes) or cancel the operation (No).
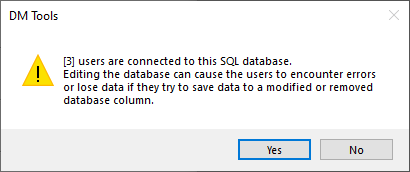
Note: This prompt can be shown if the database administrator's rights allow seeing the open connections. This administrator account is set in the Administrator of SQL Server field of SQL settings, as described in SQL Settings for P&ID Database.
-
Select if you want to save the changes in the COS library or COS project and if you want to save the database before modifications (suggested) or not.

- Manage the database tables as described in Database Table Manager.
Edit Database Tables
In the Manage Database Server dialog, click Edit Database Tables to start the interactive database table editor for editing the contents of a selected table.
Important: Be very careful, as you can easily destroy the content of the database table.
Backup COMPLOOKUP
In the Manage Database Server dialog, click Backup COMPLOOKUP to ASCII to back up the COMPLOOKUP table. Two objects are made:
- The ASCII backup is stored in the configuration object "Component lookup table".
- The script ldclookup stores the structure definition of the table and the commands to read the contents from the configuration object.
Important: You have to run this command to include the ASCII backup of the COMPLOOKUP table in the COS backup.
Rebuild COMPLOOKUP
In the Manage Database Server dialog, click Rebuild COMPLOOKUP to rebuild the COMPLOOKUP table from a backup.
You might need to do this if you have imported all Diagram Object Templates from another library.
Edit COMPLOOKUP
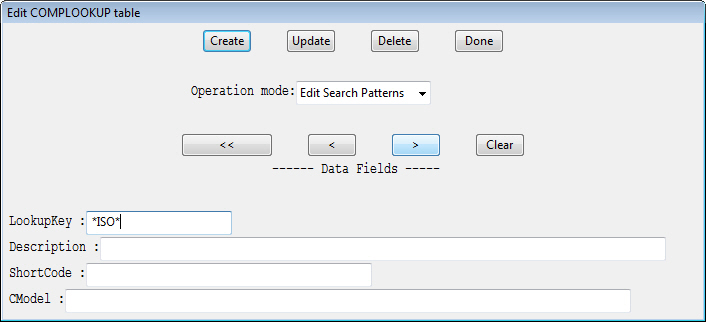
In the Manage Database Server dialog, Edit COMPLOOKUP starts the interactive database table editor with access to the COMPLOOKUP table.
You can modify the content of the fields, delete fields, and add fields. However, adding data to the table is more convenient via Object templates.
To find a specific record from the COMPLOOKUP table, do the following:
-
In the Operation mode field, select "Edit Search Patterns".
-
Enter your search string in the field whose values you want to search. You can use the asterisk character as a wildcard.
-
Click the > arrow button. The operation mode changes to "Data Entry/View".
-
Make the required modifications, then click Update to save the record.
-
Click Done to close the tool.
-
You are prompted to select whether to save the changes to the library or the project. Save the changes to the project only when you have several different projects in your library and your projects have differences in component lookup data.
Create SQL Backup
In the Manage Database Server dialog, Create SQL backup opens a file browser for selecting where to save a backup of the SQL database as a .bak file.
Important: The SQL server must have access to the target directory where you save the .bak file. If you are not performing this on the same computer where the SQL server is installed, you must define the location of the backup file using a mapped drive that is mapped to the same directory in both computers.
Restore SQL Backup
In the Manage Database Server dialog, Restore SQL backup opens a file browser for selecting a .bak file from which to restore the SQL database.
You are prompted to enter a name for the database to be added to the SQL server.