Cable route cost calculations
In the 3D model, there are usually several optional routes that the cable might take to connect the head and tail equipment to each other. As the cable router investigates the optional routes of a given cable, it calculates a cost value for each route, and then ranks the routes based on cost. The highest rank is given to the route that has the smallest cost and no errors.
What is "cost" and how it is calculated
In the Optional Routes dialog, the Cost column shows the cost value that the cable router has calculated for each cable route.
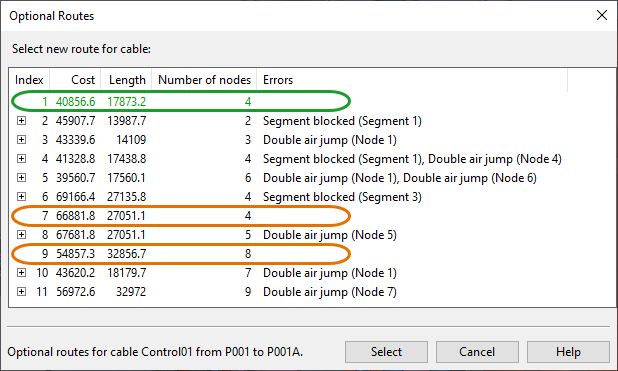
Cost is a notional route length value (millimeters) that is a sum of the calculated route length (see Cable length calculations) and additional "penalty" length derived from how the cable is routed.
There are several factors that can increase the cost of a cable route:
-
Air jump – Using an air jump segment to jump from one cable tray to another is 1.1 times more expensive than using a segment within a single cable tray. Therefore, a cable route that goes via cable trays is more preferable than one that uses air jumps, when both routes have the same distance.
-
Head/tail jump – The length of a head or tail jump is multiplied by three. If a cable route has a 1-meter head jump and 2-meter tail jump, their total cost is 9 meters.
-
Jump to penetration – Jumping to a penetration adds 1 meter to the cable route.
-
Fill rate – The fill rate of the cable way object can add cost to a cable segment, as described in Defining fill rate controls.
Defining fill rate controls
The project administrator can define whether the fill rate percentage of the cable way object affects the cost of routing a new cable through it. Additionally, the color of the cables in the work views can be set to depend on this percentage.
Do the following:
-
In Plant Modeller, on the Cabling tab, in the Cables group, click Manager Tool.
-
In the Cable Manager dialog, on the Tools tab, click Settings.
-
In the Cable Router Setup dialog, in Cable Router Settings > Network, click the Define button of the Define fill rate controls setting.
The Fillrate controls dialog opens.
-
Using the tree on the left, select whether to manage the fill rate controls of cable trays, cable conduits, or cable penetrations.
In the Fillrates pane, each data row defines a given fill rate range, the cost ratio to apply to that range, and the color to apply to cables that match that range.
-
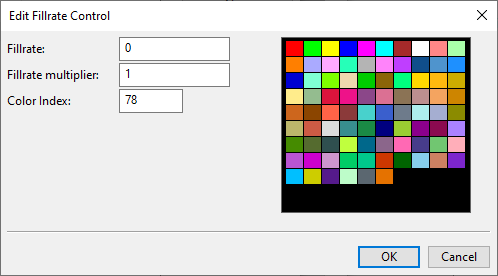
To create a new fill rate control, click New and define the following settings.
-
Fillrate – Enter the starting value of the fill rate range you want to define.
Note: The end value is not defined manually: a previous range always uses the start value of the next range as its end value, and the last range has "infinity" as its end value.
-
Fillrate multiplier – Enter the cost ratio value to use for the given fill rate range.
-
Set the value to -1 if the fill rate range means that there is no more room for new cables.
-
Set the value to 0 if the fill rate range allows new cables to be routed with no additional cost.
-
Set the value to 1 or higher if the fill rate range allows new cables to be routed with additional cost (cable length is multiplied with the given value).
-
-
Color Index – Enter the index number of the color to apply to cables in this fill rate range. For information on how to show these colors in work views, see Views.
-
-
To edit an existing fill rate control, select the control from the list, click Modify, and edit the settings as required.
-
To delete an existing fill rate control, select the control from the list and click Delete.
-
Click OK to accept the changes.