Point cloud commands
Selecting Point Clouds from the context menu of a view displays the following commands.
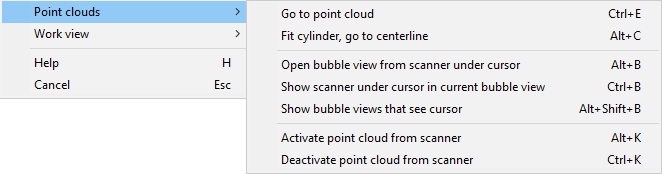
Go to point cloud (Ctrl+E)
If the current view is a bubble view, this command attempts to shoot a ray from the viewing point (scanner position) through the current cursor to the nearest point of a point cloud. Only such points of point clouds which are shown in the bubble view can be hit.
If the current view is a regular (orthogonal projection) shaded view, this command shoots a ray, parallel to view direction, through the current cursor position, and the point that is nearest to the view plane is selected from the point cloud.
Fit cylinder, go to centerline (Alt+C)
This command prompts you to define a set of points. Then Plant Modeller attempts to fit a temporary cylinder to the set of points, and the results are shown in a separate browser view. If you approve the fit, the cursor becomes constrained to the centerline of the fitted cylinder. NOTE: This command does not create a cylinder model to the 3D model.
Note: If the current view is not a bubble view, the system tries to activate a bubble view, and if that fails the operation is canceled.
When Fit Cylinder is started, the program expects you to enter the first two points so that they are parallel to the center line of the intended cylinder. A rubber band line is shown to help with the alignment. This sets the orientation of the cylinder. Then you should pick more sample points that are on the surface of the cylinder. Points are picked by left clicking or by pressing Space. Small crosses are drawn on the points that hit the scanned cylinder. Press Enter when you have defined enough sample points, to see the cylinder that best fits the specified points and the centerline.
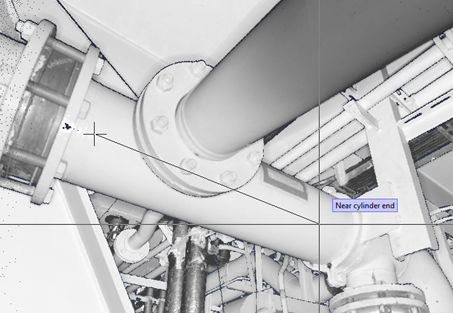
Step 1: Show a line, parallel to the pipe center line, via digitizing two points on the surface of the pipe (there is no need to use Ctrl+E in this function, left click of the mouse is enough).
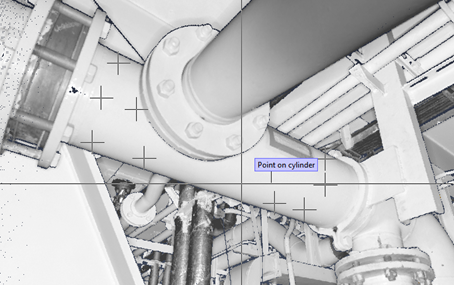
Step 2: Digitize a set of points on the surface of the pipe.
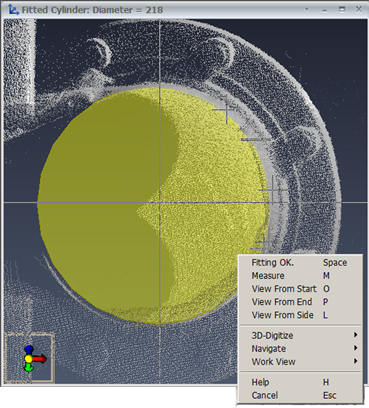
The fitted cylinder will be shown in a separate browser view, with the diameter of the fitted cylinder shown in the window title bar. Another DefinePoint command is started, with a context menu that allows you to manipulate the view and perform measurements.
Open bubble view from scanner under cursor (Alt+B)
During navigation move cursor so that it is on top of a ball that represents a scanner that you want to see in a bubble view.
Note: If you have not enabled 2D hit then the depth coordinate must also be correct for the scanner ball to be hit.
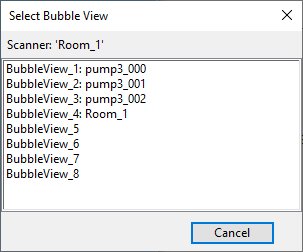
When the cursor is in place, select Open from Scanner from the context menu, or use the keyboard shortcut Alt+B. After this you will see a list to pick a bubble view to show what your selected scanner sees. The list also shows bubble views currently in use, in case you want to replace an existing bubble view with the new one. You can have up to eight bubble views open simultaneously. The location and size of open views on your screen is stored on save, thus you can arrange your screen lay-out and open new bubble views without the need to repeatedly move and rescale the views.
Note: Clouds that are shown in bubble views are not necessarily shown in other views, since this command does not activate a point cloud.
Show scanner under cursor in current bubble view (Ctrl+B)
Use this command in an active bubble view to switch from one scanner's view to another. Note that the point clouds that are shown in a bubble view are not necessarily shown in other shaded views as this command does not activate point clouds.
To use this command, first move the cursor to a ball representing a scanner in an active bubble view. If 2D hit is not enabled, the depth coordinate must also be set so that the scanner ball gets hit. Then run the command to replace the scanner data in the current bubble view.
Show bubble views that see cursor (Alt+Shift+B)
Use this command to show all bubble views that see the current location of the cursor.
For more details, see Show bubble views that see cursor in the point cloud tutorial.
Activate point cloud from scanner (Alt+K)
Use this command to activate a scanner and show its point cloud in all shaded views that have been configured to show point clouds and that cover at least some of the area of the point cloud.
To use this command, first move the cursor to a yellow ball representing an inactive scanner, and then run the command.
Note: Activating too many clouds can result in long rendering times for shaded views that cover many point clouds.
Deactivate point cloud from scanner (Ctrl+K)
Use this command to deactivate a scanner and detach its point cloud from all shaded views.
To use this command, first move the cursor to a red ball representing an active scanner, and then run the command.