Connect pipes
During pipe routing, you can use two commands to connect the new pipe to an existing pipe: Connect (P) and Join (J). Move the cursor near the connection point before using these commands. Both commands pick information from the selected connection point, so that the new pipe automatically has the right size and direction. The router proposes points in the order of how close they are to the target point. A Define Point command is used instead of a message box to confirm the proposed selection.
Note: You can also use the mouse to perform Connect or Join, as described in Show routing hints.
Connect (P)
This command picks information from the connection point so that the size and direction of the new pipe are automatically the same as the existing one. System and pipeline must be defined separately, and there will be a seam between the pipes.
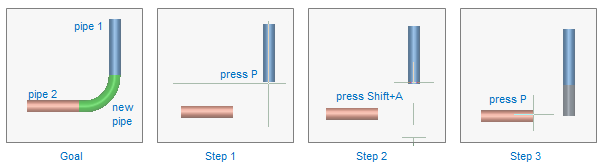
In the example above, the goal is to connect two pipes so that the new pipe is separate from the existing one.
-
Step 1: Move the cursor to the end of pipe 1, and press P. Accept the connection, and select the system and line.
-
Step 2: Press Shift+A to release the cursor.
-
Step 3: Move the cursor to the start of pipe 2, and press P. Accept the connection and the new pipe.
Join (J)
This command picks information from the connection point so that the size and direction of the new pipe are automatically the same as the existing one. System and line are the same as in the connection point, and there will be no seam between the pipes.

In the example above, the goal is to connect two pipes so that there is no seam between the first pipe and the new pipe.
-
Step 1: Move the cursor to the end of pipe 1, and press J. Accept the connection.
-
Step 2: Press Shift+A to release the cursor.
-
Step 3: Move the cursor to the start of pipe 2, and press J. Accept the connection and the new pipe.
If pipes belong to different groups, then you must select which group membership to keep. For more details, see Group membership in joining pipes.