Using a 3Dconnexion SpaceMouse
CADMATIC supports 3Dconnexion SpaceMouse devices in various contexts. The benefits include the ability to simultaneously rotate and translate a view along all axes, and the ability to assign context-specific commands to the buttons of the device.
- Before starting to use the device, install the device drivers from https://www.3dconnexion.com.
- Only connect one device to your computer at a time. Connecting multiple devices at the same time may cause unpredictable issues.
- We have only tested SpaceMouse Compact, but all newer SpaceMouse models should work in CADMATIC.
Using SpaceMouse in digitizing
When digitizing, you can use the 3D mouse to move the cursor and the view.
- Pushing the device left, right, up or down translates the cursor respectively, relative to the view direction.
- Pushing the device forward or backward zooms the view instead of translating it.
- Tilting or spinning the device orbits the view around a point in the center of the view. The horizon remains level.
While you are translating or rotating with the 3D mouse, you cannot use a regular mouse to move the cursor.
Using SpaceMouse in inspection view
In the Inspection View, you can use the 3D mouse as follows:
- Pushing the device left, right, up, down, forward or backward translates the cursor respectively, relative to the view direction.
- Tilting or spinning the device rotates the view around the current camera position.
The horizon remains level at all times.
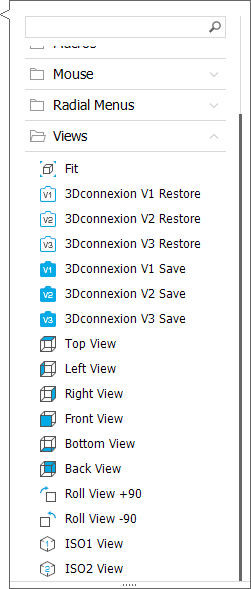
Built-in view commands
3Dconnexion devices have several built-in view commands that they recommend every software to support. The commands shown below are supported in CADMATIC, except Restore, Save, and Roll View commands are not supported. The built-in view commands are always available, but they have no effect unless you are in a 3D-digitizing context.
Configurable application commands
3Dconnexion devices support configurable application commands. Application commands can be activated with hardware keys or by using on-screen radial menus that display on top of the CADMATIC application.
You can use the 3Dconnexion software that is installed with the device driver to define what the device buttons do in each context, and then use the buttons to activate context-specific application commands.
In the radial menu you can see and activate the commands that are applicable in the current context. Here is an example of the menu with navigation commands on it:
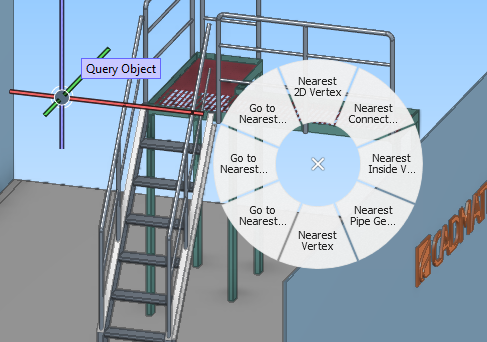
Tip: To activate a command using the radial menu, slide the cursor over the command and then out of the radial menu. Trying to activate a command by clicking the radial menu does not work properly.
CADMATIC has four application command contexts, as described below.
General
Active by default (when no other context is active).
This context has no additional application commands.
Digitize
Active when digitizing, except when routing pipes or ducts.
Available commands:
- The commands in the "Navigate" context menu that have hotkeys.
Pipe routing
Active when routing pipes.
Available commands:
- The commands in the "Navigate" context menu that have hotkeys.
- Pipe routing specific context-menu commands that have hotkeys.
Duct routing
Active when routing ducts.
Available commands:
- The commands in the "Navigate" context menu that have hotkeys.
- Duct routing specific context-menu commands that have hotkeys.
Customizing SpaceMouse buttons
Perform the following to define which application commands SpaceMouse can activate in a specific context.
Do the following:
-
In CADMATIC, go to the context whose application commands you want to modify. For example, to define application commands for pipe routing, start pipe routing.
-
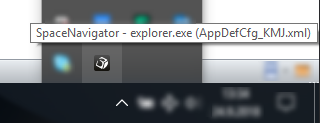
Open the 3Dconnexion Properties window, for example from the icon in the Windows taskbar.
-
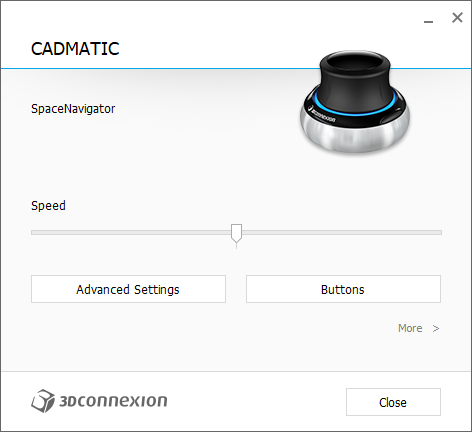
When the property window opens, make sure that it displays the word "CADMATIC", as shown below.
If you see, for example, "Windows Explorer" instead of "CADMATIC", close the dialog, try to set the focus to the CADMATIC application, and re-open the properties.
-
Configure the buttons as required. The menus show commands that are specific to CADMATIC. Refer to documentation provided by 3Dconnexion at https://www.3dconnexion.com.