Set up sister project management
Note: The tasks in this section are intended for the source project administrator.
Set up Sister Project Management by performing the following tasks:
- Set up permissions
- Export source project to base project file
- Create target project and Plant Modeller area
- Create model query for sister project export
- Create sister project export settings
- Test sister project model query
Set up permissions
-
In the Object Types section of the COS configuration, make sure the 'Sister Project Export List' object type has 'Create' and 'Modify' permissions enabled for the user profiles responsible for linking and unlinking sister project objects.
-
In the Security Policies section of the COS configuration, if databases utilize access control, make sure the Modify databases with access control policy is enabled for the user profiles responsible for linking and unlinking sister project objects.
-
In the shared Sister Project settings, specify the user profiles and/or user accounts that are permitted to link and unlink sister project objects.
Export source project to base project file
Use Plant Modeller to export the source project to a .cx file.
Do the following:
-
Open the source project ("the older sister") in Plant Modeller.
-
On the Model tab, select Sister Project Management > Administrator > Create base project export.
-
Create a Base Project Export file (.cx) that can be used for creating the target project. For more information on this command, see Create base project export.
Create target project and Plant Modeller area
Use Desktop to create the target project with the exported .cx file and to create a Plant Modeller area for that project.
In this tutorial, the name of the target project is SPM_TargetProject.pms.
Do the following:
-
In the CADMATIC desktop, create the target project ("the younger sister") in the same COS server where the source project's (root) project database is located. When you create the target project, make sure you do the following:
- Set the target project to use the same library database that the source project is using.
- Set the target project to be created from the Base Project Export (.cx) file.
For more information on how to create a project, see Creating projects.
-
In the new project, create a Plant Modeller area that covers the whole project space. It is set to be the same as the project space of the source project by default. This model area is used in future imports of the sister project settings file (.sse).
Note: Having different project settings in the source project and in the target project will cause extra work to you. The rule of thumb in the data transfer is that everything appears to the target project as it was in the source project—if you use a 2 mm gasket gap for flanged connections in the source project, then a pair of flanges that appears in the target project does have the 2 mm gap, even if the target project does not use any gap.
If the project settings are changed, then the administrators and designers of the target project must do all the required adjustments in the target; if a lot of the settings are different, doing this might be very difficult or even impossible.
Create model query for sister project export
Use Plant Modeller to create a model query that selects which COS objects are included in Sister Project Management. Also dependent objects that the query does not specifically select are exported, as described in Sister project model query and dependent objects.
In this tutorial, the name of the query is SPM_Project_MQuery and it selects everything that is inside or intersects a given 3D box, so that all the objects in the source model are included in Sister Project Management.
Do the following:
-
Open the source project ("the older sister") in Plant Modeller.
-
Select File > Environment > All library and project. The Project Environment dialog opens.
-
Select [project] > Sister Project > Query.
-
Select New > Sister Project Query and define the query as appropriate. For more information on how to define queries, see Queries.
-
Click Save As and save the query with a descriptive name.
-
Close the Project Environment dialog.
Create sister project export settings
Use Plant Modeller to create a COS object that defines which objects are exported and to which project.
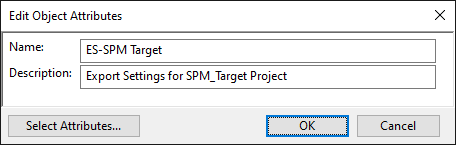
In this tutorial, the name of the settings object is ES-SPM Target.
Do the following:
-
Open the source project ("the older sister") in Plant Modeller.
-
On the Model tab, select Sister Project Management > Administrator > Create export settings.
The Edit Object Attributes dialog opens.
-
Enter a suitable name and (optional) description for the settings COS object, and click OK.
The Sister Project Export Settings dialog opens.
-
Define the export settings:
-
Target Project – Select the target project from COS.
-
Model Query – Select the model query from COS.
-
Always export all pipelines, ductlines and cable trays – In this tutorial, you do not select this option as you are not going to use CADMATIC P&ID. Only the lines that are referenced by other exported objects are in the scope and created or updated in the target project.
Note: If you do not select the option and you use P&ID, there is a risk of lines being duplicated in the target project. The lines cannot be edited in P&ID either unless they are unlinked (made local).
Then click OK. The settings are stored in the project database.
-

For more information on the settings object, see Export settings.
Test sister project model query
Use Plant Modeller to test that the model query selects the objects that you intend to export as sister project data.
Do the following:
-
Open the source project ("the older sister") in Plant Modeller.
-
On the Model tab, select Sister Project Management > Administrator > Test query.
The Select Target Export Settings dialog opens.
-
Select the Sister Project Export Settings you created in Create sister project export settings.
All the objects that the query selects directly or that have dependencies to the objects the query selects are shown in a separate 3D view.

For more information on the Test query command, see Test query.