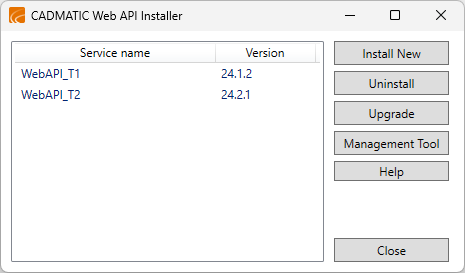
CADMATIC Web API Installer
You can use the CADMATIC Web API Installer dialog to install, upgrade, and uninstall CADMATIC Web API services, and to access the management tools of the Web API.
To access this dialog, do one of the following:
-
Select Start > CADMATIC > Web API Installer.
-
Browse to the %PMS_RUNDIR%/webapi/WebApiInstaller folder of your CADMATIC Plant/Outfitting installation, and run the WebApiInstaller.exe file as an administrator.
Note: %PMS_RUNDIR% refers to the path C:\Cadmatic\cxxx\pmsxxx0.nt (Plant) or C:\Cadmatic\coxxx\pmsxxx0.nt (Marine) where xxx is the version number of the CADMATIC release.
Installing a service
You can install multiple CADMATIC Web API services, and different versions of the services, to the same environment.
In a multi-site scenario, the Web API can be installed to an online replica site. Some of the endpoints request the ownership of objects directly from COS.
Prerequisites
-
You have administrator privileges on the target computer.
Do the following:
-
Open the CADMATIC Web API Installer dialog.
-
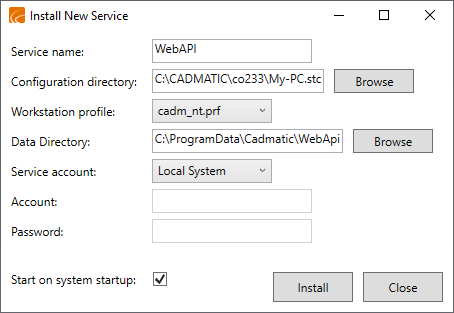
Click Install New. The Install New Service dialog opens.
-
Define the following settings:
-
Service name – Enter a unique name for the service. The name cannot contain spaces.
-
Configuration directory – Select the CADMATIC Plant/Outfitting configuration folder.
Tip: The configuration folder has the ".stc" suffix in its name (<workstationname>.stc), and it contains the workstation profiles in the wsprofile subfolder.
-
Workstation profile – Select the workstation profile that the service is to use.
-
Data Directory – The service stores its data in %ProgramData%\CADMATIC\WebApi\<service name> by default; click Browse if you want to change this location.
Important: The data folder must be empty and located on a local drive: you cannot use a network drive for this. The service account must have modify rights to the selected folder, or the service installation will fail.
-
Service account – Select the account type that the service is to use.
 Show/hide details
-
Local System – Select this to run the service as a Local System account that has extensive privileges on the local computer and in the network. This account type should not normally be used in a production environment, but it could be useful in a test environment. This account type acts as a computer on the network, and it does not have a password.
-
Local Service – Select this to run the service as a Local Service account that is specifically intended for services for security. This account type has minimum privileges on the local computer, so your computer is still relatively safe even if the service is compromised. The account cannot access most of the folders on the local computer by default, so you must explicitly give this account full control to each project folder that you want the service to be able to use. The account presents anonymous credentials on the network.
-
Network Service – Select this to run the service as a Network Service account. This is similar to a Local Service account in that it has minimum privileges on the local computer, so your computer is still relatively safe even if the service is compromised, and you must explicitly give it full control to the project folders. The differences are that this account type has the permissions for 'Log on as a service' and 'Impersonate a client after authentication' by default, and it identifies itself in the network by using the credentials of the computer account.
-
Other Account – Select this to run the service as a specific user account that requires a username and a password. Enter the required credentials in the Account (DOMAIN\user) and Password fields.
Tip: In production environments, the account type is usually set to either Local Service or Network Service. For more information on service accounts, see https://docs.microsoft.com/en-us/windows/win32/services/service-user-accounts.
-
-
Start on system startup – Select this option if you want the service to be running whenever the computer is on. You can always start and stop the service as needed, using either the Web API management tools or Windows services.
-
-
Click Install. You are prompted if the installing succeeded.
-
You can now configure the service as described in Configuring a service and then start it as described in Starting a service.
Upgrading a service
If CADMATIC Plant/Outfitting has been upgraded to a new version, you can also upgrade the related Web API services to that version.
Do the following:
-
Open the CADMATIC Web API Installer dialog.
-
Select the service to be upgraded, and click Upgrade.
-
In the Upgrade Service dialog, review the following settings.
-
Configuration directory – Make sure the correct configuration folder is selected.
-
Workstation profile – Make sure the correct workstation profile is selected.
-
-
Click OK. You are prompted if the upgrade succeeded.
Uninstalling a service
You can uninstall a CADMATIC Web API service that is no longer needed. This also deletes the Plant Modeller areas that the service has been using, and if you choose, the configuration files that the service has been using.
Do the following:
-
Open the CADMATIC Web API Installer dialog.
-
Select the service to be removed, and click Uninstall. You are prompted if the uninstalling succeeded.
-
You are prompted whether to delete the configuration files that the service has been using.