CADMATIC Web API Management Tools
You can use the CADMATIC Web API Management Tools dialog to manage installed Web API services.
To access this dialog, do the following:
-
Open the CADMATIC Web API Installer dialog, and click Management Tools.
Starting a service
You can start a properly configured Web API service using either the Web API management tools or Windows services. Starting a Web API service starts to generate a log that describes the actions that the service is performing. If there are critical errors, the service cannot start.
Prerequisites
- The SSL certificate has been installed.
- The COS server and the user settings have been defined, as described in Configuring a service.
Do the following:
-
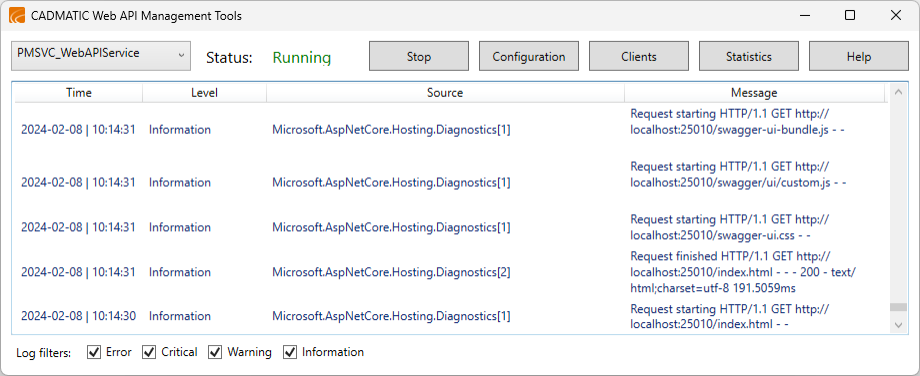
Open the CADMATIC Web API Management Tools dialog.
-
Select the required Web API service from the drop-down list, and click Start.
-
If the service started, the status is set to "Running".
-
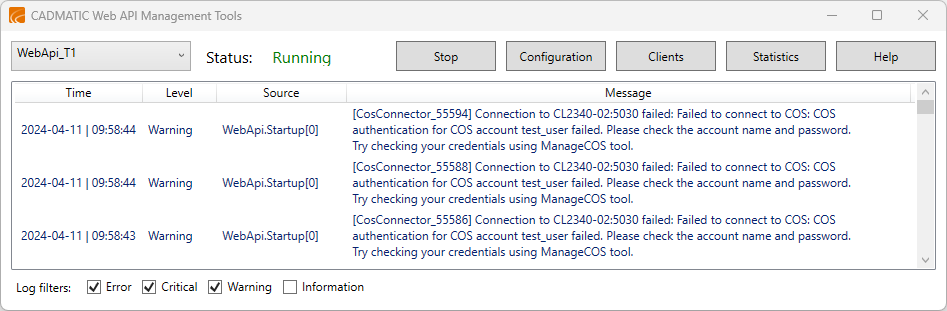
If the service could not start, or it started but the log indicates that there are errors, analyze the log to see what might be the problem.
- If the log indicates that HTTPS endpoints have not been set up, verify that the SSL certificate is correct.
- If the log indicates that COS connection failed, verify the COS server and user settings in the service configuration.
- If the log indicates a Plant Modeller connector error, click Open Log to open the Plant Modeller area log.
You can filter the log pane by hiding unnecessary messages. For example, you may want to clear all other logging levels except critical errors.
-
When a Web API service is running, you can select the service from the drop-down list and click Stop to stop the service. You must do this, for example, if you want to clear the list of calls to deprecated and sunset endpoints, as described in Viewing statistics.
Configuring a service
You can configure a Web API service as follows.
Do the following:
-
Open the CADMATIC Web API Management Tools dialog.
-
Select the required Web API service from the drop-down list, and click Configuration. The Configuration dialog opens.
-
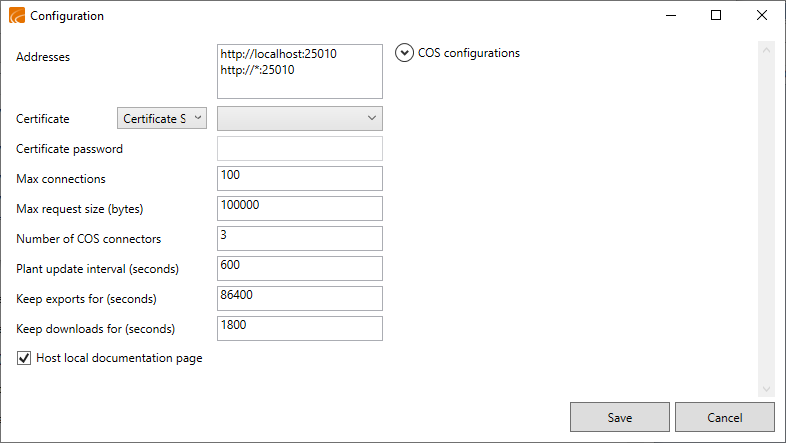
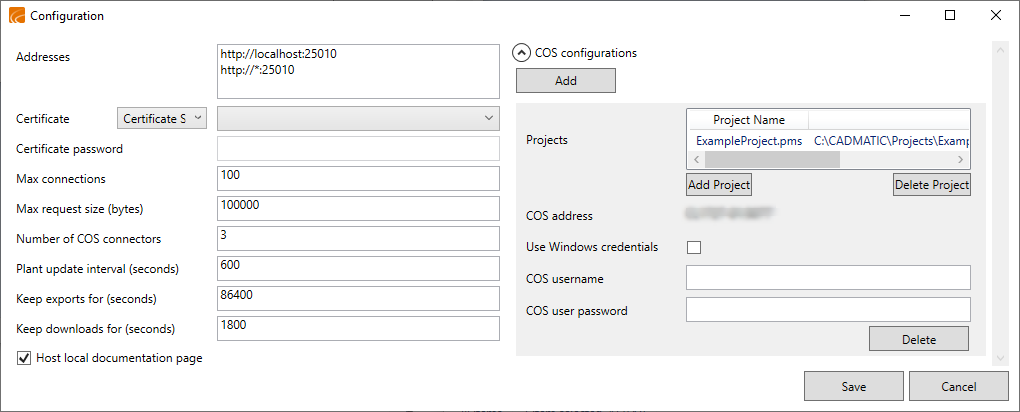
Define the general settings:
-
Addresses – Enter the URLs from which connections are accepted, in the format <protocol>://<address>:<port>. Each new URL must be entered on a separate row.
- Protocol: HTTP or HTTPS. Use HTTPS if you want to ensure that data is securely transmitted (requires a certificate).
- Address: IP address or network name. If you set this to localhost, only connections from the local machine will be accepted. The asterisk character allows connections from any address: http://*:25010
- Port: Any unused port.
-
Certificate – Select the certificate from the certificate store or from the file system. The type of the certificate is project-specific. Follow your organization's guidelines for obtaining the certificate. If you do not have a certificate, https:// connections will not work.
-
Certificate password – Enter the password of the selected certificate.
-
Max connections – Define the maximum number of connections the API accepts at a time. The default value is 100.
-
Max request size (bytes) – Define the maximum size of a single request. The default size is 100 MB.
-
Number of COS connectors – Define the maximum number of concurrent COS connectors to use for handling the requests. If there is more than one connector and the originally assigned connector is occupied, another connector can take over the request. The default number is 3.
-
Plant update interval (seconds) – Define the interval for updating the Plant/Outfitting data. The default is 600 seconds.
-
Keep exports for (seconds) – Specify how long to keep exported files until they are deleted. The default is 86400 seconds
-
Keep downloads for (seconds) – Specify how long to keep downloaded files until they are deleted. The default is 1800 seconds.
-
Host local documentation page – Select whether to allow the Swagger UI page to be used for testing the Web API in local installations. See Swagger UI.
-
-
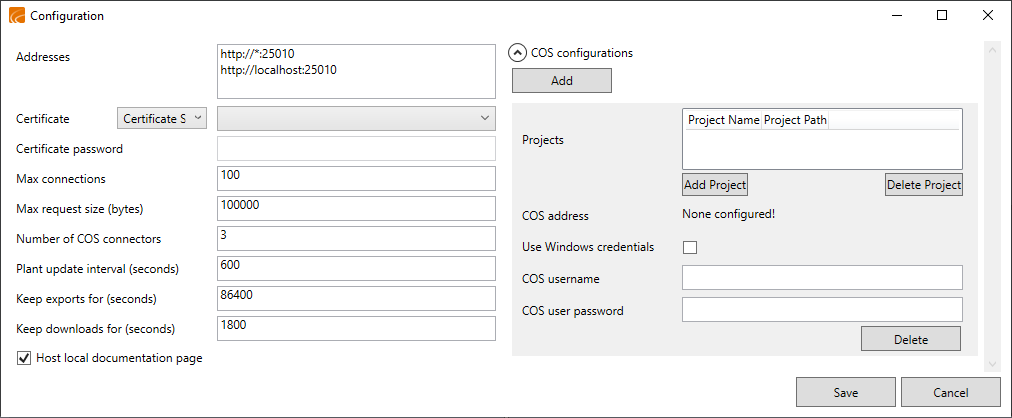
Define how the service is to connect to projects in COS:
-
Expand COS configurations and click Add. The COS connection settings are displayed.
-
To add a project, click Add Project and browse to the <projectdbname>.pms folder that contains the project database . The COS address field shows the address of the COS server, and you can add more projects that use the same COS server.
-
To define how to authenticate the service in COS, do the following:
-
If the service was installed as Local System, Local Service or Network Service, enter the COS username and password to use.
-
If the service was installed as Other Account, you can select the Use Windows credentials option to use the same Windows account that the service is using also for accessing COS. This requires that the Windows user account is a valid COS user account. Otherwise, clear the option and specify the COS username and the COS password to use.
-
-
-
Click Save.
-
You can now start the service, as described in Starting a service.
Defining clients for a service
Only predefined clients with valid access tokens can access the CADMATIC Web API endpoints.
Adding clients | Removing clients
Adding clients
Create a client for every human user or software program that must be able to access the Web API.
Important: This procedure provides you with the Name, the Client ID, and the Secret Key of the new client. You will need this information when creating an access token for the client.
Do the following:
-
Open the CADMATIC Web API Management Tools dialog.
-
Select the required Web API service from the drop-down list, and click Clients.
-
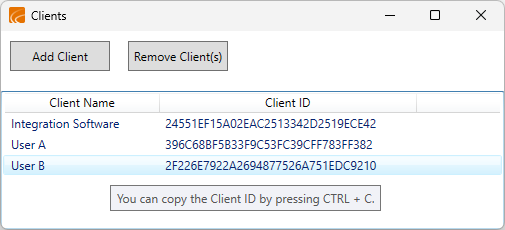
In the Clients dialog, click Add Client.
-
In the Client Name dialog, enter a name (5–256 characters, spaces are allowed) for the client, and click OK.
-
In the Secret Key dialog, click Copy to copy the Secret Key to the clipboard.
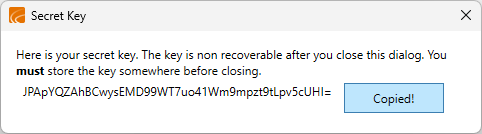
Important: Store the key in a safe place. Once you close this dialog, there is no way to recover the key.
-
In the Clients dialog, you can see the Name and the Client ID of the new client. You can now create an access token for the new client, for example, as described in Creating access tokens.
Removing clients
You can remove clients that should no longer be able to access the Web API.
Do the following:
-
Open the CADMATIC Web API Management Tools dialog.
-
Select the required Web API service from the drop-down list, and click Clients.
-
In the Clients dialog, select the clients to be removed from the list, and click Remove Client(s).
Viewing statistics
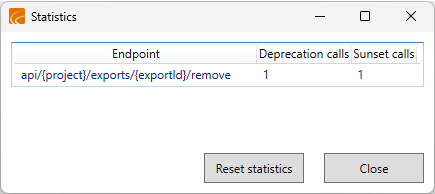
You can verify if any calls have been made to endpoints that are either deprecated or sunset. If such calls exist, determine whether newer endpoints that perform similar functions are available, and update your code to use these newer endpoints. The formal process of first deprecating, then sunsetting, and finally removing endpoints is described in Endpoint deprecation process.
Prerequisites
-
If you intend to reset the statistics, you must stop the Web API service.
Do the following:
-
Open the CADMATIC Web API Management Tools dialog.
-
Select the required Web API service from the drop-down list, and click Statistics. The Statistics dialog opens.
-
If the dialog lists any calls to deprecated or sunset endpoints, make a note of those calls so that you can start planning when to stop using them.
-
You can clear the list by clicking Reset statistics. If the service is running, you are prompted that it must be stopped first.
-
Click Close.