Insert symbols on objects
Let's revise what we have learned so far and learn another useful method for inserting symbols, i.e. inserting symbols on objects.
We will now add suspension rails and light fixtures.
Tip: You can easily change the snap mode by pressing down Shift and right-clicking. You can then select the snap mode to be used during the next function from the menu.
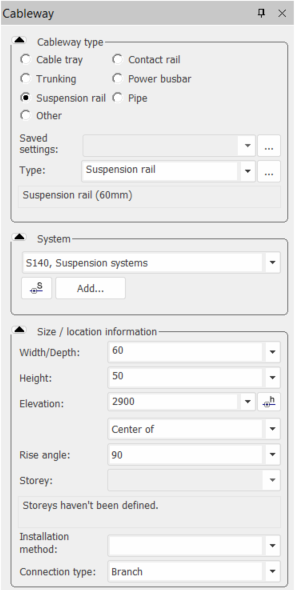
Define and draw the suspension rail
Let's first add one suspension rail.
Do the following:
-
Start drawing cableways by selecting Layout tab > Draw cableways.
-
In the Cableway dialog, enter the required information.
-
Start drawing the suspension rail as a relative displacement from the desired spot.
-
Press Shift and right-click. A menu opens.
-
Select XY-offset.
-
On the command line, enter 0 for X offset.
-
Enter 1500 for the Y offset.
-
For the offset basepoint, select the point where the module line and the wall intersect with the Intersection snap.
-
Indicate the end point of the suspension rail across the room on the right wall with the Perpendicular snap.
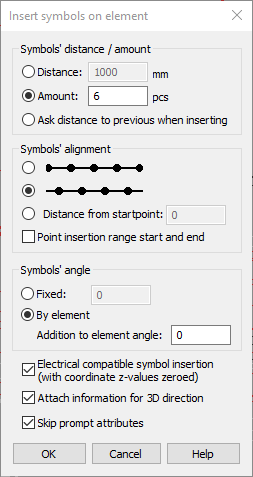
Insert light fixtures on the suspension rail
Let's insert light fixtures on the suspension rail. The suspension rail is still too long but we will shorten it later – this way we can utilize the function that divides the light fixtures at even spaces using the whole room width.
Do the following:
-
From the top part of the symbol selection window, click the
 (Insert symbols on element) button.
 -
In the symbol selection window, select Electric > Light fixtures > Linear light fixtures and double-click the Linear light fixture, 2x1250 mm symbol. The Insert symbols on element dialog opens.
-
Select Amount.
-
Enter 6 as the amount.
-
For alignment, select the middle option where the program leaves space between the symbols and the ends of the line.
-
For angle, select By element.
-
Select Electrical compatible symbol insertion (with coordinate z-values zeroed).
-
Select Attach information for 3D direction.
-
Select Skip prompt attributes.
-
Click OK.
-
Click the suspension rail. The application inserts six light fixtures on the suspension rail with equal distances.
-
End the function.
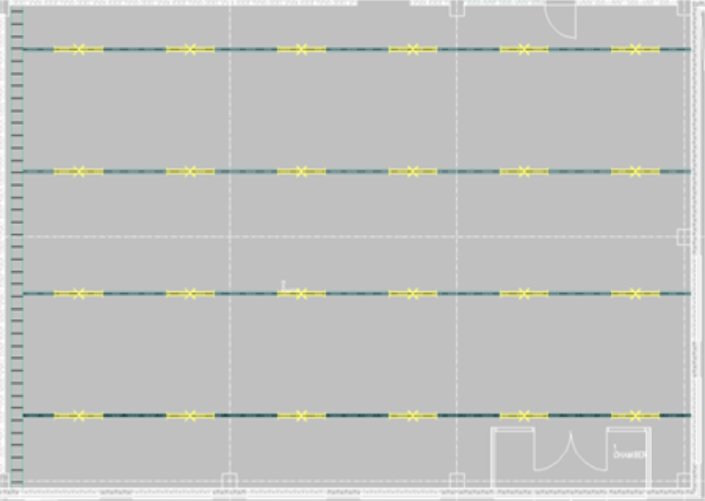
Copy the light fixture rail
Do the following:
-
Select the suspension rail and the light fixtures on it.
-
Right-click, and select Copy.
-
Indicate a base point anywhere in the drawing.
-
On the command line, enter @0,3000 as the relative displacement. This means the basepoint will be moved from the indicated spot 0 mm in the X direction and 3 000 mm in the Y direction.
-
Press Enter.
-
Copy the rail and the light fixtures so that you will have four suspension rails with 3 meters between them.
 Previous Previous |
Next

|