A clipboard project is a temporary project, which can be used to copy parts of a project to another project or inside a project. Clipboard projects are user-specific and saved under the user's profile.
You can select drawings, schematic sheets, devices, circuits, locations, I/Os, cables, processes, etc. to be copied to the clipboard project.
Copy objects to the clipboard project
When an object is copied to the clipboard project, the other linked database objects will also be copied. For example, when copying a drawing, all database objects in that drawing will also be copied with their required linked objects. For example, a device is linked to a location, which in turn can be linked to a process.
Sub-objects can also be copied. For example, when copying a device you can select whether to also copy device's cables.
Do the following:
-
Select the objects you want to copy.
-
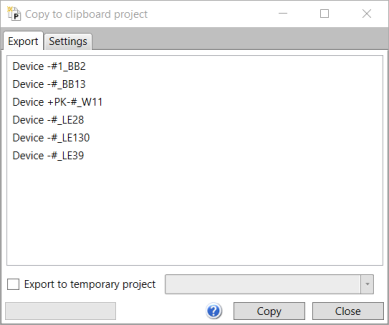
Right-click an object to be copied, and select Copy to clipboard project. The Copy to clipboard project dialog opens.
The Export tab shows the objects to be copied.
-
If you want to export the selected objects into an existing temporary project, select Export to temporary project and then the desired temporary project from the drop-down menu.
-
If you want to define which sub-objects to copy, select the Settings tab and define the objects.
-
Click Copy to add the selected objects to the clipboard project. A possible previous clipboard project will be overwritten.

Import objects from the clipboard project
Do the following:
-
In Electrical DB Tool, open the target project.
-
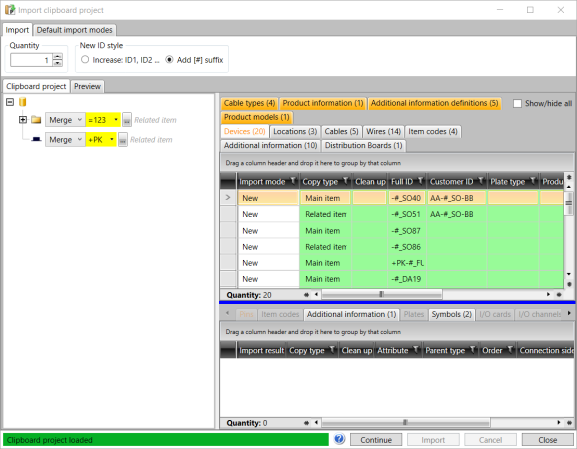
Select Functions tab > Import menu > Import clipboard project. The Import clipboard project dialog opens, showing you which objects are about to be imported.
-
If you want to create multiple copies of imported objects, define the number of copies in the Quantity field. IDs will be generated according to the New ID style setting by either increasing the number in the ID or by inserting a consecutive number in square brackets to the end of the ID.
-
If you want to change the import mode, do the following:
-
From New ID style, select how to handle overlapping IDs:
-
Select Increase, if you want to increase the number in the ID. For example, if you import the device =123+MCC1-K1 to a project where the device =123+MCC1-K1 already exists, the new device will become =123+MCC1-K2.
-
Select Add, if you want to use consecutive numbering with square brackets. For example, if you import the device =123+MCC1-K1 to a project where the device =123+MCC1-K1 already exists, the new device will become =123+MCC1-K1[1].
Note: If the wire type is internal wire, the value in the Number field is automatically increased, so that the number is always unique in the location. Numbering is done according to the New ID style setting.
-
-
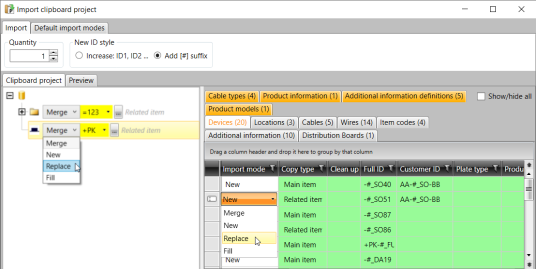
Select the import mode from the drop-down menu in the project tree or the grid.
-
Merge – Objects with the same IDs will be merged with the existing ones.
-
New – Objects will be imported as new objects. Existing IDs will be renamed according to the New ID style setting by either increasing the number in the ID or by inserting a consecutive number in square brackets to the end of the ID.
-
Replace – Existing objects with the same IDs will be replaced with the imported objects.
-
Fill – The imported objects fill in information for objects already in the project.
Note: If the wire type is something else than cable wire, import mode is always set to New.
-
-
-
Click Continue to preview pending changes. The preview shows what changes are about to be made to the database during the import. The type of change is presented with a highlight color:
-
Merged – Yellow
-
New – Light green
-
Replaced – Orange
-
Filled – Dark green
In the grid, the Import result column also shows the changes:

If you still want to make changes, you can go from the preview back to definition with Cancel.
-
-
Click Import to proceed with the import.
If necessary, you can change the import modes either in the project tree or the grid. In the project tree, you can use the ![]() button to find the desired location or circuit faster.
button to find the desired location or circuit faster.
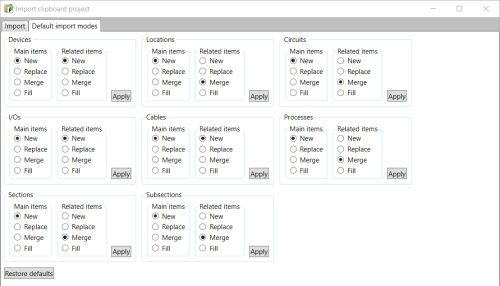
You can change the default import modes for object types on the Default import modes tab.
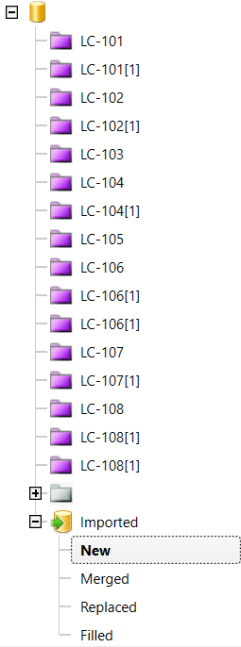
After the import, new and changed objects can be found from the Imported collection.