After you have created an import definition, you can import data to the project database with it.
Do the following:
-
Select Functions tab > Import menu > Import definition management. The Import definition management dialog opens.
-
Select the import definition you want to use to import data.
-
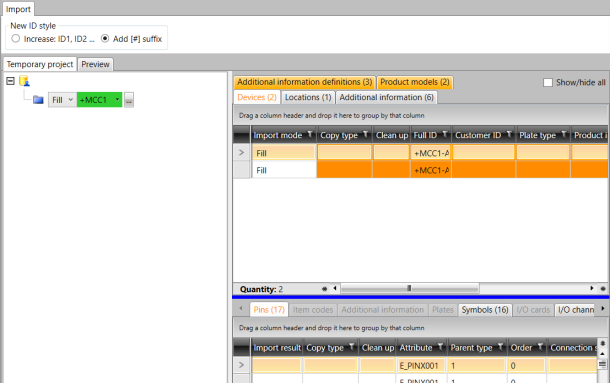
Click Import. The import is started, and the Import dialog opens. The dialog shows you the data that is about to be imported to the project.
-
If you want to change the import mode, do the following:
-
From New ID style, select how to handle overlapping IDs:
-
Select Increase, if you want to increase the number in the ID. For example, if you import the device =123+MCC1-K1 to a project where the device =123+MCC1-K1 already exists, the new device will become =123+MCC1-K2.
-
Select Add, if you want to use consecutive numbering with square brackets. For example, if you import the device =123+MCC1-K1 to a project where the device =123+MCC1-K1 already exists, the new device will become =123+MCC1-K1[1].
Note: If the wire type is internal wire, the value in the Number field is automatically increased, so that the number is always unique in the location. Numbering is done according to the New ID style setting.
-
-
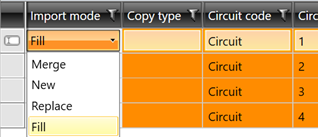
Select the mode from the row's drop-down menu:
-
Merge – The imported object will be merged with an object already in the project but no data is added to the existing object.
-
New – The imported object will be created as a new object, even if that object already exists in the project. For example, if you import the device =123+MCC1-K1 to a project where the device =123+MCC1-K1 already exists, the new device will become either =123+MCC1-K2 or =123+MCC1-K1[1], according to the New ID style setting. If the imported ID does not exist in the project, the imported ID will not be changed.
-
Replace – The imported object replaces the object in the project and all its data, if the objects are the same.
-
Fill – The imported object fills in information for an object already in the project.
Note: If the wire type is something else than cable wire, import mode is always set to New.
-
-
-
Click Continue to open the preview. The preview shows you what is going to be imported to the project based on the import definitions. At this point you can no longer change the import rules.
-
Start the import by clicking Import. If you do not want to start the import, select Cancel to go back to the import mode definition.
If necessary, change the import mode from the drop-down menus in the tree or in the grid.
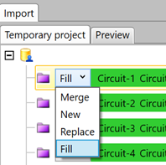
In the tree, you can use the ![]() buttons to find the desired circuits and locations faster.
buttons to find the desired circuits and locations faster.
| Source | Target | Function | Result |
| B | Merge | B | |
| A | B | Merge | B |
| A | Merge | ||
| B | Replace | ||
| A | B | Replace | A |
| A | Replace | A | |
| B | Fill | B | |
| A | B | Fill | A |
| A | Fill | A |