Editing parts
You can edit parts by renaming or dragging them.
Rename
There are three ways to start editing the logistical value of the selected item in the tree or in the list:
-
By pressing F2.
-
By a single mouse click on the selected item.
-
By selecting the Rename option in the context menu that opens when you right-click on the item.
Type the new value and press Enter. Save and refresh the tree to see the changes.
Important: When you rename items, do not use the following characters:space + ' " / : ; . , * # % ? ! < > { } ( ) [ ] | @ $ ^ &~ =
The system allows entering these characters, but if used, the changes are not saved.
|
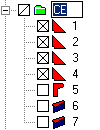
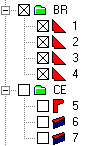
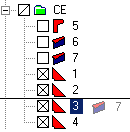
Renaming branches only affects the checked leaves. In the example below, you can see that changing the name of the branch (subpanel) CE into BR affects all its children except the unchecked parts 5, 6 and 7. Renaming a single leave is always applied whether it is checked or not.
|

Drag and drop
By dragging and dropping items inside the tree, inside the list, or from the list to the tree, you can change the involved logistical values. While dragging:
- the icon
 that appears next to the mouse pointer means an illegal drop action
 - automatic expanding branches by pointing to a collapsed branch for more than two seconds
- automatic up and down scrolling by moving the mouse to the upper/lower side of the tree control.
In this way, you can easily modify logistical information by moving items from one branch to another branch. Besides moving items, you can also shift parts, that is move the parts while the Shift key is pressed down. By shifting parts you can modify the assemble order of the parts. The shifting functionality is only available if the logistical field [Assemblyorder] is present in CADMATIC Hull database and its Editable property is also set to Yes.
If you select Drop as child, the dragged items are dropped in the way that their new parent is the same as the parent of the pointed item.
Moving parts
Point to the item you want to move. Click the left mouse button and while the mouse button is pressed, move the mouse to the destination branch and release the mouse button. The contents of the selected branch are moved to the destination branch.
|
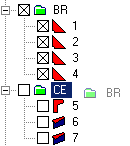
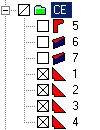
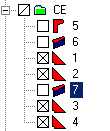
In the example below the contents of the branch (subpanel) BR is moved to the branch (subpanel) CE. After saving this action, the parts 1, 2, 3 and 4 belong to the subpanel CE. If the logistical field [Assemblyorder] is present, which is the case in the example below, the moved parts will remain in the same order and they are appended to the new branch. Otherwise, the moved parts are alphabetically reordered.
Consider the following rules:
|
Moving parts between levels
When you drag and drop a part in Hull Viewer, you can bypass levels in the hierarchy. However, if the target is not at the same level in the hierarchy as the origin, the 'skipped' levels are automatically added to the tree structure. The skipped levels are named according to what has been defined as the default value for that level in the Hierarchies.
If the option Show full tree structure is chosen in Hull Viewer, the tree will show also these skipped levels.
|
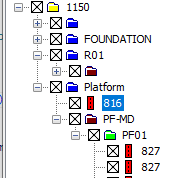
In the example below Part 816 was dropped as direct child of 'Platform', which in this project is 'Level_03', instead of where it should normally be (child of 'PF01', which is of a level called 'Level_01'). Part 816 does not currently have a value for levels 'Level_01' and 'Level_02'. In such case the skipped levels get the name '000', as has been defined as the default value for them in the Hierarchies.
|

Shifting parts
You can change the order of the items in the tree by dragging the items while pressing the Shift key.
|
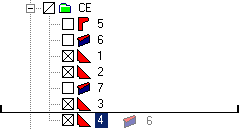
In the example below, part 7 is shifted between parts 2 and 3.
After saving this action, the logistical field value for the [Assemblyorder] will be changed. During the shift action a horizontal line appears that shows you where the items will be dropped when you release the mouse button. In case you are pointing to the last item of the branch, two small vertical lines appear.
The placement of these lines shows where the items will be dropped when the mouse button is released. If the lines are placed at the top of the horizontal line, the selected item is shifted between the second last and the last item (see left picture above). If the small lines are placed at the bottom of the horizontal line, the shifted items are places at the end of the branch (see right picture above). |

Insert neighbour / Insert child
For creating an empty branch at the same level as the pointed (selected) item, use the Insert Neighbour function (keyboard shortcut Ctrl+N). For creating an empty branch as the child of the pointed (selected) item, use the Insert Child function (keyboard shortcut Ctrl+D). You can type in a value for the created branch and press Enter. Now you can drag items to this branch too.
The Insert Neighbour and Insert Child functions are available in the context menu that opens when you right-click on a tree item.
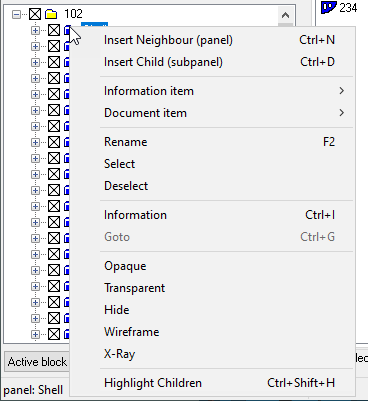
In the image Insert Neighbour option will create a new block and Insert Child will create a new panel. The Insert Neighbour option cannot be selected if the pointed item is not editable or if it has no children. The Insert Child option cannot be selected if the pointed item's child is not editable or the pointed item has grandchildren.
The empty branches (which do not have any children) will be removed after the tree is refreshed.
Use the Save and Refresh tree options regularly in to keep the CADMATIC Hull database and the work breakdown structure synchronized.
For more information about Highlight Children see Animation.
Note: Only parts belonging to the active block can be edited.
Note: The involved logistical fields must be editable (see Configuration settings).