Adding weld labels
The Weld Labeling function for weld lines can be started from the following menu locations.
3D-Contek application:
- Production > Logistics > Labeling > Weld Labeling
- Construction > Welds > Symbols/Dimensions > Labeling > Weld Labeling
Shell application:
- Production > Logistics > Labeling > Weld Labeling
- Construction > Symbols/Dimensions > Labeling > Weld Labeling
Only weld lines can be selected during weld labeling. Three user defined weld labels can be selected when placing weld labels. Once placed, the weld labels' position, angle, and type be changed.
Weld labels can be modified, and the system administrator can define the content of the label text by in System Management > Presentation > Weld Labels > Replace Text Fields.
Selecting weld lines
The weld label model and the method of selection can be chosen with the function dependent options (FDOs). The current selection method is displayed in the hint to the left of the FDO options. Press the corresponding number key to select the desired FDO.

Select the weld label model type to place is by cycling through the options with FDO <6>, the options are Dimension, Text or Number:
-
Dimension (default) – Places a label as horizontal or vertical text, depending on the selected Weld label orientation settings, with a lead line pointing to the weld line.
 Show/hide example
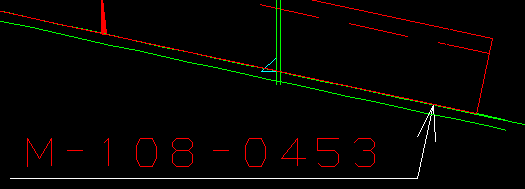
Horizontal Dimension Weld Label
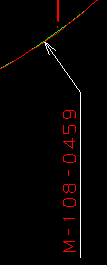
Vertical Dimension Weld Label
-
Text – Places a label which is parallel to the weld line which does not have a lead line.
Show/hide example
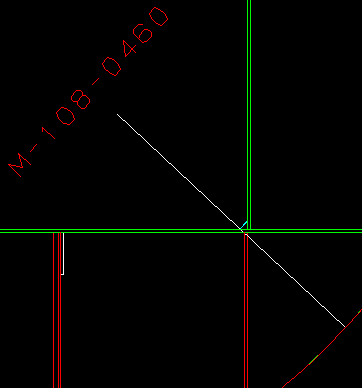
Text Weld Label
-
Number – Places a label either vertically or horizontally without a lead line.
Show/hide example
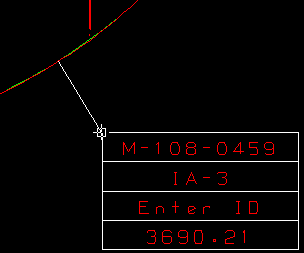
Example Number Weld Label
For Text and Number labels, FDO <7> cycles through the following selection methods:
- Point selection (default) – The nearest weld line to the point where the user clicks is selected.
- Line selection – All weld lines that intersect the selection line, which is made between the two points which the user selects, have weld labels created along the weld lines and at the position of the intersection with the selection line.
- Box selection – All weld lines will have a label placed at the midpoint of the weld line. For lines, the midpoint is defined as the middle of the vector which is nearest to the spot between the starting and end point of the weld line. Two points must be chosen for a box selection, and the selection order will determine the behavior of this function. Selecting the top left corner, then the bottom right corner, will only include weld lines which are completely within the box. Selecting the bottom right corner, then the top left corner, will include every weld line even partly within the box.
For Dimension labels, the selection is always done via Point selection.
Place weld label
The second step is placing a weld label by clicking at the location where it should be added. The next behavior depends on the selected Weld label models because if a line which already has a weld label of the same type is selected, the new weld label replaces the old one. Otherwise, a new weld label is placed in addition to any existing labels of a different type. If the weld label type is changed, the system checks if this weld label will replace another weld label to prevent duplicate identical models.
The selected label model can be changed to a different model with FDO <6> in the same way as mentioned in Selecting weld lines. With FDO <7> - Turn, the weld label is rotated 90 degrees.
Weld label orientation
The weld label orientation depends on the angle of the weld line and the settings in the System Management > Extra > Customize > Weld Labeling > Settings.
There are three possible values:
- Standard – The weld label is presented horizontally for approximately horizontal parts and vertically for roughly vertical parts.
- Non-standard – The weld label is presented vertically for approximately horizontal parts and horizontally for roughly vertical parts.
- Horizontal – Weld labels are presented horizontally.
Indication line for weld dimension
The length of the indication line on a weld dimension depends on the label's position and the weld line. However, the indication line length is also adjusted to fit to the used position.
Undo / Redo
Placements and changes of weld labels are saved in the undo / redo sequence. Pressing the hotkey K after placing a weld label removes the last weld label. When placing a series of weld labels along a line or within a box, only the last one will be removed after pressing the hotkey.