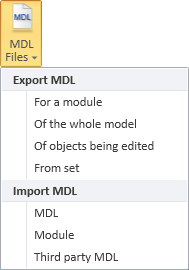
MDL Files
You can export and import 3D model objects in the CADMATIC MDL format. An MDL file is a text file that does not depend on a specific computer or software version. For more information on this format, see Model Description Language (MDL).
Export MDL
For a module | Of the whole model | Of objects being edited | From set
For a module
You can export a set of objects into an .mdl file that also contains a user-defined reference point for MDL import.
Do the following:
- On the Model tab, in the Content group, select MDL Files > For a module.
- Select the objects you want to include to the MDL file, and accept the set.
- Select a reference point for the set of objects. This will be the origin point when the MDL is imported.
- Enter a description (default filename) for the MDL file, and click OK.
- Specify the saving location, and click Save.
Of the whole model
You can export the whole 3D model into an .mdl file.
Prerequisites
-
Open the message pane if you want to see the number of objects that were exported per object type.
Do the following:
- On the Model tab, in the Content group, select MDL Files > Of the whole model.
- Specify the filename and saving location, and click Save.
Of objects being edited
You can export the set of objects that are currently checked out to you or that you have just created into an .mdl file.
Do the following:
- On the Model tab, in the Content group, select MDL Files > Of objects being edited.
- Specify the filename and saving location, and click Save.
- If the set contains groups or attributes, you are prompted whether to include them in the MDL file.
From set
You can export a set of objects into an .mdl file that does not contain a reference point for MDL import. Therefore, the objects will have the same coordinates when they are imported, except when importing them as Module.
Do the following:
- On the Model tab, in the Content group, select MDL Files > From set.
- Select the objects you want to include to the MDL file, and accept the set.
- Specify the filename and saving location, and click Save.
- If the set contains groups or attributes, you are prompted whether to include them in the MDL file.
Import MDL
MDL | Module | Third party MDL
MDL
You can use this command to import objects so that they keep the location, orientation, position ID, and attribute values that they had in the model from which they were exported, if possible.
Do the following:
-
On the Model tab, in the Content group, select MDL Files > MDL.
-
Select the file to import, and click Open.
-
If the file contains groups or attributes, you are prompted what to do with them.
Module
You can use this command to import objects so that you can change their location, orientation, position ID, and attribute values. The imported objects are assigned to a group, which allows you to manage them as a single unit. The owner of the objects is the user who performs the import.
Note: Functional Model Template provides a more sophisticated way to import MDL. See Functional Model Templates.
Do the following:
-
On the Model tab, in the Content group, select MDL Files > Module.
-
Select the file to import, and click Open.
-
If the import file contains references to objects that do not exist in your project environment, you are prompted whether to try to import those objects.
-
If you select Yes, you are prompted to first export those objects from the original database and then import them to the current database.
-
If you select No, you are prompted to submit an import request to project administrator, and then the current import process is canceled.
-
-
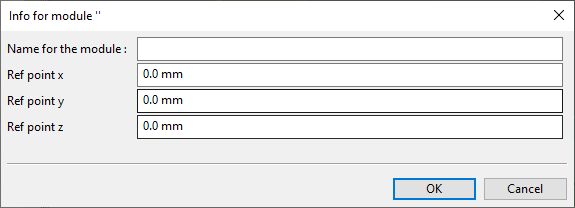
You are prompted to provide a name and reference point for the module. This name will be the name of the group that contains the imported objects. Enter a unique name, define the X–Y–Z values of the reference point, and click OK.
-
Pick a location for the reference point that was defined as the origin when the MDL file was generated.
-
Define the direction of the module's X axis and Y axis.
-
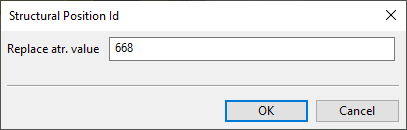
The program starts to scan the MDL file, and whenever an object definition with a name is encountered, you are prompted to replace the name. (The position ID of equipment is a name, and pipelines and groups have names, but the position ID of valves and instruments are attributes, not names.)
- Select new pipeline and cable trays.
- Give new names for groups. All membership assignments made using the original group name are updated to the new group name.
- Give new names for equipment.
- Give new position IDs for valves.
Canceling the name assignment normally indicates that no name is to be assigned to the object. However, if the object is an attribute or a group, then canceling causes the given object to be ignored, except pipeline groups are not ignored.
Third party MDL
You can use this command to import an MDL or xMDL file that has been generated by third-party software.
Prerequisites
-
Importing MDL or (encrypted) xMDL files that have been converted from PCF data requires a license for PCF import. See Import PCF.
-
Optionally, the import folder can contain a part description file named after the MDL file. See Third-party part description file (CSV).
Do the following:
-
On the Model tab, in the Content group, select MDL Files > Third party MDL. A file browser dialog opens.
-
Select the file to import and click Open.
-
If the import data contains unmapped entities, the Mappings dialog described in Mappings for MDL import opens.
-
If you have predefined mappings in a CSV file, select the Use UTF-8 option to encode the data using UTF-8 (default) or clear it to use Multibyte Character Set (MBCS). You should clear the Use UTF-8 option if you notice that some strings are not being displayed properly, but you must cancel the import and start again for the setting to take effect.
-
Map the unmapped lines on the Pipelines, Ductlines and Cable Trays tabs to CADMATIC lines. (This allows the component mappings to be based on the specifications of the lines.)
-
Map the unmapped components on the Part Identifiers tab to CADMATIC components.
-
Map the unmapped attributes on the Attributes tab to Plant Modeller Shared Attributes or Plant Modeller Connection Node Attributes.
-
When all the entities you want to import have been mapped, click OK to proceed.
-
-
If the import contains Structural Components or Equipment whose transformation requires checking, the Mappings dialog opens again. Use the Transform tool to review and possibly adjust the values, and then click OK to continue.
-
The imported objects are visible in Plant Modeller.
Third-party part description file (CSV)
The folder from which you import the MDL file can contain a CSV file that is named after the MDL file: myFile.mdl -> myFile.csv. This is a part description file where the first row contains column names and the other rows contain column values that describe the properties of the objects in the MDL file. The purpose of this file is to show more information in the mapping tool, so that it is easier to do the mappings.
Example CSV File:
"ID"; "Size"; "Property 1"; "Property 2";
# This is a comment

"Third party part 1"; 100; "Aluminium"; "90 curve";
"Third party part 2"; 200; "Aluminium"; "90 curve";
"Third party part 3"; 100; "Steel"; "Straight";