Hole requests
Hole requests store the information needed to create a hole in a model object imported as a reference from another software program (a "peer application") into Plant Modeller:
- Hole type
- Hole properties: shape, dimensions, location and orientation
- Reference to the target object
- Reference to a possible trigger object (for example, a pipe or door that requires a hole)
- Request status (for example, whether the request has been sent to the peer application)
About hole request objects
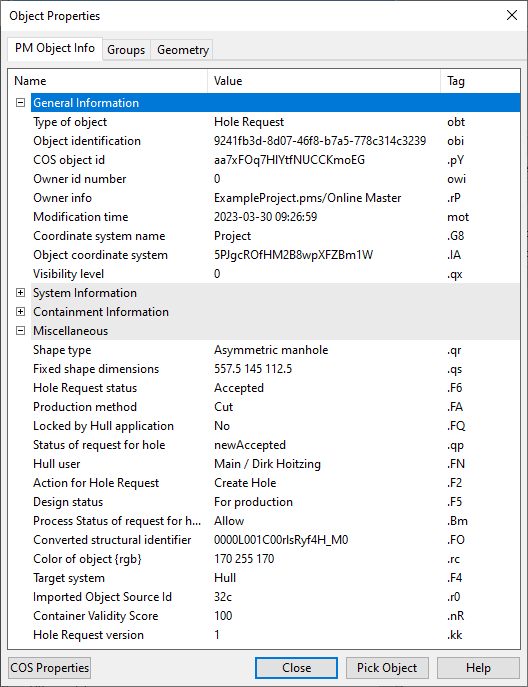
Hole requests are objects whose COS object type (obt) is 'Hole Request'. Their properties can be viewed in the Miscellaneous section of the Properties pane or the Object properties dialog.
In addition to containing important information, the hole request object can act as a temporary visual marker in the 3D model. Inactivity filter allows users to show or hide hole requests in the area model.
Users can create hole requests in the following ways:
- Explicitly with the New command.
- Implicitly by inserting model objects that require openings (see Place openings) or by creating pipe penetrations (see Penetration).
The created hole request is managed by an application-specific Plant Modeller Agent. For example, hole requests for CADMATIC Hull Classic require a Hull Agent to be watching the folder <project>.pms/Site/pm/AgentRequests/<AgentName>.pm/ for new hole request files (.req) to appear. Hulltool profile informs the Hull Agent where the Hull program is located, and without this file requests cannot even be created.
So, if using CADMATIC Hull with HDX server (or NAPA integration) and a new hole request has been created, the Agent that controls the target object where the hole is to be made also takes control of the hole request object. The Agent forwards the request to the peer application which then processes the request. After the peer application has responded to the request, the Agent relinquishes control of the hole request object, and one of the following happens:
-
If the peer application accepted the request, the model geometry is updated to include the requested hole. The hole request object still remains—each implemented hole should have the associated hole request object. To ensure this, the Hole Manager tool denies attempts to delete hole request objects that have resulted in a hole being cut.
-
If the peer application rejected the request, it should add the reason for this to the hole request object, and the Plant Modeller user should then investigate this reason.
After creating a hole request, it is not necessary to instantly connect to the peer application. The peer application and its database that contains the target steel structure do not even have to be installed at the site which requests the hole to be made. At a certain point, Plant Modeller connects to the peer application and sends the hole request. The peer application sends back the changed status of the hole request ('Creation accepted') and the updated geometry (such as a plate with a new hole). As this might take some time, from a few minutes to several days, Plant Modeller stores the hole request and its state over multiple user sessions, if needed.
Hole requests are fully supported in distributed design. Hole request objects travel across the network via normal COS replication and Agent-based area update mechanisms, to the site where they can be added to the database of the peer application. Then, the steel structures with the new holes travel in the opposite direction, back to the Plant Modeller area which ordered the hole.
All hole request objects belong to the 'HoleRequests' system (id 6007) for CADMATIC Hull or to the 'NAPA HoleRequests' system (id 6109) for NAPA.
For general information on Agents, see Agents and service requests.
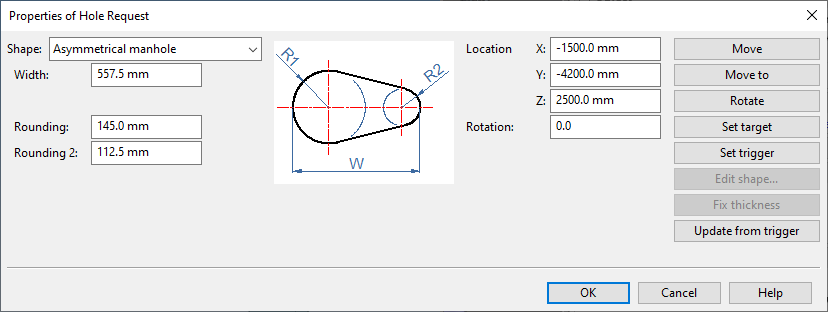
Properties of Hole Request
The Properties of Hole Request dialog opens when you create a new hole request or edit an existing one. You can use this tool to select the hole shape and define its dimensions, location, and orientation.
After editing the parameters, you can click Preview to preview the hole in the model.
If the hole request has a trigger object (such as a pipe or door), parameter editing is restricted to prevent unsuitable holes.
If the trigger object is a CADMATIC Hull object, you can lock or unlock the hole.
|
Action |
Description |
|---|---|
|
Select the shape of the hole to create (see Hole types) and define its parameter values. For Custom Shapes, you only need to select the trigger object. |
|
|
Displays a preview of the hole request in the 3D model. |
|
|
Move the hole request by selecting the target object and then a point on it. |
|
|
Move the hole request by specifying a new location. |
|
|
Rotate the hole request around the axis defined by the intersection of its width and height axes. Rotation is set by selecting a new direction for the width axis. |
|
|
Assign a new target object if the original association is lost or incorrect (for example, if a plate was split after the hole request was created). |
|
|
Select a model object to act as the trigger for the hole request. |
|
|
For custom hole types only; opens a 2D view to edit the polyline of the custom shape. |
|
|
Used when converting from pre-2019T3 format has caused angled holes to become shorter. Run this command on affected hole requests. |
|
|
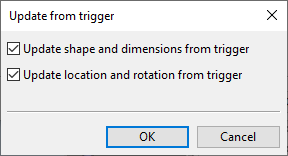
Updates the hole request based on the trigger object. Use this if the trigger object was modified without checking out the hole request.
|
In the Hole Management options, the project administrator can enable the use of custom shape types. When enabled, the Shape drop-down list of the Properties of Hole Request dialog includes an additional hole shape: Custom. Selecting this shape type hides the dimension fields and displays the Pick Trigger for Custom Shape button. Using this button, you can select a model object that intersects with the target plate, to be used as the trigger object.
The dialog does not display hole dimensions or a shape preview; it only indicates whether a trigger object is selected. The hole shape includes no extra margin, so you may need to manually adjust its boundary to accommodate the trigger object. Use the Edit Shape command to modify the embedded GDL defining the hole shape.

Activate Hole Requests
In the Hole Manager dialog, click Activate Holes to open the Activate Hole Requests dialog.
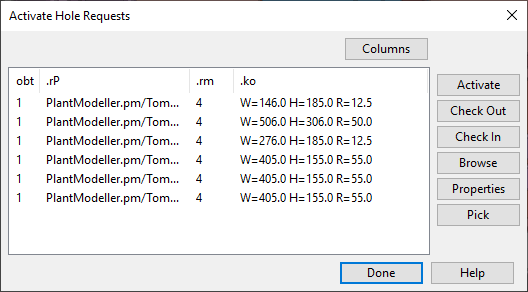
This dialog lists applicable Plant Modeller objects that intersect a hull structure (such as a bulkhead or deck plate) but do not yet have a hole request.
Criteria for listing objects in this dialog:
-
Equipment – The component model includes a node with primary face type 'Hole' (DM_CT_HOLE).
-
Standard Component – The component model's geometry type is DM_GT_2P, DM_GT_ASYMCURVE, DM_GT_FIXCURVE, DM_GT_FLEXCOMP, or DM_GT_PENETR, and dimension table includes the 'PlHoleDia' dimension attribute.
-
Piping Part – The component model's geometry type is DM_GT_2P, DM_GT_ASYMCURVE, DM_GT_FIXCURVE, DM_GT_FLEXCOMP, or DM_GT_PENETR, and dimension table includes the 'PlHoleDia' dimension attribute.
Tip: You can exclude a specific object from the list by adding the 'Ignore PlHoleDia' (.Lj) attribute to the object.
In the Activate Hole Requests dialog, you can create hole requests for the listed objects as follows:
-
Select the objects from the list or use Pick.
-
Click Check Out.
-
Click Activate. The Properties of Hole Request dialog opens for defining the properties, once per request to activate.
Retarget hole requests
Hole requests that have no target, have an incorrect target, or do not collide with the target must be retargeted so they are properly associated with the intended target plate.
Opening the Hole Manager dialog automatically retargets hole requests that are checked out to you and require retargeting. First, the process tries to find a matching hole node in the area model. If that fails, it then attempts to locate the target object using collision detection. In some cases, collision detection finds more than one potential target, and you must select the correct target manually. If you cancel automatic retargeting during the process, any hole requests that were successfully retargeted remain retargeted.
In the Hole Manager dialog, the Retarget button opens the Retarget hole requests dialog, which lists hole requests that still require retargeting. The reason the previous retargeting has failed—such as Could not find target, Multiple targets found, or No collision with target—appears in the Problem column.
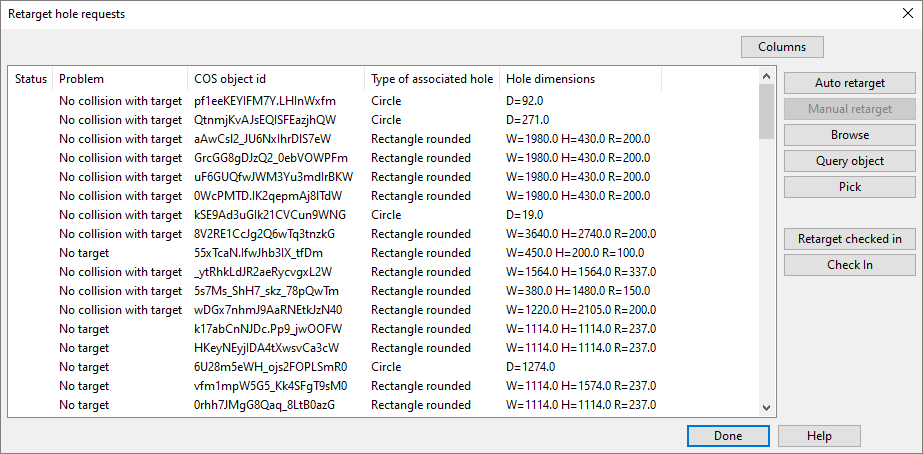
In the Retarget hole requests dialog, you can perform automatic or manual retargeting for hole requests checked out to you, and automatic retargeting for hole requests that are checked in. Use the tools described below to resolve the listed problems, if possible. Successfully retargeted hole requests are removed from the list.
|
Action |
Description |
|---|---|
|
Attempts to automatically assign a target object for the selected hole requests. |
|
|
Allows you to manually assign a target object for the selected hole requests. |
|
|
Shows where the selected hole request is in the 3D model. |
|
|
Allows you to pick an object from the 3D model and then shows its properties in the Object properties dialog. |
|
|
Allows you to pick a hole request from the model and then highlights that hole request in the list. |
|
|
Attempts to automatically assign a target object for checked-in hole requests. This operation checks out all hole requests and runs automatic retargeting. Hole requests that fail the automatic retargeting are left checked out and shown in the list, so that you can retarget and check them in manually. |
|
|
Checks in the selected hole requests and removes them from the retargeting list. |