Objects from/to file

On the Modify tab, the Objects from/to file group contains tools for copying diagram objects such as pump units from one diagram to another. This is useful when the same object set is used in several diagrams. You can transfer objects within the same project or between different projects, either including the user-defined object data or with default values.
You can also import an entire diagram from a DEXPI XML file and export objects to a DEXPI XML file.
Import
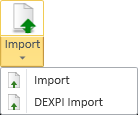
Import
Perform the following to import diagram objects from a file. The importer can run a script that modifies the import data, for example in the case that the data file has been exported from a different project and there are values that must be replaced.
Prerequisites
-
CADMATIC diagram export file (.cde).
-
Optionally, a script source file (*.mac) or script binary file (.bs) for additional processing of the import data.
Do the following:
-
On the Modify tab, select Import > Import. The Script file dialog opens.
-
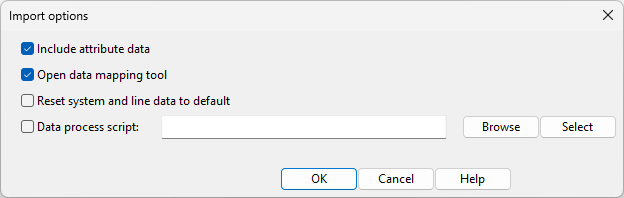
Select the .cde file and click Open. The Import options dialog opens.
-
Select the relevant options:
-
Include attribute data – Select this to import attributes.
-
Open data mapping tool – Select this to open a data mapping tool during the import.
-
Reset system and line data to default – Select this to import the data so that System and Line information is set to default values.
-
Data process script – You can select to run a script from a local file (Browse) or from the project environment (Select) to modify the import data.
Then click OK. The imported objects are displayed in the diagram.
-
-
Move the objects to the location where you want them to be placed. Then click to accept the location.
-
If you chose to display the data mapping tool, the Import objects dialog opens, listing the contents of the import file. Perform the required actions, and then click OK to accept the mappings.
 Show/hide details
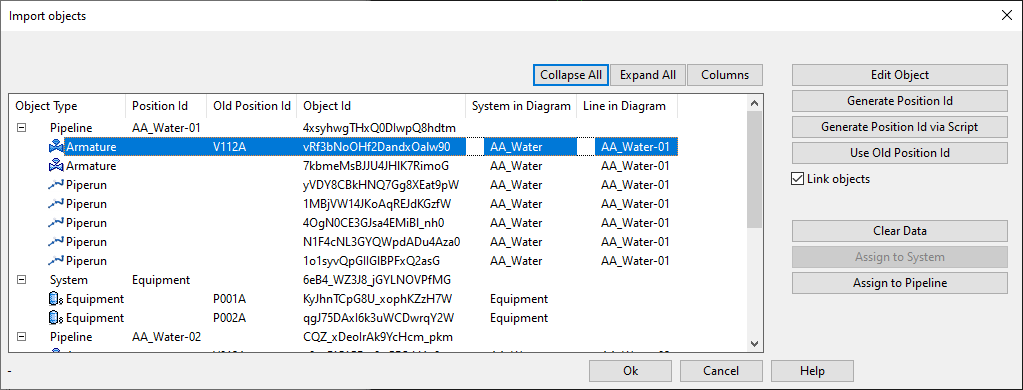
In the Import objects dialog, you can allow each object to be imported using the data in the import file. Alternatively, you can select particular objects from the list (hold down Shift or Ctrl to multi-select) and change their import settings with the buttons on the right. You can, for example, generate new position IDs for the imported objects, or you can set the imported objects to use their old IDs, if 'PosIdOld' values are defined in the import file.
-
Edit Object – Opens the database editor of the selected object. You can, for example, link the imported object to an existing position ID, as described in Edit object data.
-
Generate Position Id – Generates a new position ID for the selected objects.
-
Generate Position Id via Script – Runs a custom script to generate a new position ID for the selected objects. The button is enabled if the project contains a script by the name get_posid.
-
Use Old Position Id – Assigns the value from the 'Old Position Id' column of the selected objects to the 'Position Id' column.
-
Link objects – If selected and the same position ID already exists in the project, the imported object is linked to the existing object.
-
Clear Data – Removes the database data from the selected objects.
-
Assign to System – Opens the object browser for selecting a System for the selected objects.
-
Assign to Line / Assign to Pipeline / Assign to Tag / Assign to Circuit – Opens the object browser for selecting a Line, Pipeline, Instrument Tag, or Electrical Circuit (as applicable) for the selected objects.
-
DEXPI Import
You can import a P&I diagram from a DEXPI (*.xml) file, one file at a time. The import creates a new P&I diagram that has the Pipelines, Instrument Tags, and attribute data defined in the DEXPI file.
Attribute values can be imported to either SQL fields or COS attributes.
Nominal size values that are defined in DEXPI as inches are converted in import to millimeters, if the project is using millimeters as nominal size units.
Graphics are imported as custom diagram objects that are assigned to object types (according to SQL main tables and sub-tables) based on mapped menu item data and DEXPI class.
Systems cannot be imported directly from the DEXPI file. However, DEXPI mappings allow System assignment to be taken from the attributes of the imported object. Moreover, pipelines and instrument tags are imported from the DEXPI file, and if the pipeline already exists in CADMATIC, the imported object is automatically mapped to the System of the pipeline.
Prerequisites
-
DEXPI XML file (version 1.3).
-
P&ID does not already contain a diagram by the same name.
-
Project administrator has created a DEXPI mappings configuration. The configuration can define an object class and a System for each different kind of diagram object to be imported, as well as attribute mappings that allow DEXPI attribute data to be imported to the SQL database or to COS.
Tip: The mapping configuration object must exist before the first import, but the configuration can still be empty. When importing a DEXPI file, you can see which DEXPI types require mapping, and you can add new mappings to the configuration one import file at a time.
-
To import labels as Label Definitions, your user profile must have the required permissions:
-
Your user profile allows creating of Labeling Styles.
When you import labels as Label Definitions, the importer creates a Labeling Style called 'DEXPI_labeling_style' if it does not already exist. (This is a one-time operation.)
-
Your user profile allows creating of Label Definitions.
When you import labels as Label Definitions, the importer creates a Label Definition for the labels that do not already have one and assigns them to 'DEXPI_labeling_style'.
-
-
To import files that contain instruments, your user profile must have the required permissions:
-
Your user profile allows creating of 2D Symbols.
When you import instruments, the importer creates a special 2D Symbol called 'dexpi_instrument' if it does not already exist. (This is a one-time operation.)
-
Do the following:
-
On the Modify tab, in the Objects from/to file group, select Import > DEXPI Import. The DEXPI Import dialog opens.
-
In the DEXPI mapping field, select the mapping configuration to use for this import.
-
In the DEXPI file field, click Browse and select the XML file to be imported.
Show/hide details
The Selected file pane shows the importable entities.
-
Entities without a MenuItmData mapping (but require one to be imported) appear in bold.
-
Entities that have unmapped DEXPI attributes show the number of unmapped attributes in parentheses.
-
-
Make sure that all objects to import as diagram objects are mapped to the target System.
Show/hide details
-
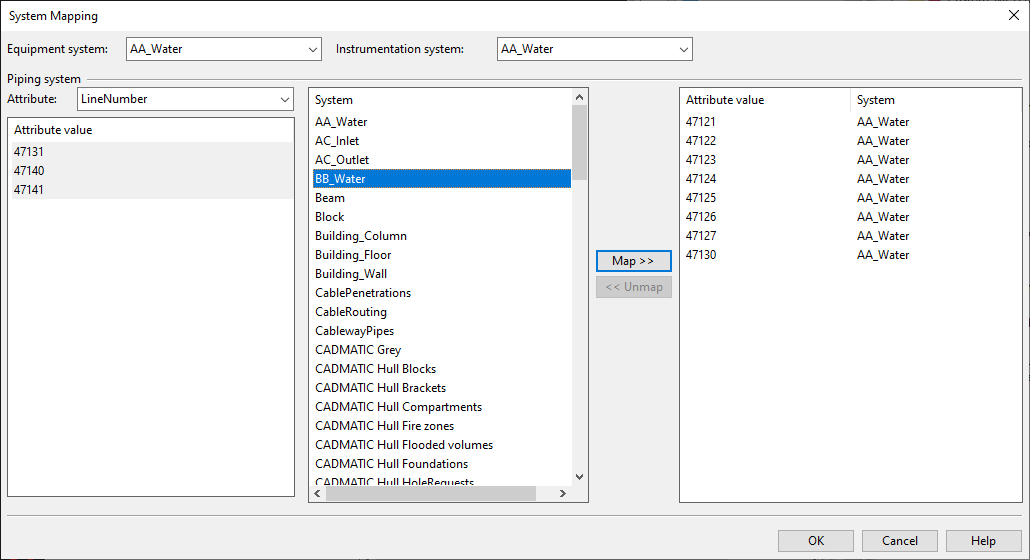
Click Map systems. The System Mapping dialog opens.
-
Equipment system – Select one System for all imported equipment.
-
Instrumentation system – Select one System for all imported instruments.
-
Piping system – Define how an imported piping part is assigned to a System based on its DEXPI attributes:
-
In the Attribute field, select a suitable 'PipingNetworkSystem' attribute from the drop-down list.
The values that the selected DEXPI attribute has in the import data are listed in the attribute value pane.
-
Hold down Ctrl or Shift and select the attribute values that you want to map to a specific System.
-
Select the target System.
-
Click Map. The mapping is displayed in the pane on the right.
-
-
Accept the System mappings by clicking OK.
-
-
Specify the general import options:
-
Include unmapped objects as drafting graphics – Select this option to import all unmapped DEXPI objects as drafting objects that you can edit later with the tools on the Drafting tab.
-
Get prefix for MenuItmData from object templates – Select this option to copy both the position ID prefix and the lookup key from the Menu Item Data fields of the Diagram Object Template selected in step 6 and combine them into a single value in the format <prefix>%<lookupkey> in the MenuItmData field of the imported object. If not selected, only the lookup key is copied.
Show/hide example
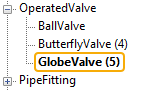
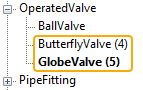
For example, if an imported DEXPI object is mapped to the 'Ball valve' template, the MenuItmData value is:
-
V%D2429T2.7.1.05, if the Get prefix… option is selected.
-
D2429T2.7.1.05, if the Get prefix… option is not selected.
-
-
Import labels as – Select how to import labels for objects other than instruments:
-
Drafting text – Select this option to import labels as editable drafting text.
-
Label definition – Select this option to import labels as Label Definitions. If your user profile is not allowed to create Label Definitions, the importer tries to find an existing Label Definition that could be used instead, and notifies you if it finds one.
-
Project default – Select this option to use the default Label Definitions of the project.
-
Exclude – Select this option to ignore labels in import.
-
-
Scale – Specify the scale for imported diagram symbols.
-
-
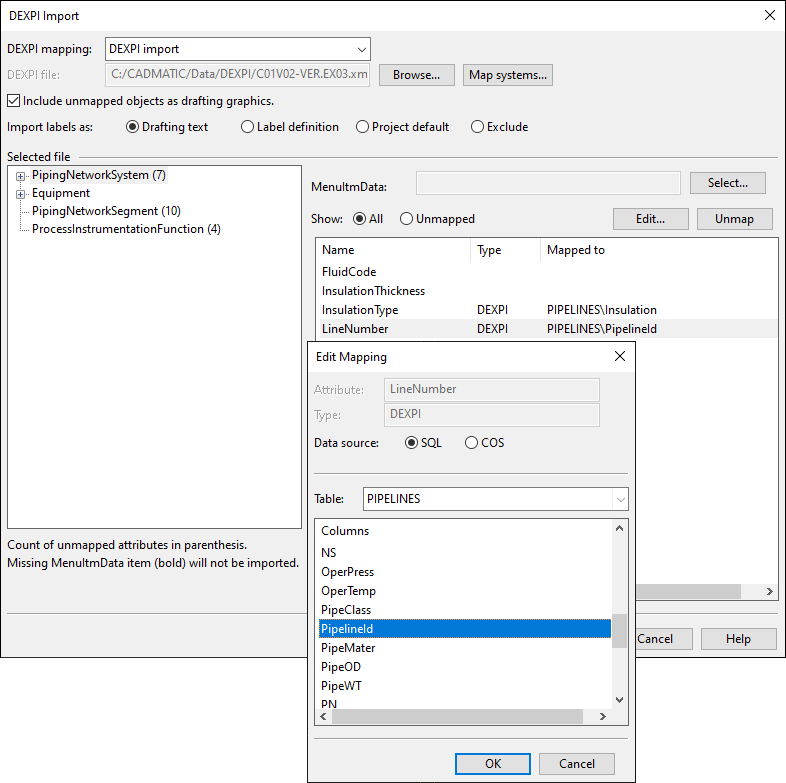
Specify MenuItmData mappings for entities with data to import to a specific sub-table in the SQL database.
Show/hide details
-
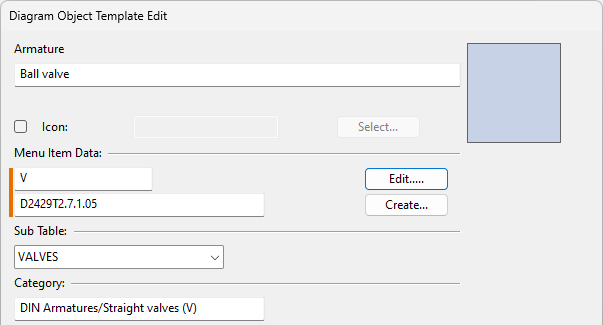
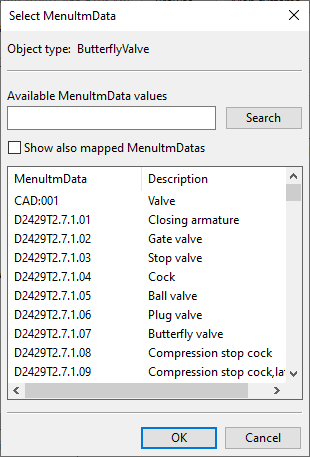
In the PipingComponent category, you can map a DEXPI object type to a MenuItmData value that refers to a Diagram Object Template whose type is Armature.
-
In the Equipment category, you can map a DEXPI object type to a MenuItmData value that refers to a Diagram Object Template whose type is Equipment.
To define a MenuItmData mapping, click Select and select the appropriate item from the list.
-
-
Specify attribute mappings for the entities to import by selecting the DEXPI attribute and clicking Edit.
Show/hide details
-
PipingNetworkSystem – You can map DEXPI 'PipingNetworkSystem' attributes to SQL or COS attributes that relate to pipelines. Click Edit to modify or Unmap to remove the selected mapping.
-
Equipment – You can map DEXPI 'Equipment' attributes to SQL or COS attributes that relate to equipment.
-
PipingNetworkSegment – You can map DEXPI 'PipingNetworkSegment' attributes to SQL or COS attributes that relate to piping parts.
-
MetaData – You can map DEXPI 'MetaData' attributes to SQL or COS attributes that relate to diagram documents. (MetaData is one of the basic objects in the DEXPI information model that are not specific for equipment, piping, or instrumentation.)
-
PlantStructureItem – You can map DEXPI 'PlantStructureItem' attributes to SQL or COS attributes that relate to diagram documents.
Important: If both a MetaData attribute and a PlantStructureItem attribute are mapped to the same document attribute, the PlantStructureItem attribute value overwrites the MetaData attribute value.
-
ProcessInstrumentationFunction – You can map DEXPI 'ProcessInstrumentationFunction' attributes to SQL or COS attributes.
-
Nozzle – You can select one 2D symbol ('Type of node symbol = Nozzle') to represent nozzles defined in DEXPI data. Click Select to choose the 2D symbol using the Select node symbol dialog; click Unmap to remove the current mapping.
-
ControlledActuator – You can map actuator-related DEXPI attributes to suitable 2D symbols ('Type of node symbol = Actuator'). Click Map to add or remove mappings using the Node Symbol Mapping dialog.
-
-
Make sure that all the required mappings are done, and click OK to import the file.
-
If you changed the mappings, you are prompted whether to save the changes.
-
If you select Yes, the new mappings are saved in the DEXPI Mappings configuration.
-
If you select No, the mappings are used for this import but then no longer available in future imports.
-
-
If there were any problems, you are prompted whether to create a report. If you select Yes, you can specify a saving location for the report file (*.csv).
Export
Export
Perform the following to export one or more diagram objects to a CADMATIC diagram export (.cde) file.
Do the following:
-
On the Modify tab, select how to export:
- Export – Select this to export objects with their user-defined data.
- Export with Default Values – Select this to export objects with default data.
-
Pick the objects to be exported, and press Enter to accept the set.
-
Pick an origin point for the objects.
Note: In file import, you can use the exported base point or change the base point, as required.
-
In the Name of the export file dialog, specify a file name and saving location for the .cde file, and click Save.
The objects in the export file contain either the data from the specified diagram or default object data, as you specified. In file import, you can import this data as is or edit the data, as required.
Note: You can add the exported file to a custom menu to easily import the same object set to multiple diagrams. If copying between different projects, the menu item data has to match.
DEXPI Export
You can export diagram objects to a DEXPI (*.xml) file that uses version 1.3 of the DEXPI format.
The export file contains all those objects in the active diagram whose MenuItmData database field has been mapped to a DEXPI type in the DEXPI Mappings configuration; also other SQL fields as well as COS attributes can be mapped to a DEXPI type. Instruments are automatically assigned to the 'ProcessInstrumentationFunction' DEXPI type.
Prerequisites
-
Project administrator has defined suitable DEXPI mappings.
-
Node directions have been set in connection lines of type 'iline'. This allows the program to determine their correct DEXPI type.
Do the following:
-
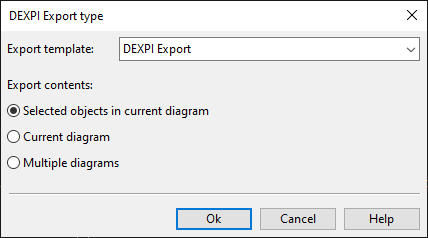
On the Modify tab, in the Objects from/to file group, select Export > DEXPI Export. The DEXPI Export type dialog opens.
-
Select the export options:
-
Export template – Select the DEXPI Mappings configuration to use for the export.
-
Export contents
-
Selected objects in current diagram – Select this to export a set of objects from the active diagram.
-
Current diagram – Select this to export the active diagram.
-
Multiple diagrams – Select this to export one or more diagrams that you select from an object browser dialog (the active diagram does not have to be included).
-
Then click Ok.
-
-
If you chose to export selected objects from the current diagram, select the set of objects to be exported and press Enter.
-
If you chose to export multiple diagrams, an object browser dialog opens. Hold down Ctrl or Shift and select the diagrams you want to include in the export, and then click OK.
-
Specify the export location:
-
If exporting a single diagram, specify the file name and export folder, and click Save.
-
If exporting multiple diagrams, select the export folder and click Select Folder.
The DEXPI file or files are exported to the specified location.
-