Manage linked objects
There are situations where a certain object (such as main engine or vessel) needs to be shown in several different diagrams, or more than once in the same diagram, so that all instances of that object use the same Position ID.
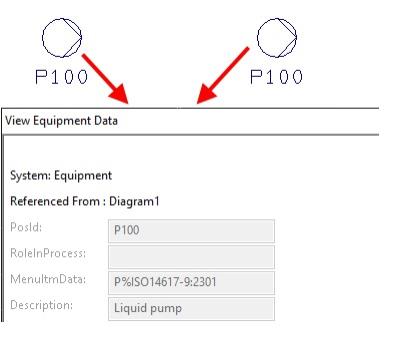
In the P&ID application, the objects that use the same Position ID are linked to the same database record that gives the objects their properties, and therefore their object type must be the same. Their symbols, however, can be different.
Linking objects
You can assign the same Position ID to multiple diagram objects by linking those objects to each other. You can do the linking in the database card of the object, for example, when inserting a new object, importing an object, or making a copy of an existing object.
Note that linking an object to an existing Position ID is not possible in the following situations:
-
When the object types do not match.
-
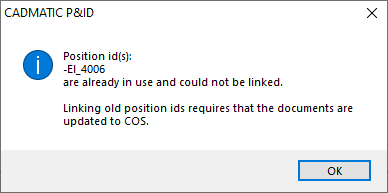
When the Position ID has been created in another diagram but that diagram has not yet been updated to COS. In this situation, you can create the object without a Position ID and link the objects once the other diagram has been checked in.
Insert and link | Copy and link | Import and link
Insert and link
-
Use the Template Pane to insert a new object. The Edit <object> Data dialog opens.
-
A new ID has been generated for the object. Click Link Object and link the object to the required Position ID, as described in Select Linked Object.
Copy and link
-
Select Home tab > Modify group > Copy > Copy with data.
-
Pick the object to be copied and drop it in the required location. The Edit <object> Data dialog opens.
-
A new ID has been generated for the object. Click Link Object and link the object to the required Position ID, as described in Select Linked Object.
Import and link
-
Select Import & Export tab > Objects from/to file group > Import > Import.
-
Import the required objects as described in Objects from/to file. In the import dialog, you can select to use the objects' old IDs if those are present in the export file, or you can link objects to existing Position IDs, as described in Select Linked Object.
Finding linked objects
You can easily check which objects are linked (that is, have the same Position ID). The linked objects can be in the same diagram or in different diagrams.
-
To show linked objects in different colors, select Home > Show > Colors > By Linked Object.
-
To temporarily highlight linked objects, select Data > Objects > Find > Highlight linked objects.
-
To see which diagrams contain instances of a linked object, pick one such object from the active diagram, right-click the diagram, and select Browse > View diagrams of linked object from the context menu. A dialog opens, listing the associated diagrams.
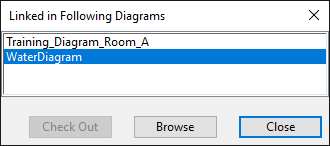
- Check Out – Checks out the selected diagram, opens it in Edit mode, and zooms to the linked object.
- Browse – Opens the selected diagram in Browse mode and zooms to the linked object.
- Close – Closes the diagram list.
Editing linked objects
You can edit the data of linked objects via one linked object at a time—it is not possible to edit linked objects in two different diagrams at the same time. The application remembers in which diagram the data was last edited, but if the latest changes are updated to COS and the diagram is checked in, you can start editing the data from a linked object in another diagram.
When working in a distributed project, you can edit linked objects within one project site in any diagram that contains these objects. It is not possible to edit linked objects between a replica and the master.
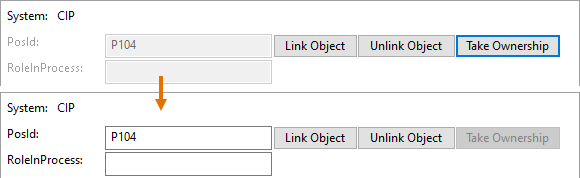
To edit a linked object, select Data > Objects > Data editor > Single object and then pick the object. The Edit <object> Data dialog opens. Now, if the object is linked and the data fields are disabled, the ownership is in another diagram, and you must click Take Ownership to be able to edit the values in this diagram.

Example
The picture below shows two diagrams: 'Electrical' and 'Motor'. The objects in these diagrams are partly the same and thus linked to the same Position IDs.

The objects were last edited in the diagram 'Electrical', and the changes were updated to COS.
-
If you are working in 'Electrical', the value fields are enabled and you can edit them.
-
If you are working in 'Motor', the value fields are disabled and you must decide how to proceed.
-
You can click Take Ownership to transfer the ownership to the 'Motor' diagram. The objects stay linked and you can edit the shared data in this diagram.
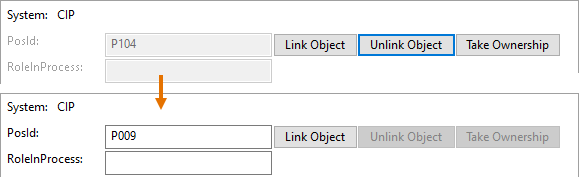
-
You can click Unlink Object to break the link. The program automatically generates a new PosId for the object you are editing.
-