Prefabrication
On the Ducting tab, the Prefabrication group contains tools for defining duct spools and creating documentation for spool prefabrication.

Spools
Select Spools > Spools to manage the duct spools of the project in the Spools and Spool Batches containment browser.
Spools (pick target)
Select Spools > Spools (pick target), pick a duct spool from a work view, and then accept the selection to manage the picked duct spool in the Spools and Spool Batches containment browser.
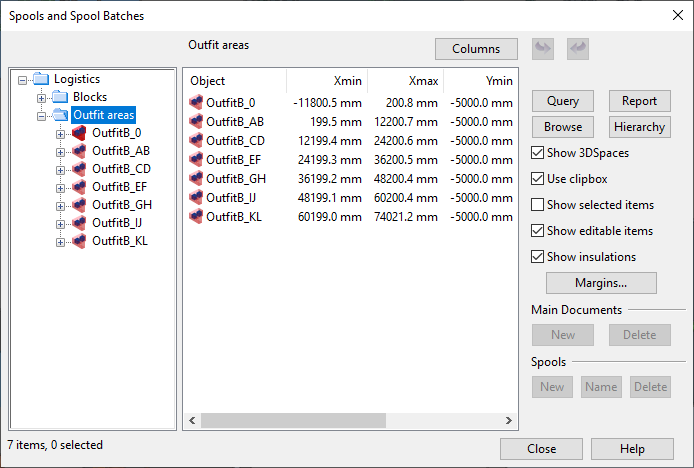
Spools and Spool Batches
Use the Spools and Spool Batches containment browser to create, edit, and delete duct spools, and to assign duct spools to duct main documents.
-
The tree on the left shows the logistics hierarchy of the project.
-
The object list in the middle shows the objects of the currently selected hierarchy. Click Columns to select which columns to show in this pane.
-
The buttons and options on the right allow managing main documents and spools:
Query – Allows picking an object and then shows its properties.
Report – Opens a menu for selecting whether to generate a material listing (see Listings) or a custom report using a macro (see Containment browser).
Browse – Opens the object preview for the selected objects.
Hierarchy – Allows picking an object and then navigates to the location of that object in the hierarchical tree.
Options
- Show 3DSpaces – If selected, object preview shows the 3D space that contains the selected objects.
- Use clipbox – If selected, object preview is zoomed so that it shows the 3D space of the selected objects + the user-defined margins.
- Show selected items – If selected, object preview shows only the objects that are selected from the object list. If not selected, object preview shows everything that is included in the node selected from the tree.
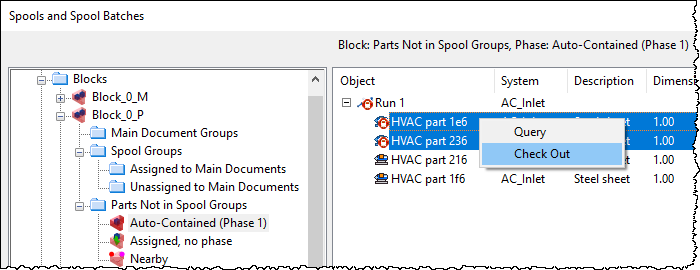
- Show editable items – If selected, only objects that are checked out to you are listed. If not selected, objects that are not editable in your area display a lock icon. You can check out objects by right-clicking the object in the object list and selecting Check Out from the context menu.
- Show insulations – If selected, the object preview shows insulation.
Margins – Allows defining the min/max margins for including objects that are at least partially outside the designated containment. If an X, Y or Z value is set to zero, objects must be completely inside the containment in the direction that the value specifies.
Main Documents
New – Allows creating a new, empty main document in the "Main Document Groups" node you have selected from the tree.
Delete – Deletes the main documents you have selected from the object list and the related spool groups.
Spools
New – Allows creating a new, empty spool group in the "Spool Groups" node you have selected from the tree.
Name – Allows renumbering the spools you have selected from the object list of a main document. You are prompted to specify the number from which to start the new sequence.
Delete – Deletes the spool groups you have selected from the object list.
Creating duct spools
Perform the following to define which duct parts in the model should be prefabricated as duct spools.
Prerequisites
-
Project administrator has defined whether duct spools can only contain air ducts, or whether also other object types such as supporting beams or inspection hatches can be included in duct spools. See Duct Spool.
-
Project administrator has defined duct spool drawing settings for your site in File > Options > Shared Settings > Documents > Duct Spool Drawing.
-
You have published the containments of the duct parts as object data, as described in Containment setup.
Do the following:
-
Select the Ducting tab > Prefabrication group, and then open the Spools and Spool Batches containment browser by doing one of the following:
-
Select Spools > Spools. This will require you to manually navigate to the containment of the required duct parts.
-
Select Spools > Spools (pick target), pick one of the duct parts to include in the spool, and then press Enter. This method selects the correct containment and automatically navigates to the node that contains the picked part.
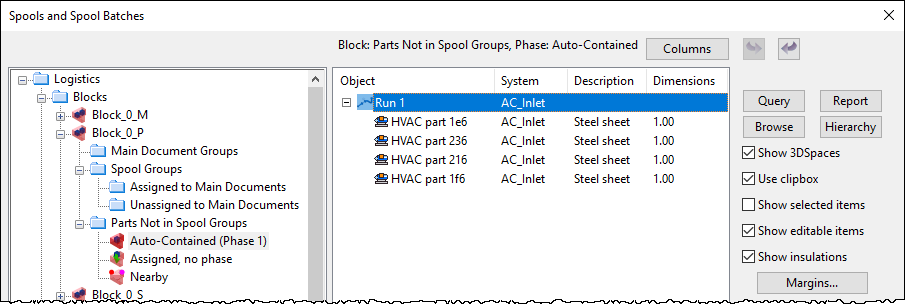
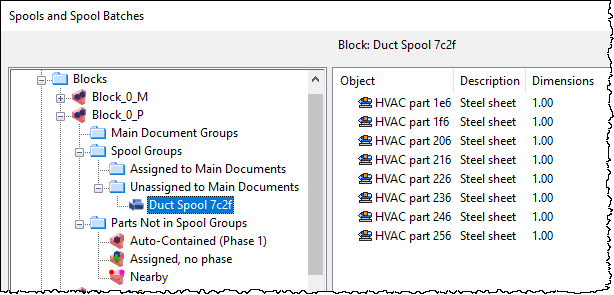
In this example, Block_0_P contains one editable duct run, and it consists of four HVAC parts that do not belong to any spools yet, so they are shown as being "auto-contained" in this space:
-
-
You can view the objects of a specific containment in object preview that uses color to indicate the relationships of the active 3D space and the objects in it.
 Show/hide details
That is, when you select a containment from the containment browser, a separate view opens showing the 3D space and the contained objects. If you close this view, you can re-open it by clicking Browse.
You can set the options on the right to change the object preview as required, as described in Spools and Spool Batches.
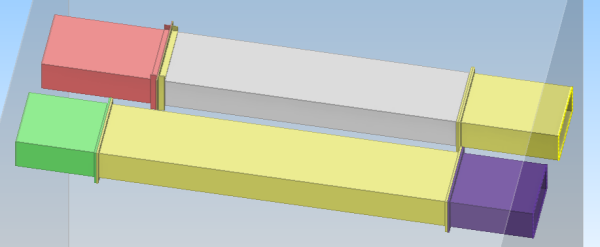
Object preview shows objects in colors that indicate their status:
-
Selected objects are highlighted.
-
Yellow objects are implicitly contained in this space, meaning that they are completely or mostly inside it, and not contained in any other 3D space that might exist in the same location.
-
Purple objects are implicitly contained in another space, meaning that they are mostly inside that other space.
-
Green objects are explicitly assigned by the user to this space.
-
Red objects are explicitly assigned to another space.
-
-
You can create spools by selecting the required duct parts with the containment browser.
Show/hide details
-
In the hierarchical tree, navigate to the required containment.
Alternatively, click Hierarchy, pick an object from the model, and then press Enter to navigate to the containment of the picked object.
-
If you want the object list to show checked-in objects, clear the option Show editable objects. Then objects that are checked in are listed, but display a lock icon to indicate that you cannot edit them. You can use the Check Out context-menu command to check out such parts.
-
Select the required duct parts from the object list. You can select whole runs or individual duct objects.
-
Right-click the "Spool Groups" node of the containment and select whether to create one spool or multiple spools:
- Select Create One Spool from Selected Items to add the selected parts to a single spool.
- Select Create Spools from Selected Items to make a separate spool from each selected part.
Note: If you selected a duct run node in the previous step, both commands will assign all parts in that node to a single spool.
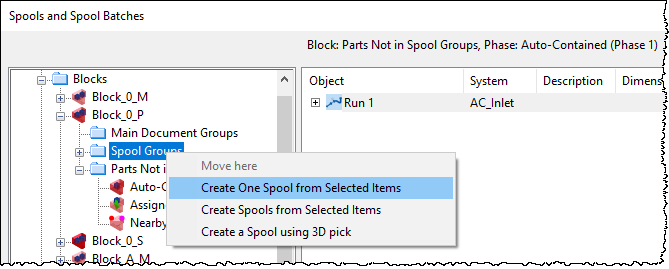
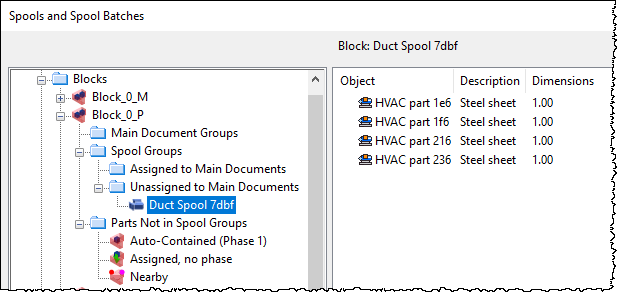
The created spools are shown in the "Unassigned to Main Documents" node.
-
-
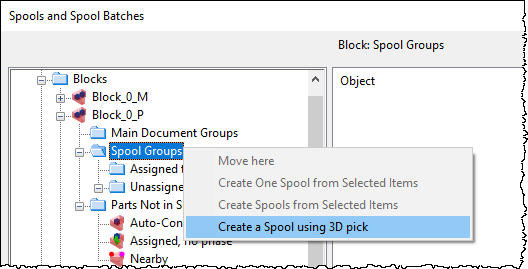
You can create a spool by selecting the required, checked-out duct parts with 3D pick.
Show/hide details
-
In the hierarchical tree, right-click the "Spool Groups" node of the required containment and select Create a Spool using 3D pick.
-
Pick the required parts from the 3D model, and then press Enter.
The created spool is shown in the "Unassigned to Main Documents" node.
-
-
You can add parts to an existing spool with the containment browser.
Show/hide details
- In the object list, select the objects to be added.
- In the hierarchical tree, right-click the target spool and select Move to this Spool Group. The objects are added to the target spool.
-
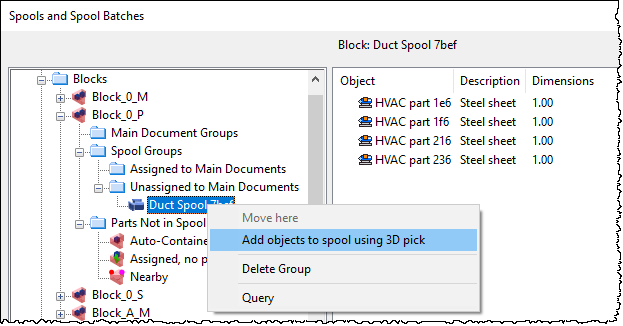
You can add parts to an existing spool with 3D pick.
Show/hide details
-
In the hierarchical tree, right-click the spool and select Add objects to spool using 3D pick.
-
Pick the required objects from the 3D model, and then press Enter. The objects are added to the target spool.
-
After creating the required duct spools, you can assign them to a main document.
Creating a duct main document
Perform the following to create a spool document for the prefabrication process of duct spools.
You can either create an empty main document and then assign spools to it, or you can select spools and then create a main document for those spools.
Prerequisites
- Project contains duct spools.
Do the following:
-
Select the Ducting tab > Prefabrication group, and then one of the following:
-
Select Spools > Spools. This will require you to manually navigate to the containment of the required duct parts.
-
Select Spools > Spools (pick target), pick one of the duct parts to include in the spool, and then press Enter. This method selects the correct containment and automatically navigates to the node that contains the picked part.
The Spools and Spool Batches containment browser opens.
-
-
Create a main document.
-
You can choose to create an empty main document:
-
Select the required "Main Document Groups" node from the hierarchical tree, and then click New in the Main Documents section on the right.
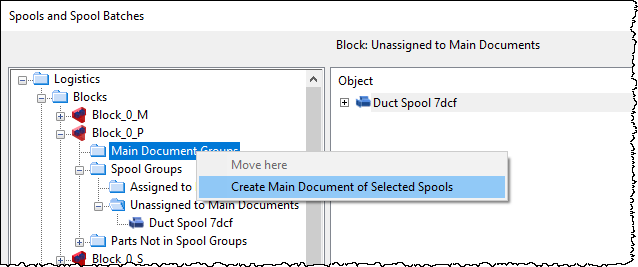
Or, you can choose to create a main document for specific spools:
-
Select the required "Unassigned to Main Documents" node from the hierarchical tree, select the required spools from the object list, right-click the "Main Document Groups" node in the hierarchical tree, and select Create Main Document of Selected Spools.
-
-
The Create New Drawing dialog opens for specifying the drawing properties.
-
Name – Enter a descriptive name for the drawing.
-
ICGD – Displays the ICGD that administrator has specified to be used in spool drawings.
-
Select Attributes - Click to select which attributes to add to the drawing. Fill in the attribute values and click OK.
Click OK to continue.
-
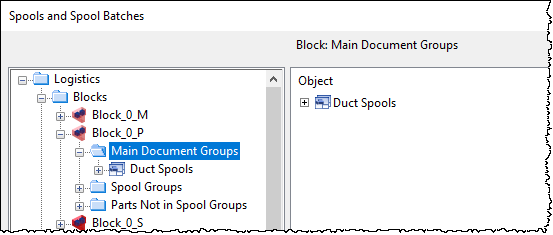
The main document is created and displayed in the "Main Document Groups" node.
-
-
If you created an empty main document, you need to add the required spools to it. You can also add spools to a main document that already contains some spools.
Show/hide details
-
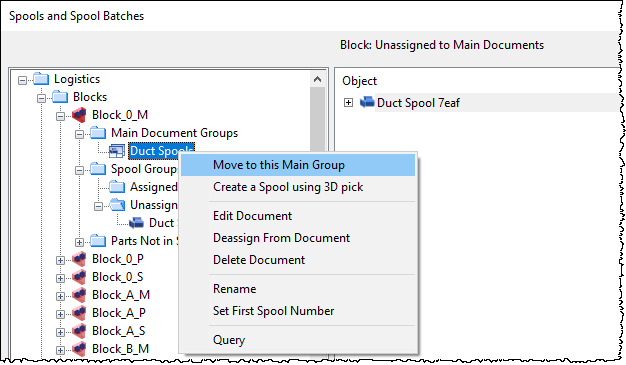
Select the "Unassigned to Main Documents" node from the hierarchy, select the spool from the object list, right-click the target main document, and select Move to This Main Group.
-
- To edit a main document, right-click the document and select Edit Document.

After creating a duct main document, you can create duct spool drawings for it.
Creating duct spool drawings
Perform the following to create duct spool drawings for duct spools assigned to a duct main document and to publish the completed document.
Prerequisites
- Project contains duct spools and duct main documents.
Do the following:
-
Select the Ducting tab > Prefabrication group > Spools > Spools.
-
In the Spools and Spool Batches containment browser, right-click the duct main document and select Edit Document.
-
If you are prompted whether to visit the save point, select Yes to synchronize the objects in your local area model with COS or No if you want to proceed without saving.
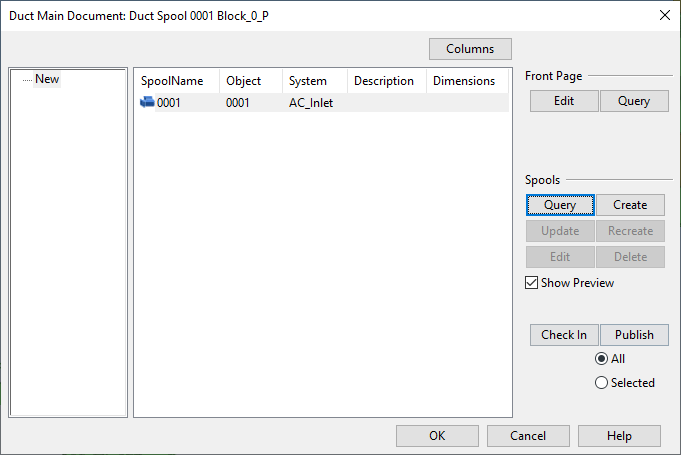
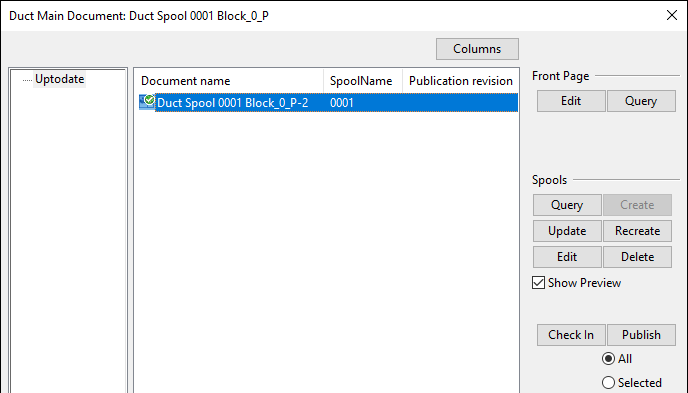
The Duct Main Document dialog opens.
-
Select a category from the left to show the items in that category.
Category
Description
Action
Uptodate
Spool drawing matches the 3D model. (none) New
Spool is assigned to the main document but there is no spool drawing yet.
Create the spool drawing.
Changed
Spool drawing contains an object that has changed in the 3D model.
Recreate the spool drawing.
Deassign
Spool drawing contains an object that has been deassigned from the main document.
Delete the spool drawing and then create a new one.
Delete
Spool drawing contains an object that does not exist in the 3D model anymore.
Delete the spool drawing.
-
Select one or more items from a given category and use the following tools to manage them as required.
Front Page
- Edit – Opens the main document's front page for editing. You can, for example, set it to show the page index and some general data related to the spool drawings. For details, see Document editor.
- Query – Displays the properties of the main document group.
Spools
-
Query – Displays the properties of the selected spool object.
-
Create – Creates a spool drawing for the selected spools and lists them in the Uptodate category.
-
Update – Updates the selected spool drawing to contain the latest changes in the 3D model while preserving your manually edited changes, if possible.
-
Recreate – Completely recreates the selected spool drawing, removing all manually edited changes.
-
Edit – Opens the selected spool drawing for editing. For details, see Document editor.
-
Delete – Deletes the selected spool drawing.
Document
- Check In – Checks in the document's front page and spools.
- Publish – Checks in and publishes the document's front page and spool drawings. You can select whether to publish all items in the Uptodate category or just the selected ones.
-
Click OK to close the Duct Main Document window.