Refrigerator
Copy an electrical device created in the Coordinates exercise into this drawing by using clipboard. This will represent a refrigerator.
Do the following:
- Select File > Open and select ElectricalDevice.drw drawn in the coordinates exercise.
- Select
Home tab > Clipboard group >
 (Copy). Select the electrical
device in the drawing and press Enter.
 - Program asks for the base point. Pick it using temporary object snap:
- Keep Shift key pressed down and right-click. Select Endpoint in the list.
- Move the mouse cursor on the electrical device, near the upper right corner so that you can see the point snapping into the corner. Click the left mouse button.
- Move back to the drawing of this exercise by clicking it's document tab above the drawing area.
- Set the current layer to ELECTRICALDEVICES and the current color to 1 (black).
- Select Home tab > Clipboard group > Paste.
- Pick the insertion point in the upper right corner of the kitchen. Use temporary object snap as earlier.
- Enter 1 as scale factor and 0 as angle.
Stove
Copy the same electric device as a stove.
Do the following:
- Select Home tab > Modify tab > Copy.
- Select the electric device objects and press Enter.
- Pick the left lower corner for the base point using temporary object snap.
- Pick the insertion point in left lower corner of the third cabinet (from left) in upper row. Use temporary object snap.
- End copying by pressing Esc.
Cabinets
First erase the wall behind the cabinet and the refrigerator. Then we'll edit the cabinets.
Do the following:
- Select Home tab > Modify group >
 (Erase).
 - Select the magenta wall and accept erasing by pressing Enter.
- Now fix the gap in the wall by stretching the last cabinet to the refrigerator.
- Select Home tab > Modify group > Stretch.
- Select the whole right side of the cabinet and press Enter.
- Pick the lower right corner of the cabinet as base point for the stretching. Use temporary object snap.
- Pick lower left corner of the refrigerator as the offset point using temporary object snap.
Fix the yellow dashdot line (upper cabinets) to reach the wall above the refrigerator. Line will be stretched using grip edit.
Do the following:
- Set Ortho on either in status bar or by selecting Tools tab > Drawing setting group > Ortho. Set 90 degrees as the ortho angle.
- Select the horizontal line of the upper cabinets.
- You can see grip boxes on the line (on endpoints and in the middle).
- Move the mouse cursor on the box in the right end of the line and click the left mouse button.
- The color of the grip box changes and the endpoint of the line "attaches" to the mouse cursor. Now you can move the endpoint of the line by clicking it (left mouse button) to desired location.
- Set temporary object snap on by selecting object snap mode Nearest.
- Move the mouse cursor on the right side of the refrigerator and click the mouse button. The endpoint of the line will attach to the right side of the refrigerator.
Ortho helps you to keep the line horizontal. Object snap helps you to click the endpoint exactly to he right side of the refrigerator.
Erase the line of the upper cabinets on the stove and chamfer the lines of the upper cabinets.
Do the following:
- Select
Home tab > Modify group >
 Break/join menu > Trim to closest intersections.
 - Select the yellow dashdot line above the stove.
- Select Home tab > Modify group >
 Fillet menu > Chamfer and fillet settings.
 - Enter value 300 for both Chamfer distances and click OK.
- Select Home tab > Modify group >
 Fillet menu > Chamfer.
 - Pick (using mouse) the horizontal and vertical dashdot lines of the upper cabinets.
Kitchen sinks
Now fillet the corners of the kitchen sinks.
Do the following:
- Select Home tab > Modify group >
 Fillet menu > Chamfer and fillet settings.
 - Enter value 50 for Fillet radius and click OK.
- Select Home tab > Modify group > Fillet.
Fillet command fillets corners between lines, arc and polylines. The drawn kitchen sink is a polyline, so it's corners can be filleted at once by using keyword Polyline. All corners in a polyline can be filleted at once by entering a keyword Polyline before selecting objects. The possible keyword of a command can always be seen on the command line in brackets.
Do the following:
- Select
filleting a polyline by entering P
on the command line and press Enter.
There is no need to type the whole keyword on the command line - type characters until it matches to only one keyword. - Select the kitchen sink to fillet by clicking it.
- Fillet the other sink the same way.
Kitchen chairs
Let's copy the chair using mirroring.
Do the following:
- Select Home tab > Modify group > Mirrors
- Select the objects that represent the chair. Press Enter.
- When functions asks "Erase current:", answer No.
- Pick the center point of the table as the start point of the mirroring line. Use temporary object snap mode Center.
- Pick the endpoint of the mirroring line downwards so that the line is vertical. It is easy because the ortho is on.
- The functions asks "Erase current:", answer No.
The mirror command asks for a mirroring line. That is a line where an imaginary mirror is. The mirroring line is not drawn in the drawing.
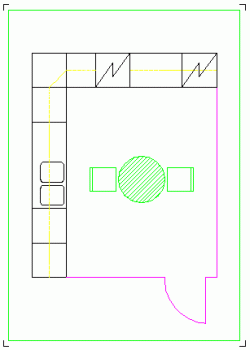
The exercise drawing should now look like this:

 Previous Previous |
Next

|