|
|
Layout tab > 3D and view group > Export to IFC |
|
|
File > Import / Export > Export to IFC |
With this function, you can create IFC (Industry Foundation Classes) model files. You have several export options: for example, you can export all 3D parts from the selected storeys and buildings defined in the storey settings to one IFC file, or the storeys of a selected building into separate IFC files. You can also generate the 3D objects automatically when you create the files.
The program exports all electric parts that have 3D symbols or 3D holes. The program only exports symbols that you have generated with the Generate 3D function on the program.
The program exports the following information to an IFC file:
-
Cableways (cable trunkings/cableways, luminaire suspension rails, contact rails)
-
Electrical outlets (plug sockets, tele-outlets, AV outlets)
The program exports the 3D parts to the right absolute elevation in the 3D model based on the storey settings and symbol elevation. For more information, see Manage storey settings.
Learn more:
Define the IFC file for export
Do the following:
-
In Basic settings, select the export style:
-
If you want to export all buildings into their own files, select the first export option and then select All to separate files from the Building drop-down menu.
-
If you want to export each storey in a building to a separate file, select the first export option. Then select the desired building from the Building drop-down menu, and All to separate files from the Storey drop-down menu. You can also select a planning area. The program names the file after the names of the building, the storey, and an optional planning area (for example, Building1_Storey5_PlanningAreaCableTrays.ifc).
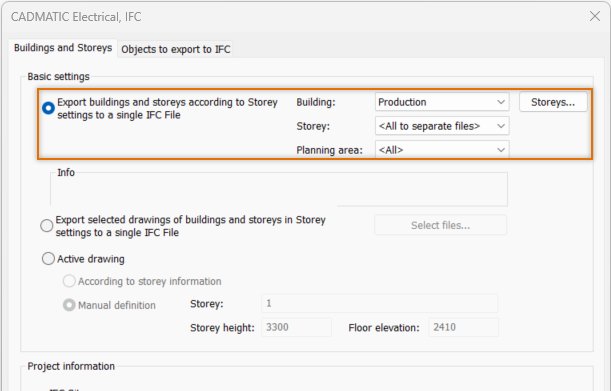
If the selected building has no storeys defined in the storey settings, it is shown in the Info field.
-
If you want to export contents from the active drawing, do the following:
-
Select Active drawing.
-
Select the storey that you want to export either by storey information or by entering the name, height, and floor elevation of the storey.
-
Enter the name and the coordinates of the site. If you have not defined specific coordinates for the site, you can enter 0 as the value.
-
Enter the name and the coordinates of the building. If you have not defined specific coordinates for the building, you can enter 0 as the value. You can also define subterranean floors, such as a basement, by entering the height of the floor as a negative value on the Z coordinate, like -3000.
-
-
-
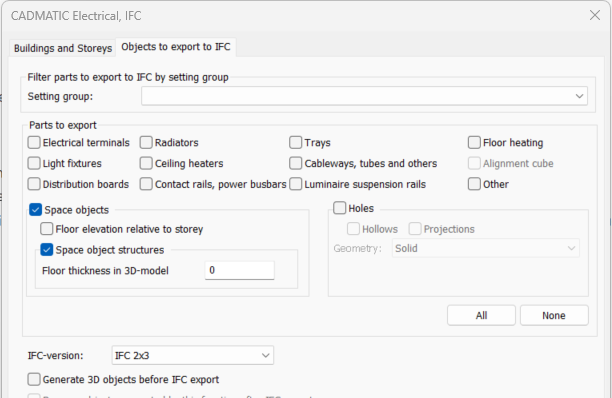
Select the Objects to export to IFC tab.
-
Select the setting group that you want to use to filter parts. For more information, see Handle setting groups.
-
Select the parts that you want to export. The Alignment cube option is disabled if the project has no alignment cube.
-
If you want to export space objects, do the following:
-
Select Space objects.
-
If you have drawn all space objects on the 0 elevation in each floor, select Floor elevation relative to storey so that the program draws them correctly. If you have defined the floor elevation for each space, leave the selection clear.
-
If you want to include the space structures i.e. walls, windows, doors, roof and base floor, in the export, select Space object structures.
-
Enter the floor thickness.
-
-
If you want to export holes, select the types and style of the holes.
-
From the drop-down menu, select the IFC version. If the version you select is different from that set in the project settings, you will be notified as export might not work as should.
-
If you have not generated 3D parts for some of the objects that you want to export, select Generate 3D objects before IFC export.
-
If you selected the previous option, select whether you want to remove the generated 3D objects after the export.
-
If you want to edit the included property sets, select Included Property Sets. For more information, see IFC property sets.
-
Click OK. The Save IFC File As dialog opens.
-
Navigate to the directory where you want to save the file.
-
Enter a name for the file.
-
Click Save.
The program saves the selected parts to an IFC file.

Select IFC property sets for export
Do the following:
-
Select Layout tab > 3D and view group > Export to IFC.
-
Select the Objects to export to IFC tab.
-
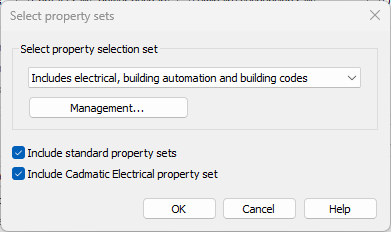
Click Included Property Sets. The Select property sets dialog opens.
-
Select the property selection set you want to include in the IFC file from the drop-down menu.
-
If you want to include the standard IFC sets, select Include standard property sets.
-
If you want to include Electrical set, select Include CADMATIC Electrical property set.
-
Click OK.
By clicking Management, you can add more and edit existing property sets in IFC property selection management.