|
File > Print > Print settings |
If no printer configuration files are found, the application automatically creates one for the Windows default printer. You must add other printers separately if you want to use them for printing.
It is recommended to set the printer most used as the default, so that it will be automatically selected. The default printer is marked with the  icon. You can change the default to another by selecting the desired printer and clicking Set as default.
Define the default settings that will be used when the printer is taken into use. If necessary, these settings can be changed when printing. If you typically print on A4 paper, for example, you should select the A4 paper as the default for the printer. A4 will then always be the default paper used, and you only need to select the paper size when it differs from A4.
Important: Install the Windows printer driver before adding the printer.
Do the following:
-
In the Printer section, click Add. The Select printing device dialog opens listing all available printer drivers.
You can add multiple printer configurations for one Windows printer. This makes it possible to create configurations that use different default settings i.e. different scales or print styles.
-
Select the desired printer, and click OK. The added printer will be named after the Windows driver name, and it can be renamed by clicking Rename.
-
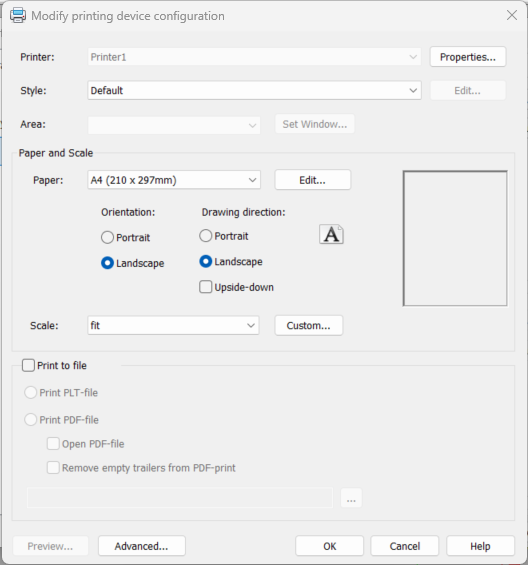
In the Printer section, click Properties. The Modify printing device configuration dialog opens.
-
Define the default settings used when the printer is taken into use. You can change the settings when printing but the changes will not be saved.
-
Area – Define the area of the drawing you want to print.
-
Limits – The print area will be the same as the drawing area of the drawing.
-
View – Either the current view or an earlier saved view of the drawing will be printed.
-
All – The whole drawing with all elements (view is the same shown with Zoom all) will be printed.
-
Window – A rectangle shaped area will be printed. By clicking Set Window, you can define the are in the drawing.
In Design mode, if the drawing is shaded, the only valid printing area setting is the current view. If the perspective is off, the area setting window is also available. In Print mode, all printing area options are valid.
-
-
Paper – Select the paper size (e.g. A4).
-
If suitable paper size is not listed, you can add new paper sizes by clicking Edit.
-
With the Orientation option, you can select to print in either portrait or landscape.
-
The Drawing direction option allows you to define the orientation in which the drawing is traced on the paper sheet. It has no effect on whether the sheet sent to the printer is landscape or portrait. If you want to print the drawing upside down, select Upside-down.
The application can only use the sizes that are defined in Windows' printer drivers. Therefore, a long paper sheet should be defined in the device driver. For more information, see Add a long paper size to a printer and Take paper sizes into use.
-
-
Scale – Define the scale factor to use when printing. You can select a scale from the list between 100:1 and 1:1000.
-
custom – If none of the scales in the drop-down menu suits your needs, you can define a custom scale.
-
fit – The program calculates the correct scale so that the entire selected print area fits to the paper.
-
scale – The scale of the drawing to be printed is based on the SCALE variable.
-
-
Print to file – You can print to a PDF file or PLT file. Enter the name of the print file in the field. You can select the print folder by clicking the
 button next to
the field. The program will automatically add the .plt or .pdf extension.
If no print directory has been defined, the program will print to
the directory defined in the file
settings. If no print directory has been defined, the program will
print to the default application directory.
button next to
the field. The program will automatically add the .plt or .pdf extension.
If no print directory has been defined, the program will print to
the directory defined in the file
settings. If no print directory has been defined, the program will
print to the default application directory.If you select Remove empty trailers from PDF-print, the PDF files are printed without any empty areas if paper size is bigger that drawing size (does not affect when printing sheets or pieces).
For more information, see Create PLT and PDF files by printing.
-
Advanced
-
Copies – Defines how many copies you want to print.
-
Quality – Defines print quality. Options are: High, Medium, Low, Draft and Printer default. Program sends this quality setting to a printer driver and it's affect to printing depends how the driver uses this information. If you choose option Printer default, no quality setting is sent to the driver and the print will be printed using driver's default quality setting.
-
Optimization – Optimization affects to the printing order. Options are: None, Pen sort, Motion + Pen sort. Some printers support motion optimization so that the joints of lines may become smoother. This option is more important when using pen plotters that are very rare nowadays.
-
Offset – By default the drawing is printed on the corner of the paper sheet. With offset you can set the position of the origin. If you check the setting Center, the print will be centered both vertically and horizontally.
-
-
-
Click OK.