Draw wiring
|
|
Schematics tab > Wiring group > Draw wiring |
With this function, you can draw main circuit and control circuit wires using the Wiring window. If necessary, you can also select to draw a cable or a cable package.
When starting the function, the wiring points on symbols (yellow squares) are shown. Wiring point is a point, where a wire or a cable can be connected (like a real terminal of equipment).

Note: Wires should always be drawn from a wiring point to another so that the application can find the right connection information for the wire.
Note: Schematics-specific settings affect the drawing of wires.
You can define the appearance of wiring references in the project settings.
Do the following:
-
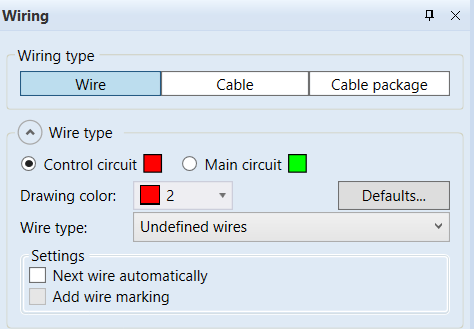
Select to draw either control circuit or main circuit.
-
If desired, select a new color for the wire you are about to draw. After you have drawn the wire, the default color is reset.
You can define the default control circuit and main circuit wire colors in the Electrical settings. By default, the control circuit wire is red, and the main circuit wire is green.
-
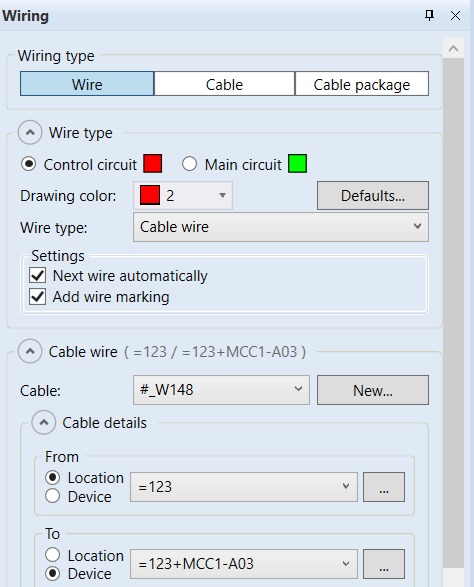
Select the wire type: undefined, internal wire, jumper bar, wire of a wire harness, or cable wire.
-
Define the settings:
-
If you are about to draw an undefined or internal wire, jumper bar or a wire of a wire harness and you want to continue drawing with consecutive numbering, select Next wire automatically. This option is not available for cable wires.
-
If you selected something else than the undefined type and you want the wiring mark to be shown, select Add wire marking. This option is not available for undefined wires.
-
-
If you selected something else than the undefined type, define the other information needed.
For example, if you selected cable wire as the type and you want to define a new cable, click New , enter the ID and then define the From and To information for it:
-
Indicate the start point (wiring point), and draw the wire.
-
If chamfer is needed or you want to draw a straight line, use the Tab key to toggle.
-
If you want to change the starting direction, press Ctrl + <>.
-
You can draw wires over the symbols, because the function knows when to cut the wire.
-
-
End the wire by right-clicking or with Enter. If you end the wire at an empty spot in the drawing, the wiring reference function starts automatically.
-
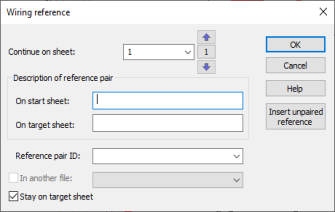
If you ended the wire at an empty spot and the Wiring reference dialog opens, do the following:
-
Define the sheet where to continue wiring.
-
You can move to the next sheet with the
 button or with the PageUp key.
 - You can move to the previous sheet with the
 button or with the PageDown key.
 -
You can select the desired sheet from the drop-down menu.
The sheet changes in the background according to your selection. The Continue on sheet field shows the current sheet. The start sheet is shown between the arrow buttons.
Alternatively, continue wiring in another open drawing by selecting In another file and then the desired drawing from the drop-down menu. The function then marks wiring references to both drawings. The reference contains the number of the drawing where the wiring continues. If no drawing number is defined or it cannot be read from the drawing label, the reference will include the name of the drawing file.
You can also create an unpaired reference with the Draw unpaired reference button. For more information on unpaired references, see Manage unpaired references.
-
-
Enter free-form descriptions for the reference pair to specify where the wiring comes from and where it is going to. If something else than Free text has been selected for Wire: Remote-end description in the wiring reference settings, the fields cannot be edited.
In addition, you can do the following:
-
You can select the wiring reference pair ID from the Reference pair ID drop-down menu.
-
If you select Stay on target sheet, you will stay on the target sheet after wiring is done. Otherwise you will return to the sheet you started from.
-
-
Click OK.
-
If the Schematics-specific setting Show the wiring dialog on modifying is enabled, clicking a wire in the drawing opens the Wiring window.
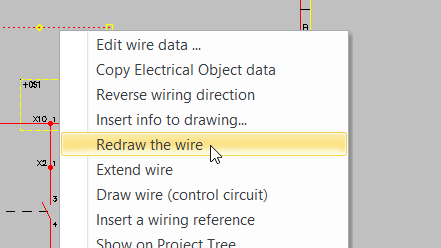
Redraw the wire
You can redraw an existing wire with existing wiring data. In some cases this is easier than editing a complex wiring.
Do the following:
-
Right-click the wire, and select Redraw the wire.
-
Draw the wire in the same way as a normal wire. If the original wire had wire marking, the same marking will be assigned to the redrawn wire.
-
End the wire by right-clicking or with Enter. If you end the wire at an empty spot in the drawing, the wiring reference function starts automatically.
-
If you ended the wire at an empty spot and the Wiring reference dialog opens, do the following:
-
Define the sheet where to continue wiring.
-
You can move to the next sheet with the
button or with the PageUp key. - You can move to the previous sheet with the button or with the PageDown key.
-
You can select the desired sheet from the drop-down menu.
The sheet changes in the background according to your selection. The Continue on sheet field shows the current sheet. The start sheet is shown between the arrow buttons.
Alternatively, continue wiring in another open drawing by selecting In another file and then the desired drawing from the drop-down menu. The function then marks wiring references to both drawings. The reference contains the number of the drawing where the wiring continues. If no drawing number is defined or it cannot be read from the drawing label, the reference will include the name of the drawing file.
You can also create an unpaired reference with the Draw unpaired reference button. For more information on unpaired references, see Manage unpaired references.
-
-
Enter free-form descriptions for the reference pair to specify where the wiring comes from and where it is going to. If something else than Free text has been selected for Wire: Remote-end description in the wiring reference settings, the fields cannot be edited.
In addition, you can do the following:
-
You can select the wiring reference pair ID from the Reference pair ID drop-down menu.
-
If you select Stay on target sheet, you will stay on the target sheet after wiring is done. Otherwise you will return to the sheet you started from.
-
-
Click OK.
-