Link highlighting
Project administrator can define if how links are highlighted in managed documents.
Defining link highlighting
You can specify whether to highlight the links to model objects in managed documents. If the links are highlighted, a specific coloring method can be selected for indicating something about the target of the link; for example, the link color can indicate that the target object is not found in the 3D model, or that the object has a specific Status Tracking value.
Do the following:
-
Navigate to the project to edit, and then click Project Admin in the main menu. The project administration view opens.
-
Click Managed Documents. The Managed Documents Configuration view opens.
-
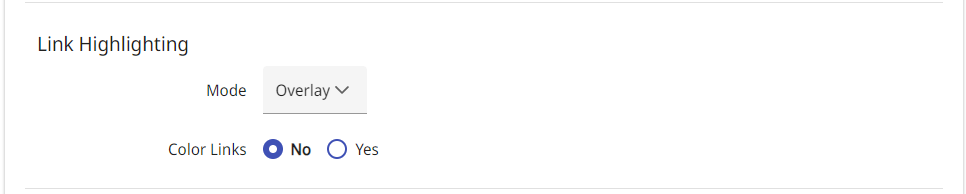
In the Link Highlighting section, specify these settings:
-
Mode – Select the mode to use. If the project contains documents that have a large number of links, some highlighting modes can slow down the speed of browsing the documents, and you should choose the mode based on the expected performance.
 Show/hide details
Mode Description Expected Performance Overlay Links have a transparent overlay. Slowest Underline Links are underlined. Faster Borderline Links have a border around them. Faster Mixed Highlighting varies, depending on what link type has been assigned to each link in the application that publishes the document:
- Symbol links have overlay.
- Label Text links are underlined.
- Default type links are underlined if they fit to a single line, otherwise they have overlay.
Normal None Links have no special indication, but they are still active. Fastest -
Color Links – If set to Yes, in the Link Coloring Configurations you can select links to be colored based on a specific property of the target objects.
If set to No, the highlight color is always blue.
-
In Link Coloring Configurations, specify the following settings:
Show/hide details
Name – Give the coloring configuration a descriptive name. This name is shown also in Document Viewer.
-
Color According to
If set to Model , select a color from the color picker for:
Show/hide details
- Object Found
- Object not Found
- Attribute not Found
- Show Legend – Set to Yes if you want a status color legend to be displayed in the documents.
For information on configuring model attributes, see Attribute settings.
If set to Status Tracking, specify these settings:
Show/hide details
- Used Status Trackers – Select a status tracker from the list.
- No Category – Select a color from the color picker.
- Object not Found – Select a color from the color picker.
- Show Legend – Set to Yes if you want a status color legend to be displayed in the documents.
For more information on status tracking, see Status tracking and object grouping.
If set to Model Attribute Categorization, specify these settings:
Show/hide details
-
Used categorization – Select a categorization from the list. You can add multiple categorizations.
-
No Category – Select a color from the color picker.
-
Object not Found – Select a color from the color picker.
-
Show Legend – Set to Yes if you want a status color legend to be displayed in the documents.
For more information on model attribute categorizations, see Attribute categorization.
If set to Data Source Categorization, specify these settings:
Show/hide details
-
Used categorization – Select a categorization from the list. You can add multiple categorizations.
-
No Category – Select a color from the color picker.
-
Object not Found – Select a color from the color picker.
-
Show Legend – Set to Yes if you want a status color legend to be displayed in the documents.
For more information on data source categorizations, see the documentation of the relevant adapter in Adapters and data sources.
If set to Smart Point, specify these settings:
Show/hide details
-
Used Smart Point Types – Select a smart point type from the list. You can add multiple types.
-
No Category – Select a color from the color picker.
-
Object not Found – Select a color from the color picker.
-
Show Legend – Set to Yes if you want a status color legend to be displayed in the documents.
For more information on Smart Point types, see Smart Point types.
To add a new coloring configuration, click Add new.
-
-
-
Click Save to save the changes.