Report Layout
Production > Reports > Report Layout

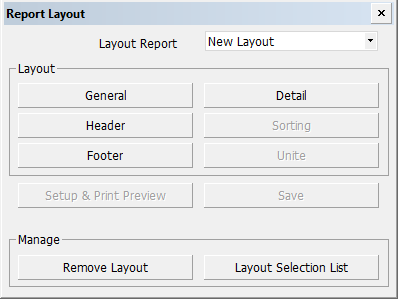
Use this function to create the layout of a report. A layout has six parts that can be created by clicking the corresponding buttons in the Report Layout dialog.
General
Set the general settings for the current report layout.
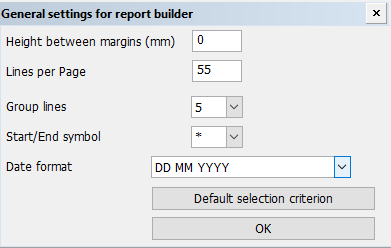
Height between margins – Set the height of the area inside the page margins. The system inserts page breaks at points where the set height + height of the top and bottom margins is reached. When the height is set to zero, or is not set at all, page breaks are inserted according to the Lines per Page setting. By default the value is set to 0 (zero).
The page margins are set in the report template file (in Excel), in the page layout settings. For example, when a template is set to size A4 with top and bottom margins of 5mm, the setting value should be 287mm (297mm - 2 * 5mm).
Lines per Page – Set the number of lines after which a new page should begin. The system adds page breaks at points where the set number of lines (rows) is reached. The number includes the lines of the header, footer, and any extra space between lines. This setting should match the page length for the selected printer. This setting has no effect if Page height is set.
Group lines – Set the number of lines after which extra space (a blank line) should be inserted. If no extra space should be added, enter 0. No start or end symbols will be placed in these blank lines.
Start/End symbol – Set the symbol to be placed at the beginning and end of each line. These symbols will not be placed within extra space or in the header and footer lines. The Production > Reports > Settings > Layout > Column Separators option can be used to set the symbols available here.
Date format – Select the date format for dates that are displayed in the report.
Default selection criterion – Set the default values for selection criteria. These criteria will be stored for each report layout.
See Default selection criterion in the Managing Production Information Administrator's Guide for more information.
Header
Specify the layout of the report header. The header is shown at the top of each page in the report. One line in the header should contain headers for the columns in the report.

You can add a new header line before or after a selected line. You can copy, paste, insert, or delete the selected word with the normal Windows functions. You can edit the header by directly typing in new items or modifying the existing ones.
Several $variables can be used in the header. See Using variables in report headers and footers in the Managing Production Information Administrator's Guide for more information.
The so-called index line (a line containing column headings) can also be included in the header. The headings represent the names of the items presented in the columns. The column headings are displayed in accordance with the settings in the Detail part.
When the header is created for the first time, a default header text is displayed. This header text is taken from the %ncgnorms%\report\header.dat file.
Add index line – Use this option to add a line containing column names and symbols in accordance with the settings in the Detail part, and a copy of the last header line.
Index lines – Set the range of lines in the header that should be used as index lines when the report is created in RTF format.
$Date – Add a $variable directly after the cursor in the list field. The available $variables are managed with the Production > Reports > Settings > Layout > Variable List setting.
Footer
Specify the layout of the report footer. The footer is shown at the bottom of each page or, if subsummaries are used, after each subsummary.
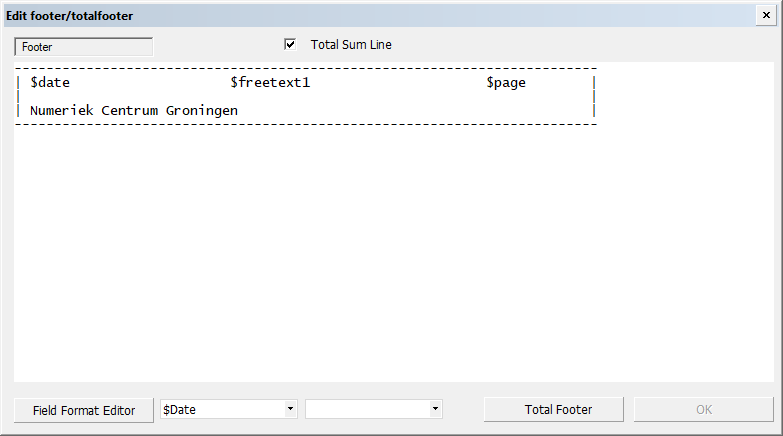
You can add a new line before or after the selected line. A selected line can be copied, pasted, or deleted with the normal windows functions. Various $variables can be used in the footer. A $variable may be included anywhere in the line, but the same variable cannot be used twice in the same line. These variables can be used, for example, to include the total weight or total length in the footer. If a subsummary has been created using the sort part, a "total" footer item can be included. This footer item will be inserted at the end of the report.
Apply the settings for the footer part by selecting a line from the footer, and clicking one of the buttons at the bottom of the dialog.
Footer – Use this option to edit the text to be placed at the bottom of a page or subsummary.
Total footer – Use this option to edit the text to be placed at the end of the report.
$part
Contains the data elements in the Selected Field list of the Report Layout Details dialog. When this type of $variable is used in a footer, the value of the corresponding data type of the construction element which was presented in the report just before the footer, is substituted into the footer.
When a new footer is created, the default footer text will be displayed in the overview.
Detail
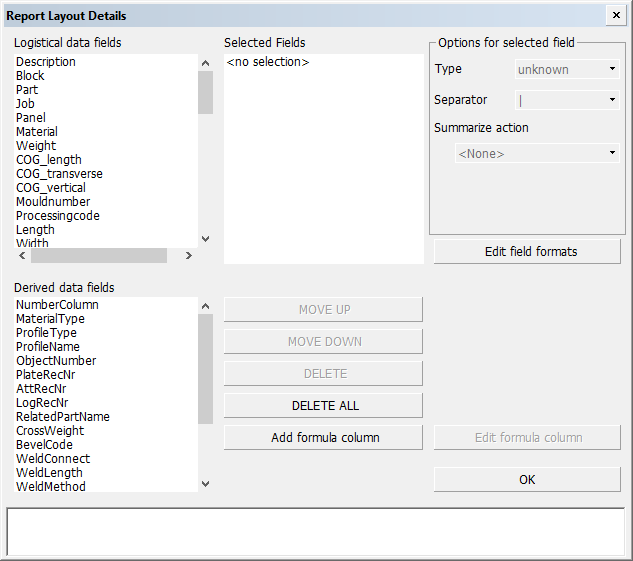
Specify the report layout details, such as the columns, and which data fields should be placed at which positions in the report, and how the data fields should be displayed.
The Selected Fields list displays the selected data fields. These are included in the report. You can include a data field in the report by selecting it from the list of the available logistical or derived data fields on the left side of the dialog. The order of the items here is also the order in the final report. You can change the order by using the MOVE UP and MOVE DOWN buttons. You can delete items from Selected Fields with DELETE and DELETE ALL.
The area at the bottom of the dialog displays the order of the selected data items. The names of the items are displayed in full here. The names will be placed in the header with the set column length (that is, the set number of positions).
Note: If such a data field is selected that represents known data which cannot be presented by a line in the dbase.log, the system adds a separate column to the layout for it.
Note the following about the derived data fields.
-
AttRecNr – The attribute record number of the part. The number is 0 if the part has no attribute record.
-
Description – In case the column contains Unicode characters (such as Japanese or Chinese), it is recommended to place the column as the last in the row for optimal alignment in the report.
-
GrossWeight – The gross weight of the construction part. For plates and brackets, the gross weight is the multiplication of the part's length, width, thickness and material density. For other parts, the gross weight is equal to the net weight.
-
NumberColumn – The number of rows that were united (combined) into the row. For more information, see Unite.
-
MaterialType – The Report & sketch part prefix set for the construction type. These prefixes are set in System Management > Logistics > Prefixes And Part Codes.
-
If the part is a face plate, bent profile, profile as property or shell frame, the prefix for the profile type is used instead.
-
If the part is a shell plate, and no prefix is set for shell plates, the prefix for plates is used instead.
-
If the part is a lug, and no prefix is set for this type of lug, ST is used instead.
-
-
Objectnumber – The object number of the project.
-
Partcode – The part code of the construction type of the part.
-
If the part is a face plate, bent profile, profile as property or shell frame, the part code for the profile type is used instead.
-
If the part is a shell plate, and no part code is set for shell plates, the part code for plates is used instead.
-
-
PlateBrAttType – The type of the part. The part types are indicated as follows:
-
Plates: P520
-
Shell frames: P2
-
Shell plates: P3
-
Brackets: P<bracket type number>
-
Attributes: A<attribute type>
-
-
PlateRecNr – The plate record number of the part, or that of its parent plate-like part if the part has no plate record itself.
-
ProfileType – The profile type (ST, HP, HG etc.) and the profile's length and width dimensions, for example ST120x10 or HP180x8.
-
ProfileName – The name definition of the profile type as defined in System Management > Presentation > Profiles > Dimension Text.
Note: ProfileType and ProfileName data fields also return a value for brackets. For brackets the returned value is the Report & sketch prefix set for brackets in System Management > Logistics > Prefixes And Part Code, and the bracket's dimensions. For example BR1188X988X12. Whether the dimensions are taken from the logistical database or the bracket type file depends on the Profile Type For Brackets setting in System Management > Production > Reports > Settings > Content.
-
TargetBlock – The block to which the profile part of a pillar-profile belongs. This field only applies to pillar-profiles. For all other parts, it is empty.
Note: TargetBlock has a special meaning when included in a report's part selection criteria in a Logistical Selection Menu. With it, it is possible to define which pillar-profiles are presented in the report if they are connected to one of the blocks to be presented in the report.
-
BevelCode, WeldConnect, WeldLength, WeldMethod, WeldThroat – These are weld related derived data fields and used for weld reports. If the report layout contains more than one of these data fields, the report will only contain parts which have weld information. These are parts with bevels. Parts without bevels will be left out from the report if more than one of these data fields is included.
Some special report layout options can be defined for each data field.
First select the data field in the Selected Fields list, and then select the desired options in the Options for selected field panel on the right side of the dialog.
-
Type – Shows the data type of the item as set in the logistical database. The type of an item can only be changed with the Logistics > Logistical Database Layout function in System Management.
-
Separator – Set the separator symbol between the columns. The Column Separators setting in Production > Reports > Settings > Layout can be used to set the available symbols. The N symbol can be used to put an item in the report without a separator character. With the separators < and > the contents of two columns is joined and aligned to the left or to the right, respectively.
-
Summarize action – Select how the field data is summarized in combined data rows. The sum total, minimum, maximum or average value of the data fields can be shown in the combined data rows. Select <None> to not summarize the data. Data rows can be combined with the Unite rules. The system applies the selected summarize action to the united data.
Note: Because only fields containing Real or Integer data types can be combined, a summarize action cannot be selected for fields containing data type Character.
When data is grouped in the report by subsummarizing, this line will not be placed at the bottom of the report. Instead, the $Sum (value is aligned according to the aligning of the column), $SumL (value is aligned to the left) or $SumR (value is aligned to the right) variable can be included in the footer to have the summarized value displayed. The $SumAll, $SumLAll and $SumRALL can be used to display the value (summarized, minimal, maximal or averaged) as really indicated in Summarize action.
Note: If a sum total is required for a centre of gravity, the total weight must be included in the report with the $Tweight variable.
Edit field formats – Set the fill character, column width, alignment and other properties for the selected fields. See Field Format Editor for detailed information.
Add formula column – Add a formula column to the layout. See Adding and editing formula columns below for more information.
Edit formula column – Modify an existing formula column. See Adding and editing formula columns below for more information.
Formula columns can be used to display the outcomes of a formula. You specify the name of the column and the formula used for it.
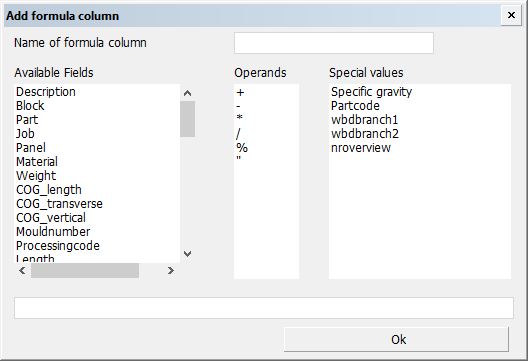
You create the formula by selecting data from the Available Fields list. The fields can be numerical data fields and data fields containing character strings. Selected fields are added to the end of the input box at the bottom of the dialog. You can also select an operator to be added at the end of the formula.
The input field can be used to modify the formula and to enter numerical values, or free text parts between double quotes.
Operators for the formula should only be taken from the list of operators. Other operators are not allowed. The operators in the formula will be processed in the order in which they appear. In other words, the operators * and / do not take precedence over + and -, for example.
You can select special values from the Special values list, for example the Specific gravity of a material type, or the nroverview keyword which initiates the united line counters, or the wbdbrach<n> keyword which gives WBD branch information.
If the formula contains free text parts inclosed in double quotes ("sample", for example), the outcome of the formula will be a character string. This is also the case when the formula contains a logistical data field of the "character" type.
You can edit a selected formula in an edit panel in the same way as in the panel for creating the formula column. You cannot change the name of the column directly. This can only be done by deleting the existing column and creating a new one.
Referencing to rules: Instead of defining a formula, you can make a reference to a rule. Enter the file name of the rule in the input box. The content of the column will be determined by the outcome of the rule. Rules are defined in System Management > Logistics > Rule Definitions. A rule that is used for reports can contain logistical data fields, and the following derived data fields: MaterialType, ProfileType, ProfileName. Other derived data fields cannot be used in a rule.
With the nroverview special value you can include the number of occurrences of a particular value of a particular logistical database field in a united line of the report. For example, with the formula
nroverview <logistical database field> N1
you can include the number of items in the united line which have the first value of the conversion table for the <logistical database field> in common. With N2 the number of items with the same second value of the conversion table are counted and so on with a maximum of 20 (N20).
Note: The keyword nroverview must be the first word in the formula definition and <logistical database field> must be the second word.
In a report layout you can define more than one formula containing the keyword nroverview. However the <logistical database field> in all formula definitions containing nroverview must be the same in one layout.
After selecting nroverview and <logistical database field> the Special values list will contain a number of N keywords. The number is equal to the number of conversion lines in the conversion table with a maximum of 20.
The united line counter could for example be used to get, in a united line, an overview of the number of parts on port side and on starboard side.
With the following conversion table for the logistical database field POSITION:
'1' 'SB'
'0' 'CL'
'-1' 'PS'
and the following formula definitions
nroverview Position N1
nroverview Position N3
the first formula will deliver the number of parts on starboard and the second the number of parts on port side. The formula
nroverview Position N1+N3
will deliver the number of parts which are not on the center line.
Instead of the "real" logistical database field name you can use its Work BreakDown (WBD) level reference in the formula by using the corresponding wbdbranch<n> keyword. The <n> numbering is from the lowest branch (normally the "Part" level) to the highest branch (normally the "Block" level), as defined in the Logistics > Work Breakdown Structure function in the System Management application.
The first reference (WBDBranch1) will be substituted with the lowest WBD level with a valid level name, i.e. not having the same "Level name" value as defined in the Logistics > Work Breakdown Structure function. The second reference (WBDBranch2) will be substituted with the next "valid" WBD level in the tree, and so on.
Sorting
Change the order of the items in the report by selecting items from the Available Fields list. The first item in the Selected Fields list will serve as the first sort key, and the second item as the second sort key, and so on. For each sort key, a sort order can be selected by clicking the Ascending or Descending.
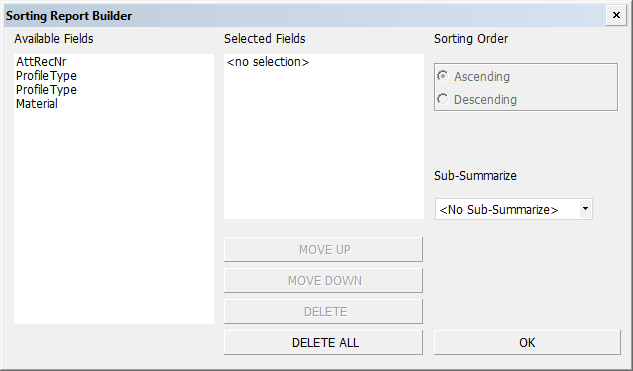
MOVE UP and MOVE DOWN – Change the order of fields.
DELETE and DELETE ALL – Remove items from the Selected Fields list.
Ascending – Items are sorted in ascending order (e.g. from small to large or from A to Z).
Descending – Items are sorted in descending order (e.g. from large to small or from Z to A).
Sub-Summarize – If you select an option other than <No Sub-Summarize>, the items in the list will be grouped according to this criterion, and then sorted. You can select one item for each report from the Sub-Summarize menu. The item selected from the Sub-Summarize menu does not need to be present in the Selected Fields list. See also Footer.
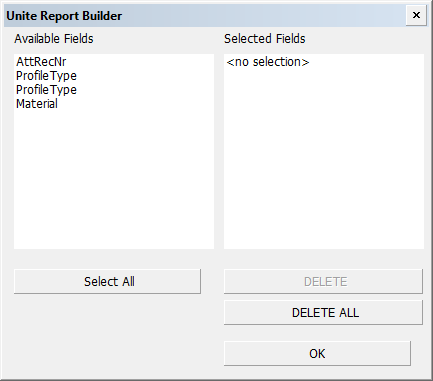
Unite
Combine report lines. Select which available fields should be combined. When multiple data rows fulfill the unite rule, there is only one row present for that data in the report. Other rows which have the same data are skipped. The system applies the summarize rules on the united data. See Summarize action under Special layout options above.
Notes:
-
Only fields containing Real or Integer data types can be united. Fields containing data type Character cannot be united.
-
In WBD 3D sketches, the system always unites the data fields of each part into one row. Therefore it is not necessary the define the fields to be united for WBD 3D sketches.
When report lines are united, some settings are available in System Management to control the appearance of the description if it is part of the report:
Production > Reports > Settings > Content > Report Unite Warning and Long United Line Field Text.
Saving the report layout
Each report layout must be saved before it can be used. If the report layout has been changed, the name of the report layout will be entered automatically in the Layout Name entry box of the Save Layout dialog. You can change the name before saving the layout. An existing name can also be selected from the Available Layouts list. This name will then be entered in the entry box automatically.
Deleting the report layout
To delete the report layout, click Remove Layout. The report layout will also be deleted from the norms directory.
Sorting the layout selection list
Set the order in which the available report layouts are presented in the selection lists of the various functions with the Layout Selection List option. It is also possible to exclude report layouts from the selection list and to give descriptive names to the layouts.