Handling of revisions in the change.cmd macro
The change.cmd macro handles the revision table functionality together with the change.tab configuration file which defines the contents of the revision entry dialog, and the title field model titlefield.mod. The macro places the information entered in the revision entry dialog at the correct coordinates in the title field model. The name, size and position of the revision entry dialog are also defined in the macro.
Important: If you want to publish from CADMATIC Hull to CADMATIC eShare, the revision table in Hull must match with the revision table in CADMATIC Outfitting. See Matching the revision tables in Hull and Outfitting and Preparing Hull data.
For the revision table functionality to work, the macro, the configuration file and the model file must located in the project's norms folder %ncgnorms%.
Note: A different location can be defined for the change.tab file. This is done in the change.cmd macro.
In the default version of the change.cmd macro the location of change.tab is defined in line 92 as the value of variable f.
The files providing the default functionality can be found in the CADMATIC Hull default norms, located in your CADMATIC Hull installation folder, in subfolder Hullcentre\client. You can use those files as the basis for your customized revision table functionality.
This Help topic describes those aspects of the change.cmd macro which are important for Hull administrators to know when customizing the revision table to their needs.
Tip: The macro contains comprehensive commenting in lines starting with # which help you to understand the code in the macro in more detail.
Note: All line numbers below refer to the default version of change.cmd macro which can be found in the default norms.
Setting up the revisions
Some variables must be set and initialized in the beginning of the change.cmd macro. Variables are used to store and retrieve data inside the macro.
The maximum number of revisions allowed in one sheet drawing is set with the MaxChange variable in line 10.

Maximum number of rows in the revision table
The maximum amount of rows in the revision table is set with the MaxRows variable in line 50.

When the number of rows in the revision table reaches the value of MaxRows, the lowest revision is overwritten by the new revision. For example, if MaxRows is 10, and the 11th revision is created, the first A revision is overwritten with the 11th K revision.
Tip: You may want keep the maximum number of revisions allowed in one sheet and the maximum number of rows in the revision table the same. In this case set equal values to MaxChange and MaxRows.
You can set the system to create a complete revision table when the first revision is created. In this case the system creates a table which contains the maximum amount of rows (set with MaxRows). The first revision is filled in and empty lines are included for the next revisions. By default the empty rows are not created. To make the system create the empty lines, change the value of the fixedtable variable in row 54 from 0 to 1.

Some variables contain a number or another variable between square brackets. These variables are called array variables. This means that the same variable name can store different values. For example, array variable myvariable[3] can store three values:
myvariable[1]=value1
myvariable[2]=value2
myvariable[3]=value3
There are two array variables in change.cmd that are used for revisions, ChangeList and RevCreated:
-
ChangeList – Contains the version designation of the revision (by default A, B, C, ... Z).
-
RevCreated – Used for keeping track of the number of revisions created.
Defining the version designation for revisions
Version designations for the revisions are set in the SetChangeList label of the change.cmd macro. The revision designators are set as values of the ChangeList array variable. By default the designations are A, B, C, ... Z. By changing the values you can change the version designations. The version designation list in the revision entry dialog's Revision drop-down menu is populated with these values.
The SetChangeList label is located at the end of the change.cmd macro.
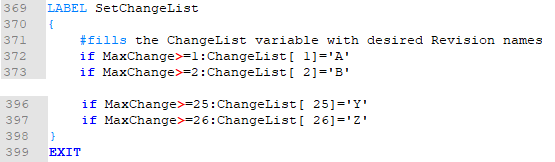
The SetChangeList label is called from a previous place in the change.cmd macro.

Retrieving information from the revision entry dialog
When the user selects Home > Create > Sheet > Title Field > Revision Table, the revision entry dialog, named Enter Revision by default, opens. The contents of the dialog are defined in the change.tab configuration file. See Customizing the revision entry dialog.
The dialog is started by the change.cmd macro. The macro also:
-
Handles the information that is entered in input boxes or selected in drop-down menus and places it into the revision table.
-
Fetches information from earlier revisions, displays it in the revision entry dialog, and saves possible changes to the revision table.
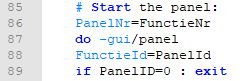
The part in the macro that is responsible for this starts with a comment line # Start the panel: (line 85 in the default change.cmd).
Example
When the user selects from the Revision drop-down menu an earlier revision (which is already included in the revision table), the macro retrieves the related revision information from the revision table and fills in the corresponding input fields in the dialog. This is done with the following function:
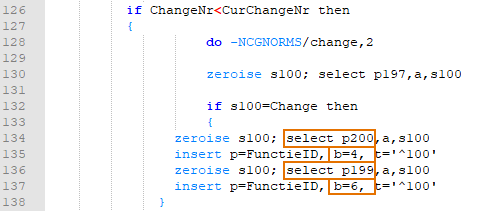
Information is retrieved from points P200 and P199 in the revision table, and placed to elements which have IDs 4 and 6 in the dialog, respectively. The elements in this case are input fields (type 6). The image below shows the corresponding element definitions in the change.tab file.

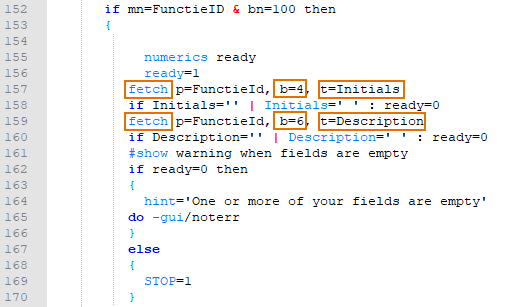
The user can at this point change the information in the input fields. Once the user presses OK, the change.cmd macro stores the updated information in variables Initials (for ID 4)and Description (for ID 6). This is done by the following function:
-
b is the unique ID of the element in the dialog box.
-
t is the variable where the content of the input box is stored.
Placing revision information in the title field
The change.cmd macro places the revision information into the revision table in two steps:
-
Retrieve the coordinate points where the information is to be placed in the revision table from the title field model file titlefield.mod, and store the information in temporary points (used internally by the change.cmd macro).
-
Place the information into the revision table into the correct positions (defined by the coordinate points in the title field model file). See Defining the placement of the revision information.
Retrieving the coordinate points
The retrieval of the coordinate points from the title field model is done in the Label 2 part of the change.cmd macro. Also the lines for the table are drawn in Label 2.
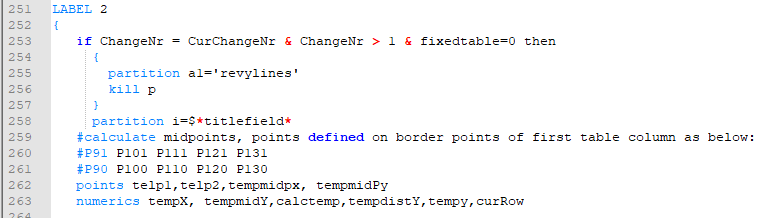
The title field model used for the sheet drawing is defined in line 258. After that the macro retrieves the coordinate points from the title field model and stores them in temporary points.
Filling in the revision information in the revision table
Next, the macro does the following:
-
Moves the current control position in the revision table to the temporary point location of each point, one by one.
-
Sets the attributes for the text element and the content of the text.
-
Modifies the attribute information of the text.
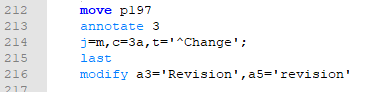
The code for this is as follows:
-
move p197
Moves the current control position to temporary coordinate point P197. -
annotate 3j=m, c=3a, t='^Change';
The lines belong together but must be separated by <ENTER> (placing them into separate lines).First a text (annotation) is created with fragment 3 (
annotate 3). Then the justification is set to middle (j=m), the character height is set to 3 mm (c=3a) and the text content is set to be the value of variable Change (t=’^Change’). Show/hide annotation command details
Syntax:
annotate <fragment number>
settings
Available settings:
-
a=<n>– Angle of the annotation in degrees -
b– Draw annotation box. -
c=<n>{a}– Character height,nmust be positive. Anaimplies actual size in mm. -
f=<frag>– Fragment number of the annotation -
j= m|tm|bm|tl|ml|bl|tr|mr|br– Position of the control point relative to the annotation box -
m=<i>– Pen number -
o= n|e|s|w|p|u|i1|i2|i3|i4|o|pp|all– On which view(s) the annotation is to be shown. The valuealldoes not includeo(orthogonal) orpp(perspective). The default is the current view. -
r=<n>– Character aspect ratio (width/height) (nmust be positive) -
t= <message> | $<file>{(u)}– A line of annotation text. If a line begins with$the annotation is defined as the contents of a text file (default extension is .dat) used as an "instance", or expanded when the(u)option is used. An empty message will signify the last line of text. -
th=<i>– Pen thickness of the annotation -
u– Underline
-
-
last
Selects the last added item. -
modify a3='Revision',a5='revision'
Modifies the last selected item. In this case it changes attribute 3 to ‘Revision’ and attribute 5 to ‘revision’.Revision designations (letters) get attributes 3, 4 and 5. The values set for these attributes are by default Revision, revisiontable and revision, respectively. These attributes are needed for publishing revision information to CADMATIC eShare. They are included in the sheet metadata. See Updating the revision table attributes in %NCGNORMS%/change.cmd.
This is repeated for all the required points. Because the text content and appearance that is placed at the different points varies, the attributes are set differently for different points.
Finally the change.cmd macro adds some additional attribute information:

With this code, all selections are first cleared (line 245), and the last four added items are selected (line 248; in this case there are four texts in total).
Line 247 modifies the selected (the last four added) items and sets attribute 2 value to be the value of the change variable, sets attribute 4 value to be revisiontable, and sets attribute 6 value to be the value of the ChangeNr variable.
Placing the information into the revision table
The macro creates new rows to the revision table automatically, one above another so that the newest one is at the top (unless empty rows are already present because the fixedtable variable value was set to 1). The location of the lines is based on the coordinate points defined in the title field model file titlefield.mod. See Placement of the information in the revision table.
If the MaxChange variable value is bigger that the MaxRows variable value, the system overwrites old revisions with new ones.