Creating standalone (local) projects
This topic instructs you on creating new standalone (local) projects. If you want to import existing (HDX) projects to be used in the current version of Hull, see Importing existing standalone (local) projects.
Standalone projects are not handled by the HCA nor available on the COS server.
Creating a new standalone (local) project is a two-phased process: the project is first predefined by selecting a non-existing or empty folder when adding the project via the Project Management Centre, after which the predefined project is created in the Create Project/Block dialog.
Creating predefined standalone (local) projects
Do the following:
-
Open System Management > Projects > Project Management Centre.
-
Click Add Local Project. The Add Local Project dialog opens.
-
In the Project Description field, enter a description for the standalone project (optional).
-
Define the project path by clicking Browse and browsing to an empty folder.
-
Click OK. You are notified about the folder being empty.
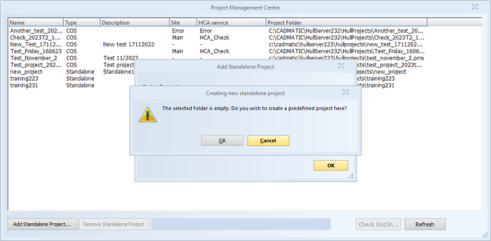
- Click OK to continue. The project is now available in the project list.
Next, you need to create the project in Hull. See Creating standalone (local) projects in Hull.
Creating standalone (local) projects in Hull
After you have created the project in the Project Management Centre, you need to create it in Hull.
Do the following:
-
In System Management, select File > New > Project/Block. The Create Project/Block dialog opens.
-
Select Project, and then select the desired predefined standalone project from the left part of the dialog.
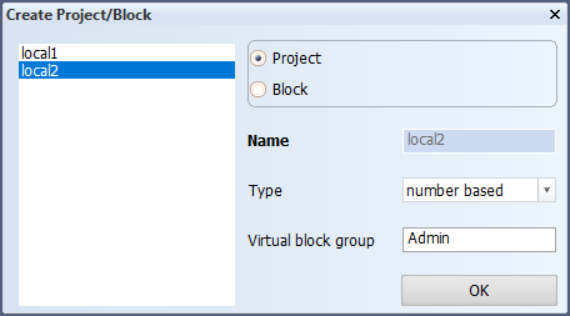
By default, the block name type is number based. The virtual block group contains the default block 999, and is by default named Admin.
-
Change the default type and virtual block group name, if necessary.
-
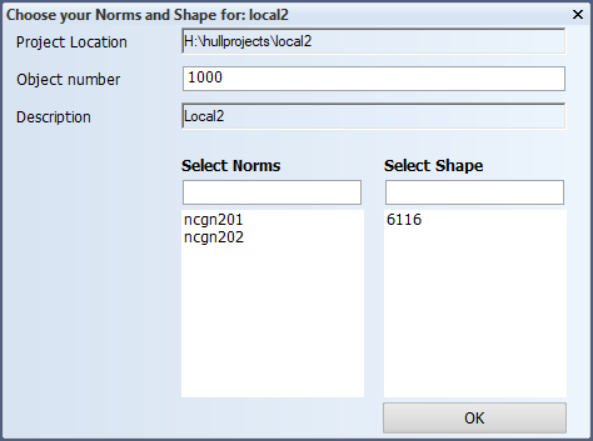
Click OK. The Choose your Norms and Shape for: [projectname] dialog opens.
The project location and description have been defined when predefining the project, and they cannot be modified here.
-
Do the following:
-
If necessary, change the object number. The object number is a unique identification for the project.
-
Set the project settings by selecting one of the available norms directories from the directory specified by the environment variable %ncgcust%. This environment variable is defined while installing CADMATIC Hull. See CADMATIC Hull Installation Guide for more information.
-
Select from the hull shape databases present in the directory specified by the environment %ncgshape%. This environment variable is defined while installing CADMATIC Hull. See CADMATIC Hull Installation Guide for more information.
-
Click OK. The system shows a dialog where you can select whether to update the hull database with hull boundary lines and/or hull group intersection lines. If you accept the selections, the system extracts these hull lines from the hull groups within the shape, and saves them to the hull shape database. If you do not need these hull lines, clear one or both of the check boxes. Click OK. For more information, see Hull boundary lines and Hull group intersection lines.
If the norms directory you selected includes the subfolder cvar and/or lvar, they will be copied alongside the selected norms folder. If there is no cvar folder, an empty cvar folder is created for the new project. If necessary, the lvar folder can be copied into the norms folder manually.
The system starts to copy files. Once the files are copied, you are prompted to select the Hull shape database version.
-
-
Enter the Hull shape database version or keep the default, and click OK.
-
Enter the reversed frame number, and click OK. The reversed frame is a virtual frame that can be used as a reference point to indicate a direction.
The project is now created.