Manage

On the Structural tab, the Manage button opens the Structural Units dialog where you can manage structural units.
Managing structural units
Selecting a structural unit from the list shows that unit in a separate, configurable view window.
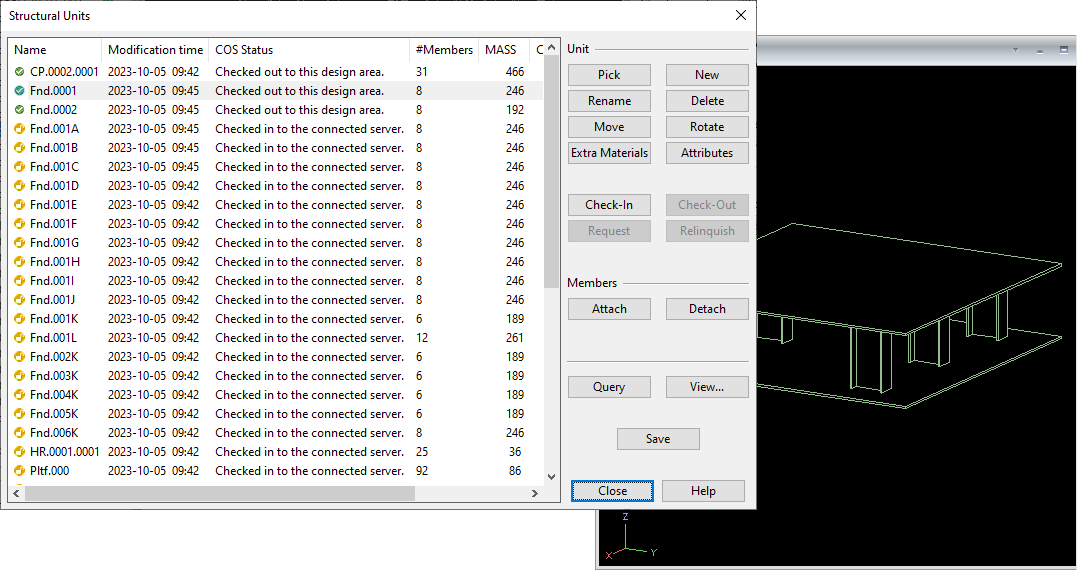
The dialog includes the following tools.
-
Pick – Allows finding a structural unit from the list by selecting one of its model objects from a work view.
-
New – Starts the process of creating a new structural unit.
-
Rename – Allows renaming the currently selected structural unit.
-
Delete – Deletes the selected structural units. You are not prompted to confirm the deletion; you can undo it if you close the dialog without saving and then use the Undo (Ctrl+Z) command.
-
Move – Allows moving the selected structural units. You are prompted to pick the base point and the target point.
-
Rotate – Allows rotating the selected structural units. You are prompted to pick two points to define the rotation axis and then the amount of rotation to be applied.
-
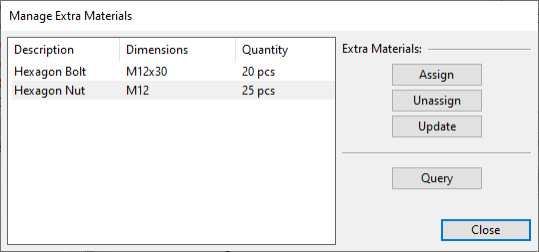
Extra Materials – Opens the Manage Extra Materials dialog where you can assign extra materials from the library or project database to the structural unit. These are materials that do not need to be visualized in the 3D model, but are needed for part lists, for example.
The Object Properties dialog shows the extra materials of the selected group, as described in Extra Material.
-
Attributes – Opens the Edit Attributes dialog for adding or removing attributes that have been assigned to the Structural Unit attribute class. For information on attribute classes, see Attribute classes.
-
Check-In – Checks in the selected structural units.
-
Check-Out – Checks out the selected structural units.
-
Request – Requests the ownership of the selected structural units.
-
Relinquish – Relinquishes the ownership of the selected structural units.
-
Attach – Allows adding new members to the selected structural unit by selecting them from a work view.
-
Detach – Allows removing members from the selected structural unit by selecting them from a work view.
-
Query – Allows picking a model object and then opens the Object Properties dialog, showing information about the selected structural unit.
-
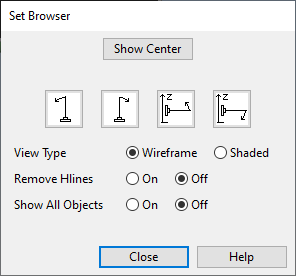
View – Opens the Set Browser dialog for defining how to show the structural unit in the view window.
-
Save – Opens the Save dialog. See Saving the area model.
Note: A structural unit is a group. When the whole group is checked out, it can also be managed with the group tools described in Managing tree items.
Creating a new structural unit
You can create a new empty structural unit and add members to it from the 3D model, or you can create a structural unit from a structural unit template that has been stored in the library or project database (see Structural units).
Do the following:
-
Select Structural tab > Structural unit group > Manage.
-
In the Manage Structural Units dialog, click New. The Create New Unit dialog opens.

-
To create a structural unit from a structural unit template, do the following:
-
Click A Unit via Template.
-
Select the template from the structural unit object browser.
-
Select the system to use.
-
Insert the structural unit into the 3D model as instructed.
-
Enter a unique, descriptive name for the structural unit.
-
-
To create an empty structural unit, do the following:
-
Click An Empty Unit.
-
Select the system to use.
-
Enter a unique, descriptive name for the structural unit.
-
Use the Attach tool to add checked-out model objects into the structural unit.
-