Building Block Overview
Projects > Building Block Overview
Shows an overview of all block areas in the active project and their descriptions.
This is the same function as Tools > Information > Building Block Overview function in the 2D-Contek and 3D-Contek applications, but with the extra functionality to modify the settings of each block. You can set the block name, define the block area, set the default grids, and add a description. You can also predefine blocks.
The blocks that will be affected by the changes need to be checked out. The system will automatically try to check out the predefined blocks, if needed.
Important: Only one user at a time can access this function with full access. Meanwhile, other users will not be able to open a block or a drawing in the project. Furthermore, this function cannot be opened with full access if another user has accessed the Block Groups, Block Order, Quick Block Definition Tool or Reassign Blocks to Groups function.
Important: A block's properties can only be modified if the block is checked out to the current site.
Note: In case the Hull application crashes unexpectedly, the Hull Block List may remain checked out at a particular site. The HCA cancels the checkout after two minutes to free the block list back into use in such scenarios.
Note: This function opens in read-only mode if System Management has been started in read-only mode. For more information, see Accessing System Management.
 Show/hide image
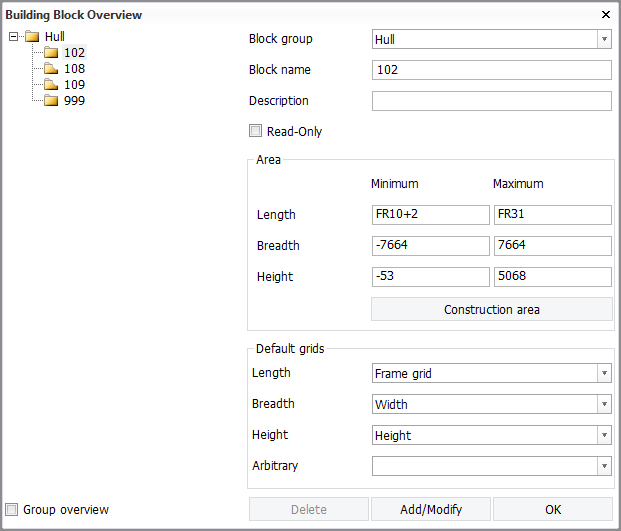
Building Block Overview dialog when project does not have reference surfaces defined
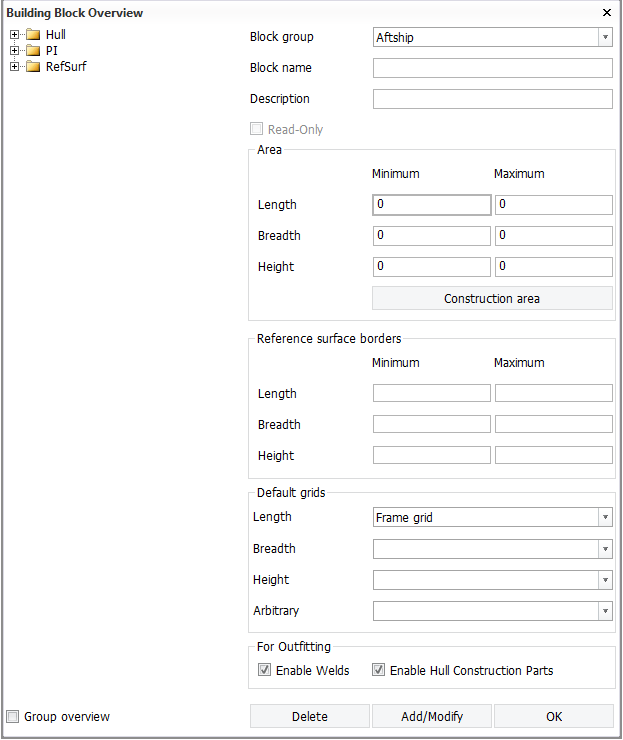
Building Block Overview dialog when the project has reference surfaces defined
Options and setting in the Building Block Overview dialog:
-
Block group – Name of the block group that is open.
Note: A group name can only consist of alpha numeric characters. It must not contain spaces, and it cannot be named Cancel or All. Group names are not case sensitive.
-
Block name – Name of the block that is open.
Note: Blocks named as 99999 and 12346 can only be opened in the 2D-Contek application.
-
Description – Description of the building block.
-
Read-Only – Changes the selected block to read-only. This setting can only be changed from the System Management application. And then also only when the selected block is checked out to the current site.
-
Area – The minimum and maximum values of the currently selected block's area in length, breadth, and height.
-
Reference surface borders – The minimun and maximum values of the block's reference surface borders in length, breadth, and height.
These settings are not shown if reference surfaces have not been defined for the project.
-
Construction area – Displays the length, breadth, and height values of the construction area.
-
Default grids – Shows the direction of the default grids.
Note: Using a width grid whose direction is towards the port side is not reflected in the presentation of the breadth (width) values here. The system always shows the minimum (port side) values as negative and the maximum (starboard) values as positive. Positive minimum values and negative maximum values can be entered in the input boxes for breadth if the width grid runs towards the port side, but when the settings are opened again, the minimum values are shown as negative, and maximum values as positive.
-
For Outfitting – Enable or disable Weld and Hull Construction Part objects for Outfitting when the active block's construction data is saved to COS.
-
Enable Welds – Enable Weld objects. Weld objects will be made available for Outfitting in COS. This option is not available for virtual blocks.
If the Welds for Outfitting setting in System Management > Projects > Outfitting > Settings is set to Disabled, the Enable Welds option cannot be changed.
Note: When welds are disabled for the curretly selected block, block welds (welds between parts in different blocks) are not enabled even if welds are enabled for the adjacent block(s).
-
Enable Hull Construction Parts – Enable Hull Construction Part objects. Hull Construction Part objects will be made available for Outfitting in COS. This option is not available for virtual blocks.
-
-
Group overview – Displays the values of all blocks in the block group in a separate window.
Change the settings as desired. Once you have made the changes, click Modify. Note that the number of the block cannot be changed.
To add block numbers, enter the block number in Block name and click Add. The number must be positive and must not be in use already.
Important: To save the changes, click OK. If you close the dialog without clicking OK, the changes will not be saved.
To delete all existing values, click Delete.