Hole list
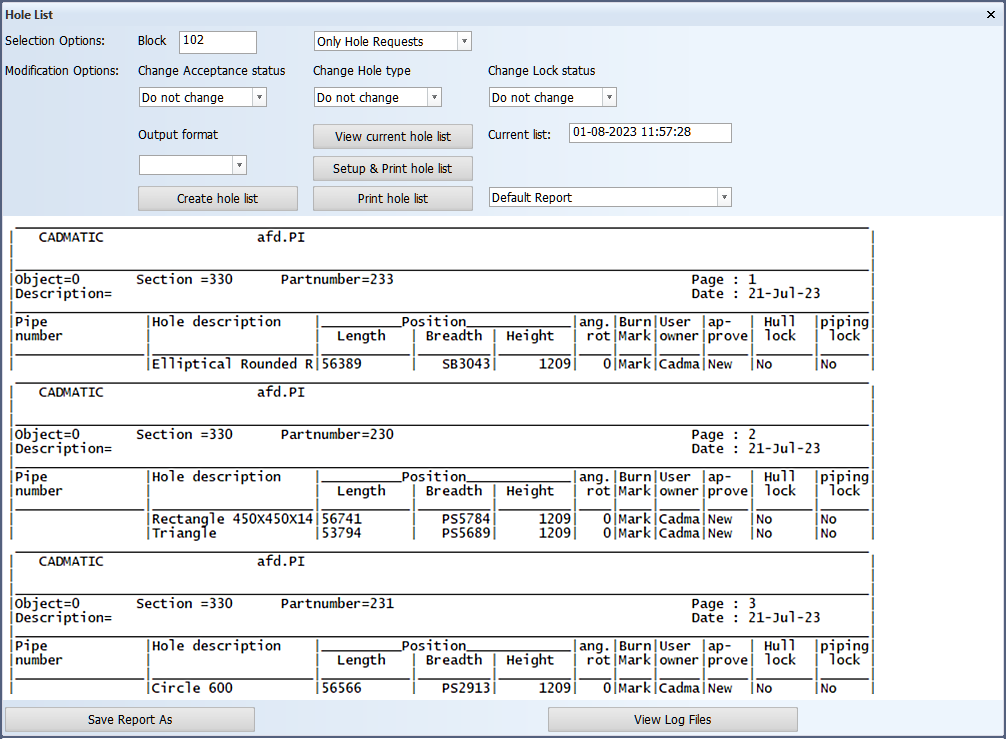
You can generate a hole list that contains the position, description, and status of the holes and hole requests in the block using the 3D-Contek > Production > Production > Report > Hole List function. You can define which type of holes and hole requests are included in the list, and change the acceptance status, hole type and lock status of the holes and hole requests in the list.
Tip: The hole list can be used to get an overview of the Outfitting holes in the block, for example.
Setting up the hole list
The layout of the hole list can be controlled with the Production > Reports > Report Layout > Report Layout function in System Management.
The text that indicates the status of the hole can be modified in Production > Hole List > Settings in System Management.
The hole descriptions can be changed in the hole type files. See Hole description line G.
Hole list contents
To view the current (last generated) hole list, click View current hole list. To create a new hole list, click Create hole list.
Note: When a new list is generated, the old list is overwritten.
The hole list provides an overview for each plate in the block. If a header is defined in the hole list report layout, the list of holes in different plates are separated by the header text between the plates.
Holes situated in profiles related to the plate are presented with an asterisk * before the hole description.
The breadth position is expressed as port description plus the value or starboard description plus the value.
The date and the time of the last generated ASCII-formatted table is shown in Current list. The hole list is generated as an ASCII-formatted table when Output format is left empty.
Selection options
With the selection options you define which holes in the block are included in the hole list.
Block
Enter the block number of the block for which you want to generate the hole list.
Hole selection filter
Select the types of holes and hole requests to include in the hole list.
The following items can be selected:
-
Only Hole Requests – Select this to only include Outfitting holes.
-
Cutting holes – Select cut holes.
-
Marked holes – Select marked holes.
-
Indications – Select indication holes.
-
Pending hole requests – Select holes for which an update was requested in Plant Modeller.
-
Accepted holes – Hole requests accepted by Hull user.
-
Rejected holes – Hole requests rejected by Hull user.
-
Locked holes – Select holes locked by Hull.
-
Not locked – Select holes not locked by Hull.
Once you have selected which holes to include in the list, click Create Hole List to generate the list.
The default selections for some of the items can be set in Construction > Holes > Change Hole Status in System Management.
Modification options
Once the system has generated the hole list based on the selection options, you can change the acceptance status, hole type and lock status of the holes and hole requests in the list. These options are not available before the hole list has been created or an old list is opened.
The status of individual holes can be changed using the Construction > Holes > Modify > Hole Status function. For more information on hole request states, see Hole request states.
Change Acceptance status
Set the acceptance status to Do not change, Accepted or Rejected. Note that if you select to accept or reject the holes, all the holes in the list will be accepted or rejected, regardless of their previous acceptance status.
Note: If the status of a hole is Locked by Outfitting (Under Work in Plant Modeller), the hole will not be accepted. The value in the piping lock column in the hole list will therefore remain as Yes.
Change Hole type
Set to Do not change, Cutting hole, Marked hole or Indication.
Change Lock status
Set to Do not change, Locked or Not locked.
Other options and functions
The following other options and functions are available.
Output format
Select the format the hole list is generated in.
-
An empty selection creates a ASCII-formatted table in a gat<block name>lijst file in the block folder. The contents of this the file are shown in the Hole List dialog once the list is generated.
-
RTF – Creates a Rich Text Format file named gat<block name>.rtf in the block folder. If you select this option, the list shown in the dialog is not updated.
-
CSV – Creates a comma-separated file named gat<block name>.csv in the block folder. If you select this option, the list shown in the dialog is not updated.
Note: When a new list is generated, the old list is overwritten.
Report layout selection
This drop-down menu lists all the available hole list report layouts in the project's norms.
Select the desired layout. Click Create hole list to create a hole list using the selected report layout.
View current hole list
Load the last generated ASCII-formatted table into the dialog.
If the file does not exist, the hole list part of the dialog will remain empty, and Current list will be set to None.
Create hole list
Create the hole list using the current selection options.
Setup & Print hole list
Opens the printer setup dialog where you can select the printer and define the printing settings of the hole list, and then print the list with the given settings to the selected printer.
Print hole list
Directly print the hole list to the default printer with the default settings.
Save Report As
Save a copy of the ASCII-formatted table with the desired file name in the desired location.
View Log Files
View the log files of the last generation of the hole list.