Opening and importing files
The following file formats can be imported:
- IGES (.igs,.iges)
- Rhino 3dm (up to version 4) (.3dm)
- NAPA (.db,.db64)
- ACIS (.sat)
- AutoCAD (.dxf) (polygons only)
Things to consider
Consider the following when opening/importing files to Shape Import.
-
Extra information such as hull group numbers (), curve types and curve numbers can be imported from IGES, Rhino and NAPA Steel files. See Hull groups. The names of the curves are used to determine the type and number. See Settings.
-
A NAPA Steel file contains all the required data, and everything is imported one-to-one. A NAPA Steel database can contain tens of thousands surfaces, and in this case the memory consumption of Shape Import can get very high, and the importing might fail. to reduce memory usage you can try to switch to selection by layer instead of selection by surface. See Settings for more information.
-
The performance of both Shape Import and the Surface Intersection Server are better with a small number of large surfaces than with a large number of small surfaces.
Opening files
Do the following:
To open/import files, select File > Open or click the toolbar button  . You can also drag and drop the desired files on the application.
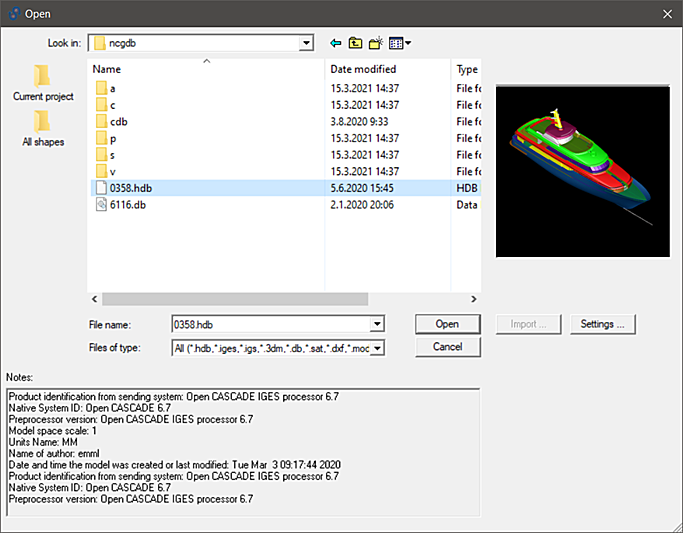
The Notes field at the bottom of the dialog shows information about the selected file. This information cannot be edited. When saving a file, a similar dialog is shown but the Notes field is editable. See Saving / exporting files and Viewing and adding notes.
On the right, a preview is available for 3dm and hdb file formats. Clicking the Settings button opens the settings dialog. See Settings.
The left side pane contains shortcuts for hull shape databases: The projects' ncgdb folder (Current project), and the %hullcentre%\shapes folder (All shapes).
Importing files
When an IGES, a Rhino or a NAPA Steel file is selected, the Import button is enabled. Clicking Import opens a dialog which shows all the layers in the selected file. It is useful when there is already a database present in the application, and you want to add or replace some geometry.
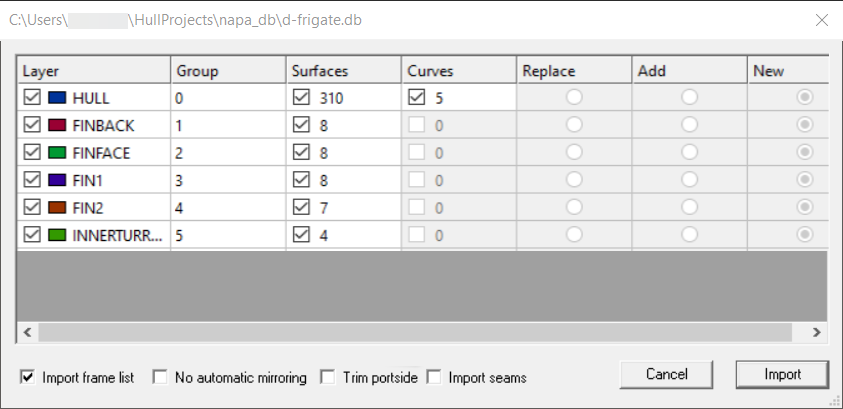
The selected layers are included in the import. To exclude a layer from the import, clear the layer's check box. You can change the Group number that the layer will get.
To exclude the surfaces or curves in the layer, clear the relevant check boxes.
If a layer to be imported already exists in the hull shape database (that is, there is already a layer with the same name and group number), you can specify what to do with that layer:
-
Replace – Deletes the layer that already exists in the hull shape database and replaces it with the layer in the imported file.
-
Add – Adds the contents of the layer in the imported file to the existing layer in the hull shape database.
-
New – Creates a new layer in the hull shape database. Note that you must change the group number of the new layer after importing it to be able to save the database. Group numbers shown in red indicate that they already exist in the currently loaded database.
Import Options
The following import options are available:
-
Import frame list – When this is selected, the frame coordinate list is imported with the layer. When importing NAPA Steel shapes, Import frame list is preselected.
-
No automatic mirroring – The main surface (group 0) is on the starboard side and automatically mirrored to the port side. Select No automatic mirroring to not mirror the main surface.
-
Trim portside – Fits the mirrored port side surfaces to each other so that they do not cross each other and the surface borders stop at their junctions.
-
Import seams – When importing NAPA Steel shapes, seams in the selected layers are included in the import. When the seams from the NAPA Steel database are included in the active hull shape database, the system tries to preserve the topology of shell plates by trying to find for them relations to hull lines. If this is not successful, fixed value relations are used.