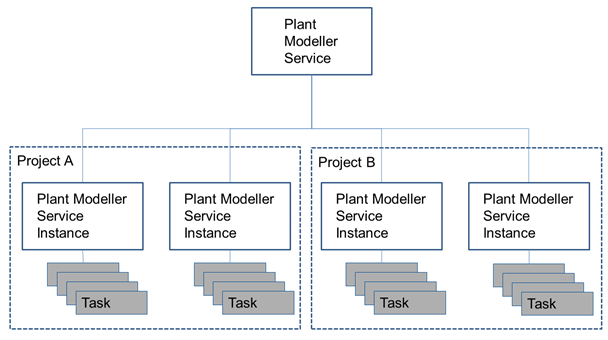
Plant Modeller services
Plant Modeller Services enable the project administrator to automate and schedule various tasks. A Plant Modeller Service consists of one main process which runs as a Microsoft Windows service and hosts one or more Service Instances. Service Instances are batch-mode processes that run in the context of a project and execute the scheduled tasks daily or hourly. For example, scheduled tasks can export a CADMATIC eBrowser model file (.ebm), publish the 3D model and the design documents to CADMATIC eShare, and synchronize P&ID data with the 3D model in COS.
Note: CADMATIC version 6.1 introduced Plant Modeller Service as a replacement for Plant Agents (which you can still create in CADMATIC desktop from Object > Create Area For > Plant Agent). The service can handle the same tasks as the agents, and no changes are required to third-party applications. Plant Agents worked by processing service request files stored in a specific folder, and also Plant Modeller Service Instances can be configured to run these requests.
Installing a Plant Modeller service
Perform the following to install the main Plant Modeller Service host for the COS server. One service host can run multiple Service Instances.
Prerequisites
- Your Windows user account is permitted to install Windows services.
Do the following:
-
In the Start menu of Windows, select CADMATIC > Plant Service Installer [version]. The Installed Plant Modeller Services dialog opens, listing the Plant Modeller Services that are installed on the local computer.
 Show/hide details

For each installed service, you can see the following information:
- Service – The service name.
- Status – The service status as "Running" or "Stopped".
- Version – The version number of the service.
- Port – The TCP port that the service is listening to (for client connections).
- Data Directory – The root directory under which the service stores its files.
- Configuration Directory – The folder that contains the service configuration file (.stc).
- Workstation Profile – The name of the workstation profile file (.prf).
-
To create a new service, do the following.
- Click Install New. The New Service dialog opens.
-
Enter the following information:
-
Service name – Enter a name for the service. The program will add "PMSVC_" as a prefix to this name.
-
Service account – Select whether the service should use the "Network Service" account or a specified domain user account.
-
Select Network Service if the project directory is located on the local disk, in the same computer as the Plant Modeller Service.
The Network Service account must have Read, Write and Modify permissions to the projects.
-
Select Another account if any project directories are located on a network share. The given account must have Read, Write and Modify permissions to the shared projects. (Select this option if you are not sure which one to choose.)
Note: If the project uses Content categories, make sure the COS user profile for the service account has no content category restrictions. See User Profiles.
Note: If the service is to be used for publishing to eShare, you must add this user to eShare server's user list (as normal user) as well as to the user list of the target project (as project administrator). The project is automatically created in eShare when eShare Integration Settings are defined in Plant Modeller as described in eShare.
- If Service account = Network Service and eShare is in the same computer as Plant Modeller, add the user NT AUTHORITY\NETWORK SERVICE to eShare; if they are in different computers, add the user to eShare in the format DOMAIN\COMPUTERNAME$.
- If Service account = Another account, add the specified domain user to eShare.
See CADMATIC eShare Administration Guide for details. -
-
Port – Specify the TCP port that the service will listen to. Use a number between 1024 and 65535, and make a note of the number as you will need it later.
-
Data directory – Click Browse to select a local directory where the service can store its files. Make sure that the selected Service account has read and write permissions to this directory.
-
Configuration directory – Click Browse to select the directory that contains the local wsprofile directory of your CADMATIC installation: \Cadmatic\<version>\<computer>.stc.

-
Workstation profile – This is the workstation profile (cadm_nt.prf in the specified configuration directory) that the service will use. This profile should point to the local installation of CADMATIC.
-
Service administrator – Specifies the administrator account name for the service. By default it displays the current Windows account, but this can be changed. New administrators can be added later.
Example settings:

-
-
Click OK. The service is installed and started. You can stop the service from the Services list of Windows, if needed. Note that a PMSVC_ prefix has been added to the service name you specified.

-
Click Close to close the dialog.
You can uninstall a service by selecting the service and clicking Uninstall.
You can upgrade a service created in a previous software version to be compatible with the new version by selecting the service and clicking Upgrade. For more details, see Upgrading Plant Modeller Services.
Installing a Plant Modeller service instance
Perform the following to install a Plant Modeller Service Instance to a project. A Service Instance allows managing project data with scheduled tasks.
Do the following:
-
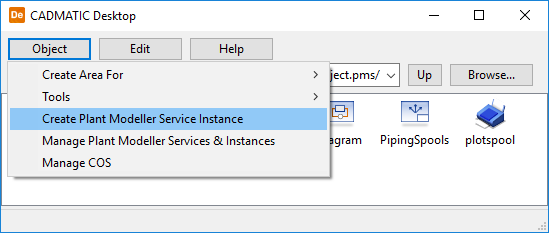
In the CADMATIC desktop, navigate to the required project and select Object > Create Plant Modeller Service Instance.
-
In the Select Plant Modeller Service dialog, select the service host to which to add the instance, and click OK.

-
In the Settings for new Plant Modeller Service instance dialog, specify the following information.
-
Name – Enter a name that identifies this Service Instance.
This name is also used as the COS user name for this Service Instance and thus will be seen for example in the COS properties window as the user who has an object checked out.
-
Port – Specify the TCP port that this Service Instance will listen to.
Make a note of this number as you will need to provide it if some external clients want to connect to this Service Instance.
-
COS Profile – Specify the COS profile that the Service Instance will use.
This profile is assigned to the service COS user, and the COS permissions associated with the profile apply to the Service Instance.
-
Service Type – Specify the type of the Service Instance if other than "Plant Service". If for example the service needs to handle CADMATIC Hull–CADMATIC Outfitting integration, select the "Hull Service" option.
-
Manage diagram integration – If selected, the Service Instance will be responsible for managing P&ID integration data in the project.
Note: The Manage diagram integration option must be selected also when External Data Management (EDM) objects are to be used in Sister Project Management. For more information on EDM, see External Data Management (EDM) objects. For more information on Sister Project Management, see Sister project tutorial.
-
Design checker – If selected, the Service Instance will be able to run scheduled design validity checks that provide reports about potential design flaws.
Example settings:

-
-
Click OK.
-
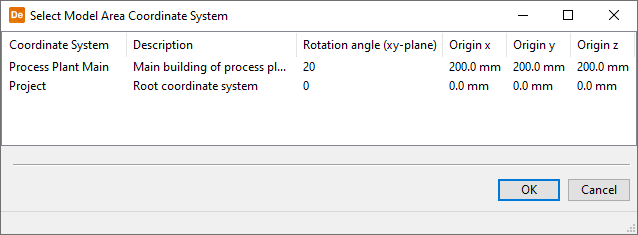
If project administrator has defined custom coordinate systems, the Select Model Area Coordinate System dialog opens. Select which coordinate system the Service Instance is to use ("Project" is the default coordinate system), and click OK.
The Service Instance is created.
You can change the services settings and add scheduled tasks to it, as described in Managing a Plant Modeller service instance.
Managing a Plant Modeller service instance
Perform the following to change settings and manage scheduled tasks in a Plant Modeller Service Instance.
Do the following:
-
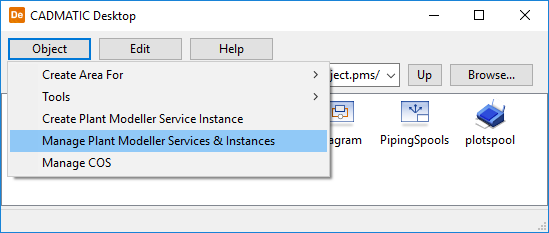
In the CADMATIC desktop, select Object > Manage Plant Modeller Services & Instances.
-
In the Manage Plant Modeller Services & Instances dialog, click Connect.
-
The Select Plant Modeller Service dialog lists all Plant Modeller Services installed to this computer; you can click Add and then specify host:port to connect to a service in another computer in the same local area network.
From the list of services, select the one that contains the Service Instance you want to manage, and click OK.Note: You can administrate a Plant Modeller Service in a remote computer only if the service uses the Network Service account. See Installing a Plant Modeller service.

-
After connecting to the service, the Manage Plant Modeller Services & Instances dialog lists the available Service Instances.

-
Admins – Select this to add or delete service administrators (people who are allowed to modify the service and its instances).
-
Edit Settings – Select this to modify the settings of the selected Service Instance. See Plant Modeller service instance settings for details.
-
Delete – Select this to delete the selected Service Instance. See Deleting a Plant Modeller service instance.
-
-
Click Close to close the dialog.
Plant Modeller service instance settings
In the Manage Plant Modeller Services & Instances dialog, select a Service Instance and click Edit Settings to edit the settings of that Service Instance. The Plant Modeller Service Instance Settings dialog opens, displaying the following tabs.
General tab | Design Checker tab | Exports tab | Document Publish tab | Managed Imports tab | Diagram tab | Tokens tab
General tab
On the General tab, you can specify general Service Instance settings.

Area update interval in seconds – Specifies how often the Service Instance updates the area model, updates P&ID integration data, and publishes documents (see Document Publish tab).
Current area limits displays the area limits of the project, to indicate the area size managed by the Service Instance. Service Instances automatically cover all model objects in the project; if you want to change the limits, click Edit Area Limits.
Enable support for Plant Agent clients – If selected, the Plant Modeller Service Instance polls the shared project folder for service request files (.req), and processes the new requests in the same way as Plant Agents. For general information about agents and service requests, see Agents and service requests.
Design Checker tab
On the Design Checker tab, you can schedule design checks.

Scheduling a design check
Prerequisites
- The design check to schedule is defined in the Project Environment dialog, in <project>.pms > Design Checks.
- Design checks were enabled when creating the Service Instance. See Installing a Plant Modeller service instance.
Do the following:
-
On the Design Checker tab, right-click the list pane to open a context menu that allows scheduling new design checks and managing existing ones. Use Shift or Ctrl to multi-select items from the list. The context menu has the following options.
-
Add – Schedule a new design check.
-
Edit – Edit the settings of the selected design check.
-
Delete – Delete the selected design checks.
-
-
If scheduling a new design check or editing an existing one, a dialog opens for defining the schedule.
You can select the task to be performed either hourly or daily and specify the start time. If the task is performed hourly, the Hour field's value is not relevant as the task will be started at the specified minute every hour. Click OK to accept the settings.

Exports tab
On the Exports tab, you can schedule exporting of 3D model data to various formats.

Scheduling model export
Prerequisites
-
The export you want to schedule is defined in the Project Environment dialog, in <project>.pms > 3D Export Settings. If Abort export on error is selected in export settings and export fails due to bad object geometry, a log file by the name <export_filename>.failed_objects.txt is saved in the export folder.
-
For file-based exports, Plant Modeller Service Instance has write access to the output folder. The write permission must be given to the service account that the Plant Modeller Service uses. See Installing a Plant Modeller service.
-
To export to a shared network disk, you know the UNC path to use—for example \\myFileServer\share\exports\file.3dd. You cannot use a mapped drive in 3D export.
-
Publishing 3D models to CADMATIC eShare requires that the address of the eShare server is defined in project settings (see Managing project settings), the project has been created in eShare, and the service account that the Plant Modeller Service uses (see Installing a Plant Modeller service) has been defined as a user and added to the specified project in eShare. Otherwise, publishing will fail with status "Unauthorized" or "Project not found".
-
Publishing 3D models to CADMATIC eShare may require a JSON Web Token. See Tokens tab.
Do the following:
-
On the Exports tab, in the Filter exports by field, you can filter the list of previously scheduled exports by typing a case-sensitive filter string or by selecting a previously used filter string from the context menu. A scheduled export is listed if the filter string is found from any column of that export.
-
In the Scheduled exports pane, you can schedule a new export or manage existing ones—use Ctrl or Shift to multi-select items from the list.
Right-click the pane to open a context menu that includes the following commands.
-
New JT Export – Schedule a new .jt file export. You are prompted to select the JT export settings to use.
-
New IFC Export – Schedule a new .ifc file export. You are prompted to select the IFC export settings to use.
-
New 3DDX Export – Schedule a new .3ddx file export. For details, see Exporting model objects to 3DDX.
-
New eBrowser Export – Schedule a new .ebmx or .ebm file export.
-
New eBrowser Export to eShare – Schedule a new model export to eShare.
-
New Library Export 3DDX – Schedule a new .3ddx library file export. For details, see Exporting library data to 3DDX.
-
New STEP Export – Schedule a new .stp file export. You are prompted to select the STEP export settings to use.
-
New 3D DWG/DXF Export – Schedule a new .dwg or .dxf file export. You are prompted to select the 3D DXF/DWG export settings to use.
-
Edit – Opens the settings of the selected export.
-
Delete – Deletes the selected exports.
-
Reset export history – Normally, a 3DDX library export only exports the objects which have been modified after the previous export. This command clears the export history, and the next export will export all objects.
-
Export now – Performs the selected exports immediately. The list is not updated automatically when an export completes—use the Refresh command to update their statuses.
-
Refresh – Refreshes the export list.
-
-
If scheduling a new export or editing an existing one, the Edit Export Settings dialog opens for defining the export settings.
You can select the task to be performed either hourly or daily, specify the start time, and specify the export location and file name, if relevant for the export type. If the task is of type "Hourly", it will start at the specified minute every hour.
Click OK to accept the settings.

-
To verify that an export works, select the export and then Export now from the context menu. Update the list using Refresh, as needed. If an error occurs and the export is set to create a log file, inspect the log file in the export folder to see which objects have problems.
Document Publish tab
On the Document Publish tab, you can schedule document publishing to the respective project in eShare. When a publishing configuration exists on this tab, documents are published to eShare using the time interval defined on General tab.

Scheduling document publishing
Prerequisites
- Publishing documents to CADMATIC eShare requires that the eShare server address is defined in project settings (see Managing project settings), the project has been created in eShare, and the service account that the Plant Modeller Service uses (see Installing a Plant Modeller service) has been defined as a user and added to the specified project in eShare. Otherwise, publishing will fail with status "Unauthorized" or "Project not found".
- Publishing documents to CADMATIC eShare may require a JSON Web Token. See Tokens tab.
Do the following:
-
On the Document Publish tab, you can create a new publishing configuration or manage an existing one. Right-click to open a context menu that includes the following commands.
- New – Schedule document publishing to eShare.
- Edit – Edit the selected publishing configuration.
- Delete – Delete the selected publishing configurations.
-
If scheduling publishing to eShare, you are prompted to enter a name for the publishing configuration; there are no parameters to be defined. (You only need one publishing configuration per project.)
Managed Imports tab
On the Managed Imports tab, you can schedule importing of 3D model data from files that have been attached to 3D-Import Manager at the project site where the Service Instance is located.

Scheduling a 3D import
Prerequisites
For a Service Instance to manage a 3D import attached to the import manager, the following requirements must be met:
-
The account used by the Service Instance has read access to the file to import.
-
To import from a shared network disk, you know the UNC path to use—for example \\ourfileserver\share\imports\file.3dd. You cannot use a mapped drive in 3D import.
-
The 3D import has been manually performed in 3D-Import Manager at least once. For general information about the import manager, see Imports.
-
The 3D import is managed by the same site as the service that the Service Instance is connected to.
-
The 3D import (import manager group and 3D model objects) is checked in. Otherwise, it will not be added to the schedule.
Do the following:
-
On the Managed Imports tab, the Schedule field specifies one or more times when all the imports will be performed every day. Use the Add and Remove buttons to define the scheduled times.
-
In the Managed 3D Imports pane, you can schedule a new 3D import or manage existing ones—use Ctrl or Shift to multi-select items from the list. Right-click to open a context menu that includes the following commands.
- New – Schedule a new 3D import.
- Delete – Delete the selected imports.
- Import now – Perform the selected imports now.
- Refresh – Refresh the import list.
-
If scheduling a new import, select the import from the Select Import dialog and click OK.

-
To verify that an import works, select the import and then Import now from the context menu. If an error occurs and the import is set to create a log file, inspect the log file in the import folder to see which objects have problems.
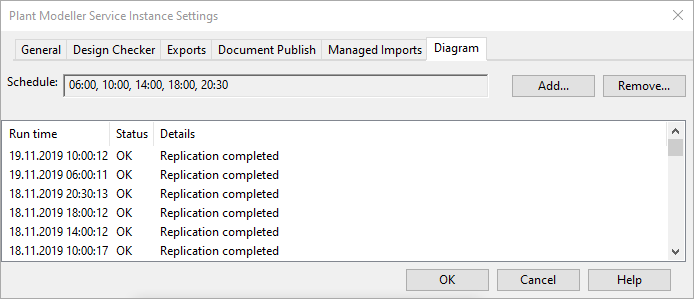
Diagram tab
On the Diagram tab, you can schedule automatic replication of diagrams that are created with the CADMATIC P&ID application and stored in the SQL database.
Important: Scheduled diagram replication cannot be performed at a time when COS backup is running.
In distributed design, starting the P&ID application starts the replication process. This can considerably slow down the opening of the application, especially when there are multiple design sites and there is a lot of new data to be replicated.
Using Service Instance based replication at each site that has its own SQL server allows updated diagram data to be automatically synchronized, which in turn allows the P&ID application to start up faster.
Scheduling diagram replication
On the Diagram tab, use the Schedule field to specify the times when replication will be performed.
Prerequisites
-
Each project site that participates in P&ID replication has its own SQL server.
-
Each project site that uses the P&ID application has the Replicate Diagrams setting in Manage Project > SQL Settings set to "CoDesigner ON". See SQL Settings for P&ID Database.
-
The account that the Plant Modeller Service uses (which was selected when creating the service) has read/write permissions to the SQL database.
In Object > Manage Project > SQL Settings you can see which authentication method the SQL server is using.
- If it uses SQL Server authentication, the Plant Modeller Service can use a suitable database user account such as the default P&ID database administrator account "as".
- If it uses Windows authentication, you must ensure that the Windows account that the Plant Modeller Service uses has permission to read and write data in the SQL database.
To check the permissions of a specific SQL user, open the Microsoft SQL Server Management Studio application, browse to Security > Logins, and open the required login. In the Login Properties dialog, check that in the Server Roles view "public" and "sysadmin" are selected, and that in the User Mapping view the project database has the database role memberships "db_owner" and "public".
Do the following:
-
To add a new replication time to the schedule:
-
Click Add. The scheduling dialog opens.
-
You can select the task to be performed either hourly or daily and specify the start time. If the task is performed hourly, the Hour field's value is not relevant as the task will be started at the specified minute every hour.
-
Click OK to accept the settings.
-
-
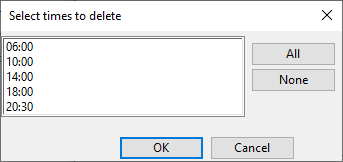
To remove one or more replication times from the schedule:
-
Click Remove. The Select times to delete dialog opens.
-
Select the times when replication should not be performed, and click OK.
-
Results
The report pane shows the last replication times and the status of each replication as "OK" or "Failed". You can refresh the view by right-clicking the list and selecting Refresh.
You can find the last ten replication log files from your Plant Modeller Service directory: …\<Service>\<ServiceInstance>\<ServerName>$.wsp\service.pd\replication_status.txt.
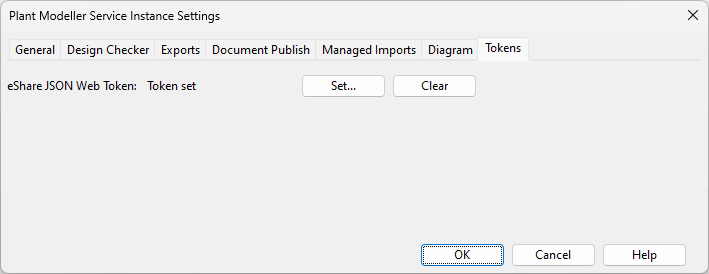
Tokens tab
On the Tokens tab, you can assign a JSON Web Token (JWT) to the Plant Modeller Service Instance. This might be necessary to enable the Service Instance to export 3D models and documents to CADMATIC eShare.
eShare servers can use Active Directory or Azure Active Directory for user authentication, and JSON Web Tokens for headless authentication of non-AD users. If eShare uses Azure AD authentication and the user account that the Plant Modeller Service logs on as is not managed in Azure AD, Plant Modeller Service Instances must use a JSON Web Token to authenticate with eShare. If eShare integration is using Azure AD authentication, the users of design applications are prompted for their user credentials the first time they interact with the application, and occasionally after that.
If the JSON Web Token is not set, the Service Instance connects to eShare with Active Directory authentication.
Prerequisites
-
The eShare system administrator has created a user account for this purpose in eShare.
-
The eShare system administrator has generated a JSON Web Token for the user, you have the token string, and you know when the token will expire. The default expiration time is 180 days, but eShare can be configured to generate tokens with a different expiration time.
-
The eShare system or project administrator has added the user to the eShare project as a project administrator.
Do the following:
-
To set the token:
-
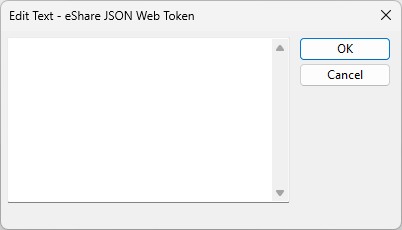
Click Set. The Edit Text - eShare JSON Web Token dialog opens.
-
Copy–paste the JWT string into the dialog, and click OK. The Tokens tab displays the text "Token set".
-
-
To clear the token:
-
Click Clear. The Tokens tab displays the text "Token not set".
-
For general information on eShare integration, see Working with CADMATIC eShare.
Deleting a Plant Modeller service instance
Perform the following to delete a Plant Modeller Service Instance. This also cancels all COS checkouts that the instance has made, and removes the COS user of the Service Instance.
Do the following:
-
In the CADMATIC Desktop, select Object > Manage Plant Modeller Services and Instances.
-
In the Manage Plant Modeller Services & Instances dialog, click Connect and connect to the service that contains the Service Instance.
-
In the Manage Plant Modeller Services & Instances dialog, select the Service Instance to remove, and click Delete.

-
Click Close.