Modify

On the Home tab, the Modify group contains tools for managing sets of objects by moving, rotating, mirroring, resizing, reversing, copying, or deleting them. Using these commands changes the length of the pipe runs and instrument lines automatically, if possible. Also the connections are automatically reconnected, but if this is not possible then the connection is broken off. See also Nodes and connections.
Move
Use the Move tools to move a set of objects and their labels from one place to another. You can include both diagram objects and drafting objects into the set.
Do the following:
-
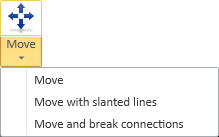
Select Home tab > Modify group > Move, and then the required command:
-
Move (default) – Select this to move a set of items and auto-route their connection lines to the new location using only straight connection lines (right angles).
-
Move with slanted lines – Select this to move a set of items and auto-route their connection lines to the new location using straight or slanted connection lines, as applicable.
-
Move and break connections – Select this to move a set of items to a new location. Diagram objects are broken off from their connection line if the connection line is not selected into the set.
-
-
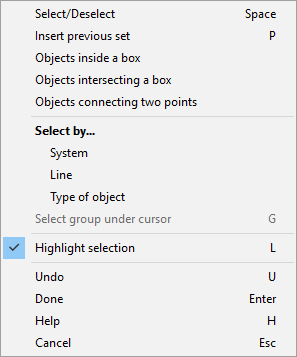
Select the objects to be moved by clicking them one by one or by using the Context menu for selecting objects in commands to select, for example, objects inside a box. You can remove unwanted objects from the set by clicking them.
Then press Enter to accept the set.
-
Pick a base point for the operation. You can use the Set base point (B) context-menu command to change the base point, if needed.
-
Use the mouse to move the objects to their new location and press Space or click to complete the move operation.
Tip: The Move commands are also available from the context menu of the active diagram. First select the objects and then the appropriate command.
Rotate

You can rotate a set of objects around a given base point. You can include both diagram objects and drafting objects into the set. Connection lines are auto-routed to the new location.
Do the following:
-
Select Home tab > Modify group > Rotate.
-
Select the objects to be rotated by clicking them one by one or by using the Context menu for selecting objects in commands to select, for example, objects inside a box. You can remove unwanted objects from the set by clicking them.
Then press Enter to accept the set.
-
Pick a base point for the operation. You can use the Set base point (B) context-menu command to change the base point, if needed.
-
Rotate the objects using one of these methods:
-
Move the mouse to apply rotation and click or press Space to accept the current rotation.
-
Use the context-menu command Rotate 90 (T), Rotate 180 (Shift+J), or Rotate 270 (P).
-
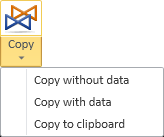
Copy
You can copy a set of objects to the same diagram, either with empty database records or with all the related information, or you can copy objects to the clipboard for pasting to the same or different diagram. You can select both diagram objects and drafting objects into the set.
Tip: The Copy… commands are also available from the context menu of the active diagram. First select the objects and then the required command.
Copy without data
You can copy a set of objects to the same diagram. In the new objects, all the data records except System, Pipeline, Description, and MenuItmData are empty and must be filled in.
Do the following:
-
Select Home tab > Modify group > Copy > Copy without data.
-
Select the object or objects to be copied by clicking them one by one or by using the Context menu for selecting objects in commands to select, for example, objects inside a box. You can remove unwanted objects from the set by clicking them.
Then press Enter to accept the set.
-
If you are copying a single object, the base point for the transformation is automatically set to the grip point of the object. Move the cursor to where you want the object to be inserted, and accept the location by clicking or pressing Space.
There are also context-menu commands that you can use to insert the object into the diagram.
-
If you are copying several objects, do the following:
-
Pick a base point for the transformation. After this, you can still change the base point with Set base point (B).
-
Move the cursor to where you want the objects to be inserted, and accept the location by clicking or pressing Space.
-
The Import objects dialog opens. You can assign the objects into systems, generate position IDs, or open the database record of an object. When you have defined the necessary data, click Ok to continue.
-
Copy with data
You can copy a set of objects to the same diagram. The new objects have the same data records and data as the original objects, and the values can be edited after the copying.
Do the following:
-
Select Home tab > Modify group > Copy > Copy with data.
-
Select the object or objects to be copied by clicking them one by one or by using the Context menu for selecting objects in commands to select, for example, objects inside a box. You can remove unwanted objects from the set by clicking them.
Then press Enter to accept the set.
-
If you are copying a single object, do the following:
-
The base point for the transformation is automatically set to the grip point of the object. Move the cursor to where you want the object to be inserted, and accept the location by clicking or pressing Space.
There are also context-menu commands that you can use to insert the object into the diagram.
-
The database editor opens, allowing you to enter the required data for the new object. Click OK when you are ready to continue.
-
-
If you are copying several objects, do the following:
-
Pick a base point for the transformation. After this, you can still change the base point with Set base point (B).
-
Move the cursor to where you want the objects to be inserted, and accept the location by clicking or pressing Space.
-
The Import objects dialog opens. You can assign the objects into systems, generate position IDs, or open the database editor for editing the data. When you have defined the necessary data, click Ok to continue.
-
-
If the objects have labels that display "???" even though they have the associated data in the database, you can update the labels with Update.
Copy to clipboard
You can copy a set of objects to the clipboard and then paste the objects to the same or different diagram.
Do the following:
-
Select Home tab > Modify group > Copy > Copy to clipboard.
-
Select the object or objects to be copied by clicking them one by one or by using the Context menu for selecting objects in commands to select, for example, objects inside a box. You can remove unwanted objects from the set by clicking them.
Then press Enter to accept the set.
-
If you are copying several objects, pick a base point for the transformation.
-
Paste the objects:
-
Right-click the target diagram and select Paste (Ctrl+V).
Tip: On the Drafting tab, you can also use the Clipboard > Paste command of the Modify group.
-
Move the cursor to where you want the objects to be inserted, and accept the location by clicking or pressing Space.
-
The Import objects dialog opens. You can assign the objects into systems, generate position IDs, or open the database editor for editing the data. When you have defined the necessary data, click Ok to continue.
-
Mirror
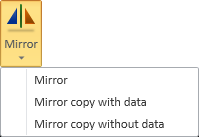
You can mirror a set of objects and their labels across a given mirror line or you can create mirrored copies, with or without the data of the original objects. You can include both diagram objects and drafting objects into the set. Connection lines are auto-routed to the new location.
Do the following:
-
Select Home tab > Modify group > Mirror, and then the required command:
-
Mirror (default) – Select this to transform a set of objects by mirroring them across a user-defined line.
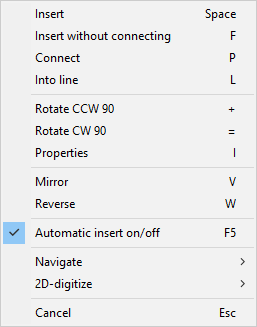
Note: The Mirror command of Context menus mirrors a single object across its centerline.
-
Mirror copy with data – Select this to copy-and-mirror a set of objects with their data, so that the new objects have the same data as the original objects.
-
Mirror copy without data – Select this to copy-and-mirror a set of objects without adding the original data to the new objects.
-
-
Select the objects to be mirrored by clicking them one by one or by using the Context menu for selecting objects in commands to select, for example, objects inside a box. You can remove unwanted objects from the set by clicking them.
Then press Enter to accept the set.
-
Define the mirror line using one of these methods:
-
Select the first point and then the second point of the mirror line by clicking or pressing Space. This allows you to draw the mirror line anywhere, in any direction.
-
Select the first point and then mirror the objects over the X- or Y-axis with the applicable context-menu command: Mirror over X-axis (T) or Mirror over Y-axis (J). In this case, it does not matter where the cursor is when you activate the context-menu command.
-
Navigate to the location where you want the first point to be and then mirror the objects over the X- or Y-axis with the applicable context-menu command: Accept first point and mirror over X-axis (T) or Accept first point and mirror over Y-axis (J). In this case, the cursor must be exactly in the correct location when you activate the context-menu command.
-
-
If you used a copy-and-mirror command on an object that has a position ID, assign a position ID to the new object by right-clicking the object and selecting Edit data. If you used Mirror copy with data, you are prompted whether to link the new object to the original ID or assign a new ID for the new object.
Tip: The Mirror command is also available from the context menu of the active diagram. First select the objects and then the command.
Resize

You can resize a set of objects and their labels. Connection lines are auto-routed to the new location.
Do the following:
-
Select Home tab > Modify group > Resize.
-
Select the objects to be resized by clicking them one by one or by using the Context menu for selecting objects in commands to select, for example, objects inside a box. You can remove unwanted objects from the set by clicking them.
Then press Enter to accept the set.
-
Pick a base point for the operation. You can use the Set base point (B) context-menu command to change the base point, if needed.
-
Resize the objects using one of these methods:
-
Move the mouse to increase or decrease the size and click or press Space to accept the current size.
-
Use the context-menu command Define scale factor to input a single scale factor.
-
Use the context-menu command Define scale factors to input X- and Y-scale factors separately, if the objects support non-uniform scaling.
-
Reverse

You can reverse the flow direction of a set of objects.
Do the following:
-
Select Home tab > Modify group > Reverse.
-
Select the objects to be reversed by clicking them one by one or by using the Context menu for selecting objects in commands to select, for example, objects inside a box. You can remove unwanted objects from the set by clicking them.
Then press Enter to accept the set and complete the operation.
Tip: The Reverse command is also available from the context menu of the active diagram. First select the objects and then the command.
Delete

You can delete a set of objects from the diagram and from the database. You can include both diagram objects and drafting objects into the set.
If you delete a component from the middle of a pipe run, the program automatically joins the connection lines so that no gap is left where the component used to be.
Do the following:
-
Select Home tab > Modify group > Delete.
-
Select the objects to be deleted by clicking them one by one or by using the Context menu for selecting objects in commands to select, for example, objects inside a box. You can remove unwanted objects from the set by clicking them.
Then press Enter to accept the set and complete the operation.
Tip: The Delete command is also available from the context menu of the active diagram. First select the objects and then the command.
Custom symbol

A custom symbol can be created for a piece of equipment when the diagram symbol needs to resemble the physical object it represents. If you expect to use the symbol frequently, ask your administrator to add it to the library. If you only need the symbol once, it is usually faster to create it while inserting the diagram object template into the diagram, as described below.
You do not need to be an administrator to edit custom symbols created within diagrams: the symbol is not a library object and can be edited only in the diagram where it is inserted. If you make copies of a custom symbol, each copy is an independent entity that must be edited separately.
Do the following:
-
In the Template Pane, select the DIN category.
-
Double-click the required Create… tool, such as Create Vessel. A symbol editor context menu opens on top of the active diagram.
-
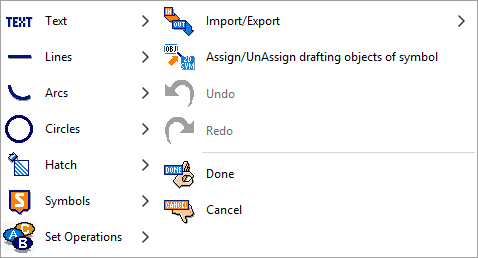
Use the menu commands to create the symbol. Add node points if needed. When ready, select Done.
-
Depending on the settings, you may be prompted to add database data and position a label. The format of the generated position ID depends on the equipment type.
-
To edit the symbol, select Home tab > Modify group > Custom symbol, and click the symbol in the diagram.
-
To move the symbol, select Modify > Move.