Properties pane
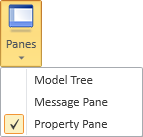
Select Home tab > Show group > Panes > Property Pane to show or hide the Properties pane. This pane displays the properties of the selected object, one object at a time.
Opening the property pane docks the pane to the right side of the application window. You can drag the pane by its title bar to detach the pane from its current position, and then either leave it floating or dock it to another part of the application window.
You can use the property pane for the following:
-
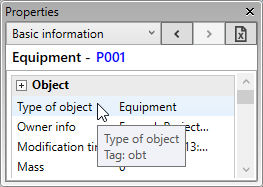
View and edit object properties. To see the tag of an attribute, hover the cursor over the attribute name:
-
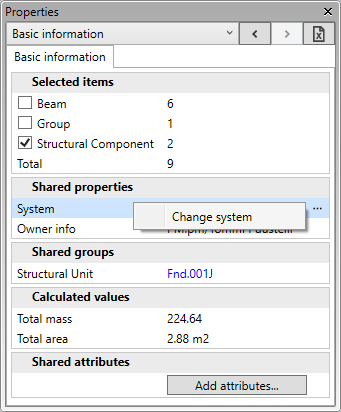
Assign model objects to systems and lines.
-
Edit systems.
-
Add and remove attributes and edit their values.
-
View markups created in eShare.
-
Export object properties and markups to Microsoft Excel files.
For general information on panes in Plant Modeller, see Panes.
Property tabs
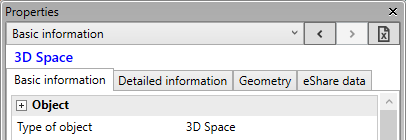
Object types that have a lot of properties display multiple tabs.
-
Basic information
-
Detailed information
-
Insulation
-
Connections
-
Geometry
-
eShare data
When the property pane is very narrow, the tab headers are hidden, but you can select the appropriate tab from the drop-down list.

When multiple objects are selected, you can exclude objects from the selection by clearing the checkbox of the object type. This can be useful, for example, before changing the system or the attributes of the selected objects.
 After you have viewed the properties of more than one object, you can use the arrow buttons at the top to jump from one object to another—the same tab remains selected, allowing you to compare the properties of the recently visited objects. If you move to an object that does not have the currently active tab, the basic information tab is displayed instead.
 You can export all property tabs to a Microsoft Excel file (.xlsx) or macro-enabled Microsoft Excel file (.xlsm) by pressing Ctrl+E or clicking the export button at the top.
Each property tab appears on a separate sheet in the exported file.
Note: If you want the export file to contain eShare data, make sure to update the eShare data tab before performing the export.
Property links
The top of the Properties pane displays the type and the name of the currently selected entity. The name functions as a link that selects the entity in the Model Tree pane and highlights the hierarchical structures where the entity is located.

Also some property values function as links.
In most cases, clicking the link displays the properties of the linked entity.
In the following properties, clicking the link opens a dialog:
-
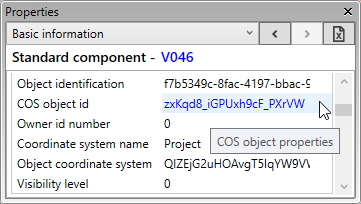
COS object id – The link opens the Object Properties dialog for the selected object.
-
Name of component model – The link opens an object browser that shows the Component Model referenced by the model object.
-
Part id string in corporate catalog – The link opens an object browser that shows the Catalog Part referenced by the model object.
In the following properties, you can access related settings:
-
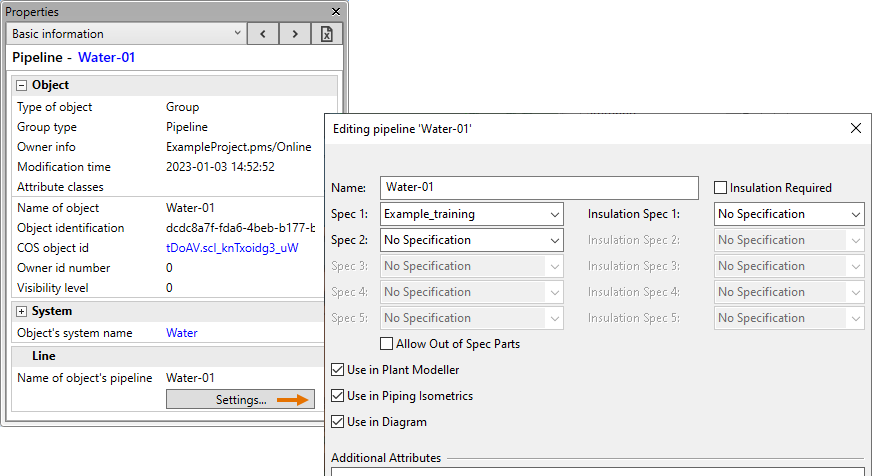
System – When viewing the properties of a system, the Settings button below the properties opens the system configuration for editing.

-
Pipeline – When viewing the properties of a pipeline, the Settings button below the properties opens the pipeline configuration for editing.
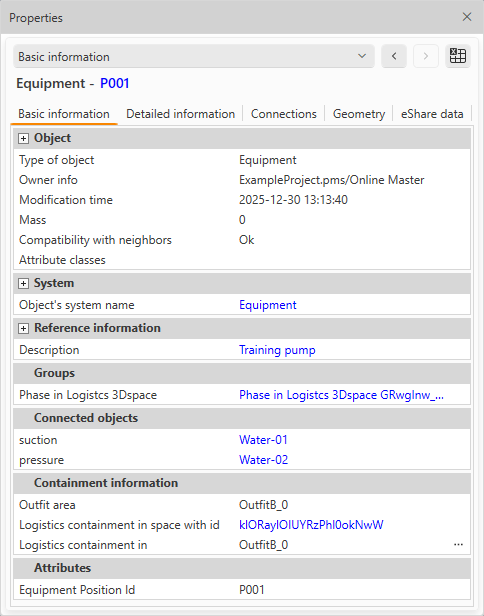
Containment information
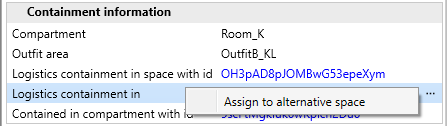
In the Containment information section of the Properties pane, you can see information relating to the logistics containment of the selected object.
You can assign objects to an alternative logistics 3D space, as described in Assigning objects to alternative spaces.
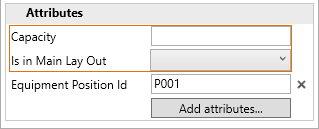
Attributes
In the Attributes section of the Properties pane, you can add, edit, and remove attributes, if allowed for the selected model object and the object is checked out to you.
-
On the Basic information tab, you can add Plant Modeller shared attributes to the object by clicking Add attributes.
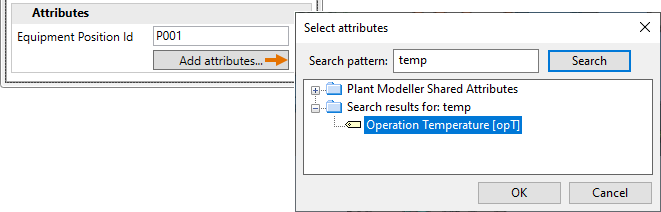
After adding a new attribute, enter a value for it, or the attribute will automatically be removed.
Note: Attributes that are listed in this section even though their values are empty are linked to the model object via Attribute classes. You can take such attributes into use by entering values for them.
-
You can remove an attribute from the model object by clicking the X next to the attribute value.
Note: Adding or editing a position ID attribute might prompt you that the ID is reserved.
– If the ID is reserved by an EDM object (used in third-party integrations), you are prompted whether to link the model object to the EDM object, except when the EDM has the attribute "External Position ID = Deleted" which means that the ID cannot be used.
– If the ID is not reserved by an EDM but has been defined as a reserved ID in the P&ID application, you are prompted whether to use the ID for the model object.
– If the ID is reserved by an EPD object (used in P&ID integration) or Electrical Device object (used in Electrical integration), you are prompted that the ID cannot be used.
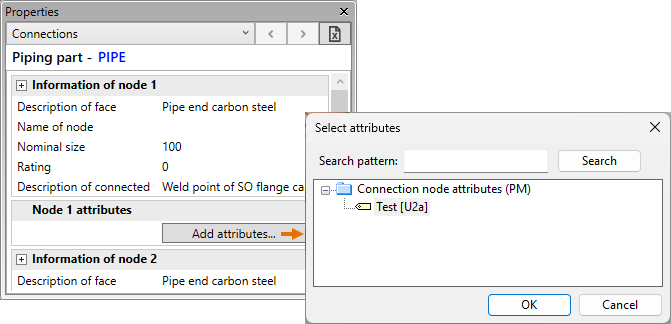
Node attributes
On the Connections tab, you can assign, edit, and remove attributes of connection nodes.
-
You can assign attributes to a node, if the required attributes have been assigned to the 'Model Object Connection Node' COS object type. For information on managing object types, see Object Types.
-
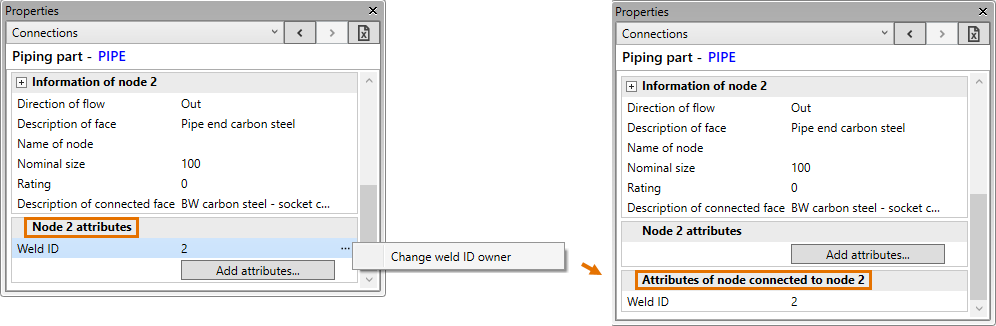
Assigning a model object to an isometric group or pipe main document group generates weld IDs for connection faces that are welded, if the project administrator has enabled the relevant option in Isometric Groups or Spools, respectively. This feature enables the generation of weld ID labels in the drawings. If a specific connection face does not receive this label, assignment rules may have assigned the weld ID to another drawing that includes the connecting face. These wrongly assigned labels can be corrected by using the Change weld ID owner function of the Properties pane to transfer the 'Weld ID' node attribute to the opposite side of the connection. To use this function, both model objects must be checked out to you, the target object must be a member of an isometric group or pipe main document group, and the target node cannot be a branch anchor point.
eShare data
The eShare data tab shows the data stored for the selected model object in eShare, if you are using eShare integration and the object can be found from eShare via its position ID.
Initially, this tab is empty. Accessing the tab retrieves the current data automatically from eShare, if you have enabled automatic retrieval in the Markups settings. Otherwise, you must click Update to retrieve the object data from eShare.
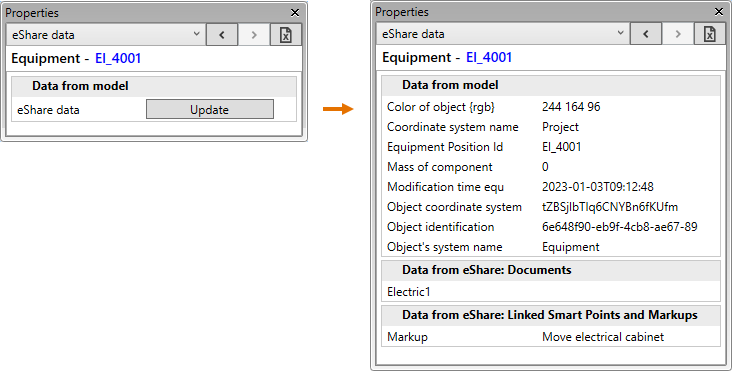
If eShare has markups linked to the object, you can view the markup details as described below.
Markup properties
If the project has been connected to eShare and you have enabled the use of Markups in your Plant Modeller area, updating the area model notifies you with a pop-up message if any markups are now assigned to you.
After loading the latest markups to the Model Tree pane, you can select a markup from the model tree to show the markup properties in the property pane.
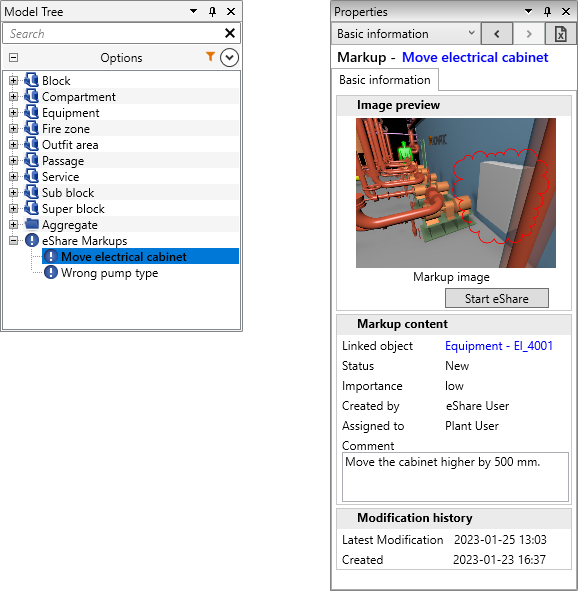
Markups have these properties:
-
Markup name – You can click the markup name to highlight the related model object in the active work view. This requires that the markup is linked to Equipment Position Id, Instrument Position Id, or Valve Position Id.
-
Image preview – Shows a preview of the markup image. Photos attached to the markup in eShare cannot be displayed in Plant Modeller, but if your user account is permitted to access eShare you can click Start eShare to see the actual markup in eShare.
-
Markup content – Shows the linked object (click the link to open the object's properties), markup status, markup importance, markup creator, markup assignee (if the feature is enabled in eShare), and the latest markup comment. You cannot add or modify comments in Plant Modeller.
-
Modification history – Shows when the markup was originally created and last modified in eShare.
You can export the markup content and the modification history to a Microsoft Excel file (.xlsx) or macro-enabled Microsoft Excel file (.xlsm) by pressing Ctrl+E or clicking the export button. The markup image is not exported.