Detail
Production > Reports > Report Layout > Detail
The Report Layout Details dialog opens when you click the Detail button in the main Report Layout dialog.
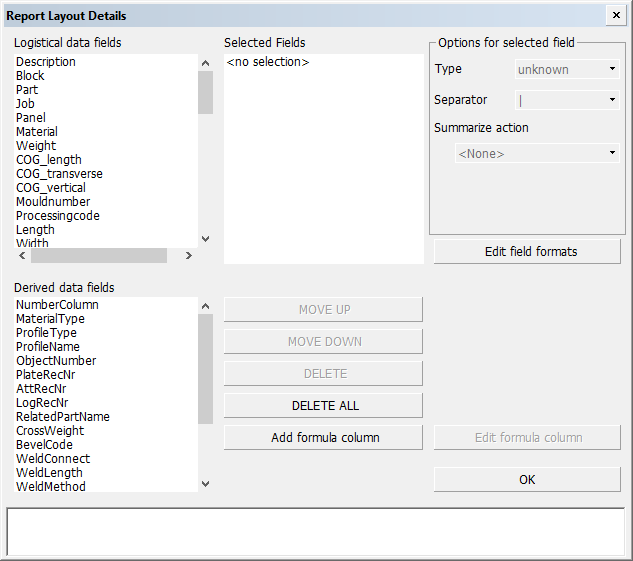
You can include an item in the report by selecting it from the list of the available logistical or derived fields on the left side of the dialog.
The Selected Fields list displays the selected items. The selected items determine the layout of the report. The order of the items here is also the order in the final report. You can change the order by using the MOVE DOWN and MOVE DOWN buttons.
Delete items from Selected Fields with DELETE and DELETE ALL.
The area at the bottom of the dialog displays the order of the selected items. The names of the items are displayed in full here. The names will be placed in the header with the set column length (that is, the set number of positions).
Note: If an item that represents known data which cannot be presented by a line in the dbase.log is selected, a separate column for it is added to the layout.
About derived data fields
Note the following about the derived data fields.
-
AttRecNr – The attribute record number of the part. The number is 0 if the part has no attribute record.
-
Description – In case the column contains Unicode characters (such as Japanese or Chinese), it is recommended to place the column as the last in the row for optimal alignment in the report.
-
GrossWeight – The gross weight of the construction part. For plates and brackets, the gross weight is the multiplication of the part's length, width, thickness and material density. For other parts, the gross weight is equal to the net weight.
-
LogRecNr – The logistical record number of the part
-
NumberColumn – The number of rows that were united (combined) into the row. For more information, see Unite.
-
MaterialType – The part prefix set for the construction type. These prefixes are set in System Management > Logistics > Prefixes And Part Codes in the Report & sketch setting column.
-
If the part is a face plate, bent profile, profile as property or shell frame, the prefix for the profile type is used instead.
-
If the part is a shell plate, and no prefix is set for shell plates, the prefix for plates is used instead.
-
If the part is a lug, and no prefix is set for this type of lug, ST is used instead.
-
-
Objectnumber – The object number of the project.
-
Partcode – The part code of the construction type of the part. Part codes are set in System Management > Logistics > Prefixes And Part Codes in the Part code setting column.
-
If the part is a face plate, bent profile, profile as property or shell frame, the part code for the profile type is used instead.
-
If the part is a shell plate, and no part code is set for shell plates, the part code for plates is used instead.
-
-
PlateBrAttType – The type of the part. The part types are indicated as follows:
-
Plates: P520
-
Shell frames: P2
-
Shell plates: P3
-
Brackets: P<bracket type number>
-
Attributes: A<attribute type>
-
-
PlateRecNr – The plate record number of the part, or that of its parent plate-like part if the part has no plate record itself.
-
ProfileType – The profile type (ST, HP, HG etc.) and the profile's length and width dimensions, for example ST120x10 or HP180x8.
-
ProfileName – The name definition of the profile type as defined in System Management > Presentation > Profiles > Dimension Text.
Note: ProfileType and ProfileName data fields also return a value for brackets. For brackets the returned value is the Report & sketch prefix set for brackets in System Management > Logistics > Prefixes And Part Code, and the bracket's dimensions. For example BR1188X988X12. Whether the dimensions are taken from the logistical database or the bracket type file depends on the Profile Type For Brackets setting in System Management > Production > Reports > Settings > Content.
-
TargetBlock – The block to which the profile part of a pillar-profile belongs. This field only applies to pillar-profiles. For all other parts, it is empty.
Note: TargetBlock has a special meaning when included in a report's part selection criteria in a Logistical Selection Menu. With it, it is possible to define which pillar-profiles are presented in the report if they are connected to one of the blocks to be presented in the report.
-
BevelCode, WeldConnect, WeldLength, WeldMethod, WeldThroat – These are weld related derived data fields and used for weld reports. If the report layout contains more than one of these data fields, the report will only contain parts which have weld information. These are parts with bevels. Parts without bevels will be left out from the report if more than one of these data fields is included.
Special layout options
Special layout options can be applied to selected items. These options have a big influence on the layout of an item in the final report. The area at the bottom of the dialog displays the order of the items and any separator characters.
To change the layout of an item, first select the item in the Selected Fields list, and then select one or more of the options on the right side of the dialog.
Type
This option represents the type of the item as set in the logistical database. The type of an item can only be changed with the Logistics > Logistical Database Layout function in the System Management application.
Separator
Set the separator symbol for the selected item. The Column Separators option of the Production >Reports > Create/Edit Report Layout menu can be used to set the available symbols. The N symbol can be used to put an item in the report without a separator character. With the separators < and > the contents of two columns is joined and aligned to the left or to the right, respectively.
Summarize action
Use this option to display the sum total, the minimal, the maximal, or the average for the item in a line at the bottom of the report.
When data is grouped in the report by subsummarizing, this line will not be placed at the bottom of the report. Instead, the $Sum (value is aligned according to the aligning of the column), $SumL (value is aligned to the left) or $SumR (value is aligned to the right) variable can be included in the footer to have the summarized value displayed. The $SumAll, $SumLAll and $SumRALL can be used to display the value (summarized, minimal, maximal or averaged) as really indicated in 'Summarize action'.
Note: If a sum total is required for a centre of gravity, the total weight must be included in the report with the $Tweight variable.
Add zero
This option applies to the "integer" data of type. If this option is selected, the integer value will be right-aligned in the report, and any positions left in the column will be filled with zeroes.
Print no zero
If this option is selected, and the value of items with data types "integer" or "real" is 0, the value will not be displayed in the report.
Convert column
If this option is selected, a value will first be converted before being displayed. If an item is to be converted, an <item>.conv file must be present in . The first line of this file can be used to specify what the data type should be converted into.
Data types "integer" or "real" can be converted to Character, Inch, or Pound, by placing the word Character, Inch, or Pound, respectively, in the first line. The rest of the lines in this file specify the conversion of the value to another value.
Place the original value enclosed in single quotation marks at the beginning of the line and then the converted value (also in single quotation marks) to convert the value.
For conversions of integer or real values to inches and pounds, the new value should be placed in the second column.
For example:
Character
'100' 'ST42'
'200' 'GR-A'
These conversion files can be generated with the Logistics > Logistical Conversion > Conversion settings option in the System Management application.
Align
Click either the Left or Right radio button to have the item aligned left or right respectively. The alignment may be overridden by the special separators < and >.
Add formula column
Add a formula column to the layout. See Adding and editing formula columns below for more information.
Edit formula column
Modify an existing formula column. See Adding and editing formula columns below for more information.
Adding and editing formula columns
Formula columns can be used to display the outcomes of a formula. You specify the name of the column and the formula.
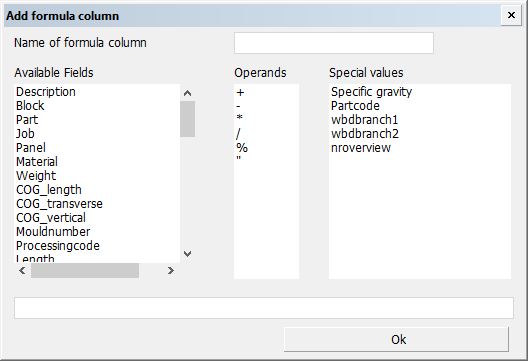
You create the formula by selecting data from the Available Fields list. The fields can be numerical data fields and data fields containing character strings. Selected fields are added to the end of the entry box at the bottom of the dialog. You can also select an operator to be added at the end of the formula.
The entry field can be used to modify the formula and to enter numerical values, or free text parts between double quotes.
Operators for the formula should only be taken from the list of operators. Other operators are not allowed. The operators in the formula will be processed in the order in which they appear. In other words, the operators * and / do not take precedence over + and -, for example.
You can select special values from the Special values list, for example the Specific gravity of a material type, or the nroverview keyword which initiates the united line counters, or the wbdbrach<n> keyword which gives WBD branch information.
If the formula contains free text parts in closed in double quotes ("sample", for example), the outcome of the formula will be a character string. This is also the case when the formula contains a logistical data field of the "character" type.
Referencing to rules: Instead of defining a formula, you can make a reference to a rule. Enter the file name of the rule in the input box. The content of the column will be determined by the outcome of the rule. Rules are defined in System Management > Logistics > Rule Definitions. A rule that is used for reports can contain logistical data fields, and the following derived data fields: MaterialType, ProfileType, ProfileName. Other derived data fields cannot be used in a rule.
Editing a formula
You can edit a selected formula in an edit panel in the same way as in the panel for creating the formula column. You cannot change the name of the column directly. This can only be done by deleting the existing column and creating a new one.
United line counters
With the nroverview special value you can include the number of occurrences of a particular value of a particular logistical database field in a united line of the report. For example, with the formula
nroverview <logistical database field> N1
you can include the number of items in the united line which have the first value of the conversion table for the <logistical database field> in common. With N2 the number of items with the same second value of the conversion table are counted and so on with a maximum of 20 (N20).
Note: The keyword nroverview must be the first word in the formula definition and <logistical database field> must be the second word.
In a report layout you can define more than one formula containing the keyword nroverview. However the <logistical database field> in all formula definitions containing nroverview must be the same in one layout.
After selecting nroverview and <logistical database field> the Special values list will contain a number of N keywords. The number is equal to the number of conversion lines in the conversion table with a maximum of 20.
The united line counter could for example be used to get, in a united line, an overview of the number of parts on port side and on starboard side.
With the following conversion table for the logistical database field POSITION:
'1' 'SB'
'0' 'CL'
'-1' 'PS'
and the following formula definitions
nroverview Position N1
nroverview Position N3
the first formula will deliver the number of parts on starboard and the second the number of parts on port side. The formula
nroverview Position N1+N3
will deliver the number of parts which are not on the center line.
WBD branch references
Instead of the "real" logistical database field name you can use its Work BreakDown (WBD) level reference in the formula by using the corresponding wbdbranch<n> keyword. The <n> numbering is from the lowest branch (normally the "Part" level) to the highest branch (normally the "Block" level), as defined in the Logistics > Work Breakdown Structure function in the System Management application.
The first reference (WBDBranch1) will be substituted with the lowest WBD level with a valid level name, i.e. not having the same "Level name" value as defined in the Logistics > Work Breakdown Structure function. The second reference (WBDBranch2) will be substituted with the next "valid" WBD level in the tree, and so on.