Automatic part and panel
This chapter explains the functions and options of the Automatic Part Numbering dialog. See Automatic panel numbering of parts and Automatic part numbering within panels for more information.
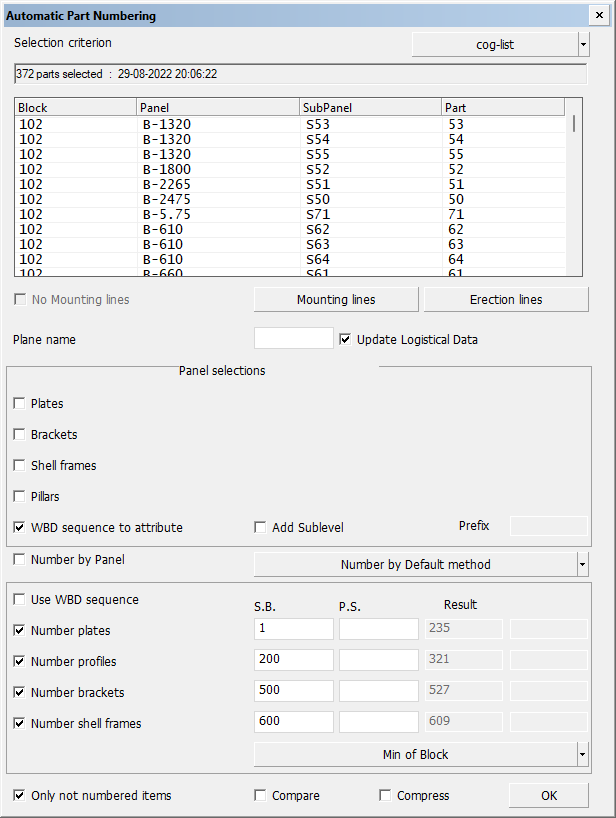
Once you have made all the selections, click OK to start the numbering process. The task sequence in the process is as follows:
- Update logistical data.
- Define the Plane name and Panel name.
- WBD sequence to attribute.
- Add Sublevel.
- Number by panel and Number method.
- Define the part numbers.
- Do Compare.
- Do Compress.
Each step in the sequence can be performed separately by only selecting the desired operation and clearing the rest of them.
Creating a new selection
The panel will display the number of parts, including plates and profiles, that have been selected together with an overview of these parts. The displayed selection date and time indicate when this selection was made. Use the Selection criterion drop-down menu, which will open the familiar standard selection menu, in which it is possible to enter the desired selection criteria. This will make a new selection. Once the new selection has been made, the program will automatically display the new number of selected parts.
Also a Hull viewer selection can be used by selection some parts in Hull Viewer and use the Hull Viewer button in the Selection criterion.
The selection is important, because only the selected parts will be used to give new part numbers while Compare will always use all parts in the block. The previous selection is always the default, and a new selection must be made if this selection is not up-to-date anymore.
Mounting lines
This section after Selection criterion is important in combination with the Compare function. It is always necessary to make a choice to add Mounting lines or not, even if the Compare option is not selected. The system expects mounting lines and cannot be started without them. Only if the No Mounting lines option is selected, the Automatic part numbering function will continue without any mounting lines. This extra check is done for safety reasons. See Mounting lines.
Mounting and erection lines are automatically added as marking lines to the production data. This information can make similar parts more unique, which is important for the Compare method.
Erection lines
With the Erection lines function erection planes can added, deleted and modified, which is important when assembling the blocks together. The erection planes can be seen in Hull Viewer by selecting Show in Hull Viewer. See Erection lines for a description of this function.
Marking lines for erection planes can be included in profile sketches, and via the sketches to robot files and DXF output. These markings are placed on the part close to the block boundary, and their purpose is to let production know where to stop welding. For information on how to add erection plane markings in profile sketches, robot files and DXF output, see Erection plane markings.
Plane name
The panel name can be set if the user wants to deviate from the default. See Panel name.
Update logistical data
The logistical data must be up to date before starting the Automatic Part and Panel function so that the block contains all part attributes created by the Hull server, for example when seams or splitters are added. In some cases the Hull server is not finished or switched off. Then this function takes care that all parts are up to date according to the latest changes. If the Hull server is switched off for a while this Update Logistical Data function can cause some delay before starting the Automatic Part and Panel function. It is not wise to switch off this function but in some cases it is necessarily. In that case it is not sure that all parts will be numbered.
Panel selections
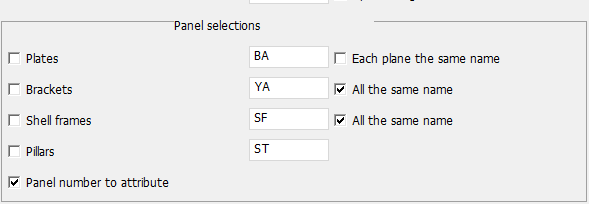
When the method Whole ship is selected, start name or number can be given for each construction type in the Panel selections area. For more information, see Panel name.
For plates an extra selection can be made: Each plane the same name. This selection will give all plate parts on the same plane level the same panel number.
For brackets and shell frames you can give all constructions the same panel name while pillars always get the same panel name when method Whole ship is selected.
The system will ask if you want to continue to change the panel names. The Only not numbered items choice has effect only on the part numbers.
WBD sequence to attribute
With the WBD sequence to attribute function all attributes, like profiles, part numbers and lugs, will get the same work breakdown branch content as the parent plate. This from the sublevel to block level.
Add sublevel
When this option is selected, the work breakdown tree gets an additional level (with field type PanelExtension) between the panel and part levels when the WBD branch contains more than one part. This level is called subpanel.
The name of the subpanel always consists of a prefix and the part number of the plate which has the lowest part number in the subpanel branch. The prefixes are as follows:
-
The prefixes for plates with profiles depend on the orthogonal plane of the plate. The prefixes are defined in System Management > Logistics > Partnumbering > Other, with the following settings:
-
Plane Name Prefix, Length – Used for length direction planes. The default setting is L.
-
Plane Name Prefix, Breadth – Used for breadth direction planes. The default setting is B.
-
Plane Name Prefix, Height – Used for height direction planes. The default setting is H.
-
-
F is used for plates with one or more face plates.
-
F is also used for plates which have both face plates and profiles.
-
S is used for shell plates.
-
With a user-defined prefix all parts will get the same prefix, so there is no distinction between them based on the plane direction.
A single part will not get a PanelExtension if Add sublevels is used but a prefix is not given. When the user enters his own Prefix these parts will get the prefix so there is no distinction between them.
If the Part Code As Subpanel Prefix setting is set to Enabled, the special part codes (prpa) will be added as prefix instead of the given character. In this way a special name can be used for each construction collection, for example, depending on the maximum length and/or whether faceplates are present or not. For more information, see partnumbering Settings.
Note: The use of the part code (prpa) will get priority over the default prefix naming. In this case these settings control how the prefix will be defined. The user will be notified.

Number by panel
The Number by panel function knows two numbering sequences, numbering by panel or numbering by section. If numbering by panel is chosen, each panel starts with the same part number. If numbering by section is chosen, the part numbers of the panel will start with the highest number of the previous panel plus 1. In the last case all part numbers are unique. In the first case all part numbers are unique within a panel. If the panel appendix code is used, the part number will be unique for each combination name.
Numbering of parts
A distinction can be made for each type of part (plate, profile, bracket, shell frame) and another distinction can be made between port side (P.S.) and starboard side (S.B.).
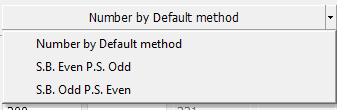
Furthermore, the user can specify whether the parts on the SB side should be given even numbers and the BB parts odd numbers or vice versa. By default, this option is set to Number by Default method, which means that the sorting direction will determine the numbers. All parts of a panel will be given a unique number simply by entering SB in the Number plates entry box. If a value is entered in the Number profiles box also, the plates and profiles will be numbered separately. In that case, the same number may occur twice and the type will determine the unique status of the part. The last method is more suitable for giving profiles a different number sequence than plates.
If the Partpostfix setting is set to yes, the partcode (prpa) will be added as postfix to the given number. In this way a special name can be used for each construction type.
Use WBD sequence
The order of the tree in Hull Viewer will be used to organize the part numbers from top to down. The work breakdown sequence in automatic part numbering will restructure the tree so that all attributes will be below the plate level.
Max / min of block or selection
After clicking this button the input fields will giving the maximum/minimum numbers plus one of the block or the selected items.
Only not numbered items
The Only not numbered items function can be used when a block is already numbered and only some parts must have a new part number. If this is the case, enter the highest numbers in the input fields (result plus one). This to prevent a total new sequence for your current part numbers and to prevent identical part numbers on not identical (plate) parts.
If this option is used in combination with the check for identical parts Compare, all parts in the block will be checked even if no new part number is given. If used in combination with Compress, the compression will affect all selected parts. For this reason it is not wise to use the Compress function if you don't want to change the older part numbers.
Compare
If the Compare option is selected, the check for identical profiles, brackets and lugs will search within the entire block. If these are present, the group of identical parts gets the same part number. This will be the lowest number within the group of the identical part.
Note: The check does not include plate parts, because of the variation in markings, text or bevel data.
This function can also be used alone after small changes are made in the construction. Though, it will change some numbers to zero when these parts were the same in the past. For this reason, it is not wise to use the Compare function as such, and instead use it always in combination with the part (re)numbering functions.
If the Count Mirrored Profiles setting is switched on, the Compare function will treat mirrored profiles and plates as the same. An extra line will be present in the panel. Brackets are excluded.
The Compare function compares the lugs and brackets regarding weight, material, center of gravity (length and height), and thickness. When these values are equal, the part gets the same number. If the Count Mirrored Profiles setting is switched on, it will include mirrored plates parts and it will treat them the same when the abs (center of gravity width) is equal.
The profiles will use the content from the type file aracrobot.pap and check if the (profile id name)d.pap and (profile id name)m.pap are identical. If this is the case, they get the same part number. The system will change the part number to zero, within the same profile id name group, when the part number was the same while the content is not. This is also the reason why it is not wise to use Compare function separately from the part (re)numbering functions.
Note: The content of the aracrobot.pap file should be complete, including flange and bevel data. For the bevel data you need to add the bevel lines into the type definition. Insert the bevel mirror conditions as well.

Compress
If the Compress option is selected, selected parts in the block are compressed according to the given start numbers.
It is possible to define a range of part numbers that is not compressed in System Management > Logistics > Partnumbering > Settings > No Compression Part Number Start and No Compression Part Number End.
Note: When the Compress option is used in automatic part numbering, all selected parts are affected, also parts that were previously manually numbered. Setting a part number range that is not compressed does not prevent manually numbered parts from being auto-numbered.
Note: The part code prefixes are not included after compress action. However, if the first part number includes a part code prefix, the same prefix will be added to all following part numbers.
The Compress function can also be used alone. See Rearrange part numbers.
Panel numbering system
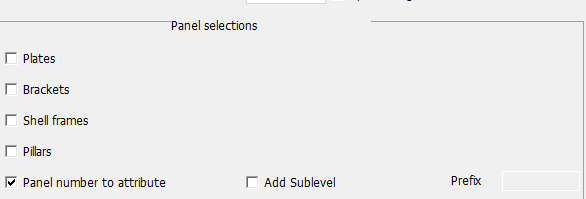
Depending of the general setting Panel numbering system some functions can be used and others not. For that reason the default panel has a different layout in the panel selection. If this setting is set to Whole ship, this section looks like:
If this setting is set to Area, this section looks like: