Category tree in Cable Manager
The left pane of the Cable Manager dialog displays a tree where you can select whether to manage 3D cables, diagram cables, systems, queries, or penetrations.
Cables
The Cables category contains the routing statuses of the created 3D cables.
Select a routing status from the tree to list the cables that have that status. You can manage these cables with the tools described in General tab and Tools tab.

-
Routed – Select this category to see the routed cables.
This status means that the cable has been routed and the program considers the route to be acceptable.
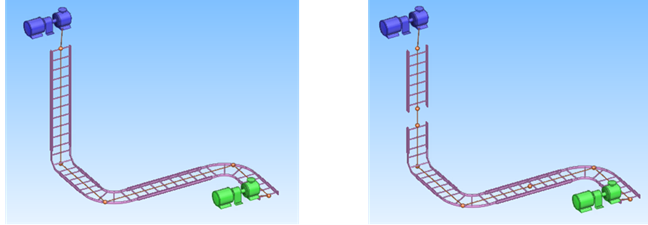
If the cable routing network is recreated (see Recreate) and in the new network the cable is not using exactly the same nodes as before but is still using the same main nodes in the same locations, the cable is allowed to keep its status as "routed".
 Show/hide example
In this example, the old network on the left and the new network on the right do not have the same amount of nodes, but the length and the shape of the cable route does not change, so recreating the network can keep this route as "Routed".
-
Not Routed – Select this category to see the cables that have no route yet or whose route has been removed.
-
Route Changed – Select this category to see routed cables that have been changed.
Cable has changed if…
-
Head or tail object has been moved by more than 100 mm or deleted, or object's position ID has changed.
-
The node that connects the head or tail object to the cable has been deleted.
-
A main node has changed.
-
There are more corner nodes than before.
-
The route has been changed by recreating the cable routing network tool with Recreate.
-
-
Route Broken – Select this category to see the cables whose route is broken. Some of the problems that cause broken routes are listed in the log of the Recreate tool.
Route is broken if…
-
Network has changed so much that the cable cannot be automatically rerouted and Try to reroute cable was not selected when recreating the network.
-
Network cannot be formed because host objects have been deleted or moved to unsuitable locations.
-
Segment is blocked by some other object in the model.
-
Segment cannot be created due to the interference classes of the host objects.
-
Segment's fill rate cannot accept more cables.
-
Note: A node is a main node if it is the first or last node of a run, the first node of a penetration, a branch node, a major corner node, or any type of node that already has a node ID. A node is a corner node if the cable route changes its direction by 10 degrees or more. A corner node is a main corner node if the direction changes by more than 88 degrees.
You can right-click a cable in the Cables pane to access the context-menu described in Cable list context menu.
Not created diagram cables
The Not created diagram cables category lists the single-line diagram cables that Plant Modeller has received from Electrical or P&ID.
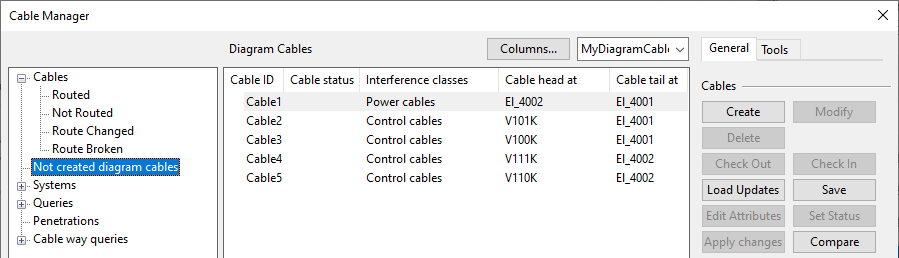
These preliminary cables must be created as 3D cables before they can be routed in the 3D model. To create these cables, select the cables from the list and click Create. This moves the cables to the Cables > Not routed category, where they can be selected for routing. For more information, see Create.
If the diagram cable is changed after creating the 3D cable, you can see the differences in the Compare tool. For more information, see Compare.
If you delete the 3D cable, the cable returns to the Not created diagram cables category.
Systems
The Systems category contains the systems that one or more 3D cables are currently using.
Select a system from the tree to list the cables that use that system. You can manage these cables with the tools described in General tab and Tools tab.

In the tree, you can right-click Systems to access the following context-menu commands:
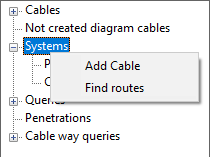
-
Add Cable – Opens the Add Cables dialog for adding a new 3D cable to the model as described in Create.
-
Find routes – Allows you to pick one node as the head node and another node as the tail node and then finds the shortest route between those two nodes.
Queries
The Queries category allows you to use queries to find and list specific kinds of cables. You can press Ctrl+E to export the query results into a Microsoft Excel file.
In the tree, you can right-click Queries to access the following context-menu commands:
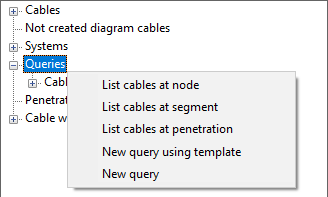
-
List cables at node – Allows you to pick a node from the model and then lists the cables that go via that node.
-
List cables at segment – Allows you to pick a segment from the model and then lists the cables that use the selected segment. The fill rate of the segment is shown above the list. For cable trays, the fill rate can be more than 100%, indicating that the physical capacity is currently being exceeded. However, the fill rate of an overfilled cable tray does not take into account available space that could possibly be utilized by using a different packing style.
This command also opens a separate view that shows the fill rate view of the segment.
-
List cables at penetration – Allows you to pick a penetration from the model and then lists the cables that go through that penetration.
This command also opens a separate view that shows the fill rate view of the penetration.
-
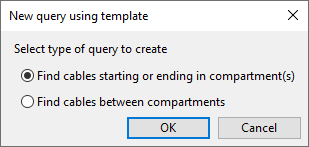
New query using template – Allows defining a query using a predefined template.
-
New query – Allows defining a query that lists the cables that match the query criteria, according to their routing status. When a project has multiple cables, it is good to make a query of the cables that you are focusing on, so that you can easily find those cables after recreating the cable routing network. See Query editor.
Note: If a cable route is broken or changed, any query on a node, segment, or penetration will display data from the previous route, provided that the queried network object is part of the old route that is still stored in COS. A broken or changed cable does not use the new route for fill rate calculations. Cable length, on the other hand, is re-calculated from the new route, and the new length is displayed in the Changed cable length column.
Tip: In the Cable way queries category, you can create queries that list all the cables of a specific cable way.
Penetrations
The Penetrations category lists all cable penetrations.
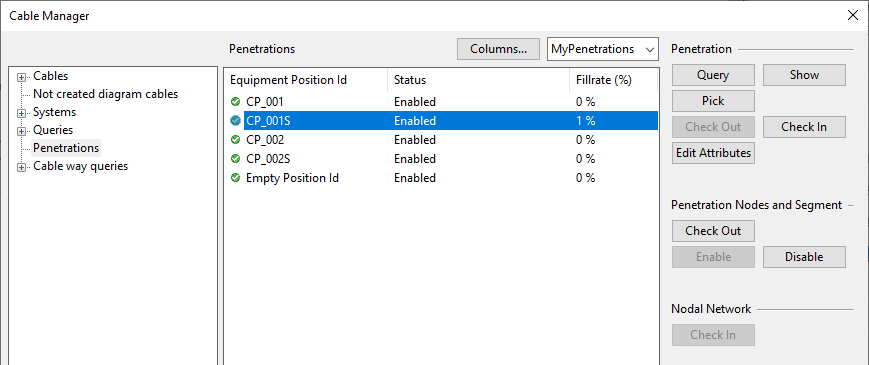
For more information, see Penetration list in Cable Manager.
You can press Ctrl+E to export the query results into a Microsoft Excel file.
Tip: In the Cable way queries category, you can create queries that contain penetrations and other types of cable way objects.
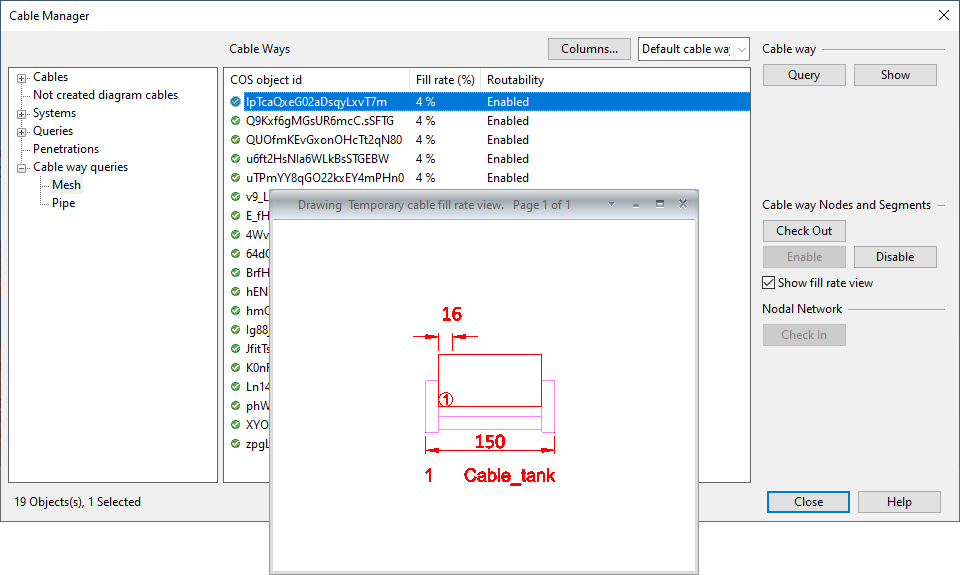
Cable way queries
The Cable way queries category allows you to use queries to find and list cables that use specific cable way objects: cable trays, conduits, or penetrations.
There are several ways to start creating a new cable way query:
-
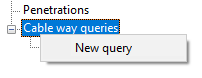
Right-click Cable way queries in the tree and select New query.
-
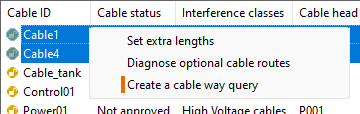
In a cable list, select the cables that use the same cable way, right-click the selection, and select Create a cable way query.
You are prompted to enter a name for the new query, and then you define the query using Query editor. In the query, the targeted object type can be "Cable tray", "Equipment", or "Pipe", or it can be the combination of "Cable" and "Cable Network Part".
Selecting an existing cable way query from the category tree lists the related cable ways. When you select a cable way from the list, you can use the following commands:
-
Query – Shows the properties of the selected cable way.
-
Show – Shows where the cable way is in the 3D model. Press Esc to return to the cable manager.
-
Check Out – Checks out the nodes and segments of the selected cable way.
-
Enable / Disable – Enables / disables the nodes and segments of the selected cable way.
Note: The "Routability" tag defines whether the cable way object is enabled, disabled, or partially disabled. If all the related cable network parts (nodes and segments) of the cable way are disabled, then also the cable way object is disabled. If only some of the cable network parts are disabled, then the cable way object is partially disabled.
-
Show fill rate view – Shows a fill rate view for the most populated segment in the selected cable way, if the segment supports fill rate views.
In the document editor, you can insert fill rate views to cabling documents from Home > Drawing Views, as described in Drawing Views.
-
Check In – Checks in the cable routing network.
If you right-click a cable way, you can select List cables at segment to generate a cable query that lists the cables in the cable way.
You can press Ctrl+E to export the query results into a Microsoft Excel file.